


Identify your specific stovetop model by checking the manufacturer’s label underneath or inside the unit—this number is essential for ordering the correct replacement burner or entire cooktop surface. Remove power at the circuit breaker before attempting any inspection or removal, then lift the existing burner element by gently pulling it from its receptacle to assess whether you need a simple element replacement or a full cooktop unit.
Purchase replacement parts directly from the manufacturer’s website, authorized appliance retailers, or reputable online suppliers like RepairClinic or AppliancePartsPros, where you can cross-reference your model number to ensure compatibility. Most single burner elements cost between $15-$50 and can be installed in minutes, while complete electric cooktop replacements typically range from $200-$800 depending on size and features—significantly less than buying an entirely new range.
Consider whether your home uses gas or electric options when evaluating your replacement path, as switching fuel types requires professional rewiring or gas line installation. For electric replacements, most coil-style burners are genuinely DIY-friendly projects requiring only basic tools and careful attention to electrical connections, while glass or ceramic cooktop surfaces often demand professional installation to prevent cracking during the process.
Evaluate the age of your entire stove before investing in replacement parts—if your unit exceeds 10-12 years, multiple component failures may follow, making a full appliance upgrade more cost-effective long-term. Modern electric cooktops offer improved energy efficiency that reduces your monthly utility costs while providing more precise temperature control for everyday cooking needs.
Signs Your Electric Stove Top Needs Replacing (Not Just Repairing)
Knowing when to replace your electric stove top rather than repair it can save you money, time, and potential safety headaches down the road. While repairing individual burners makes sense for minor issues, some situations call for complete replacement.
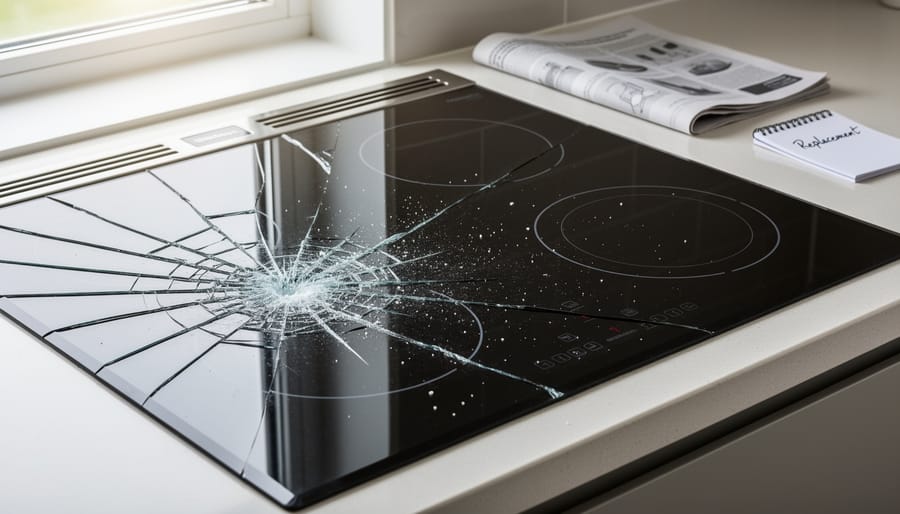
A cracked or shattered glass surface is your clearest sign that replacement is necessary. Even small cracks compromise the integrity of your cooktop and create serious safety hazards. These can’t be repaired and will only worsen with continued use, potentially causing injury or electrical problems.
When multiple burners fail simultaneously or stop responding to controls, you’re likely facing a bigger problem than isolated component failure. If you’ve noticed issues like a burner stuck on high affecting more than one element, or burners that won’t heat at all despite troubleshooting, the main control board or wiring may be compromised. In these cases, replacement often costs less than extensive electrical repairs.
Visible damage like discoloration, warping, or melted components around burner areas signals serious overheating issues that compromise safety. Similarly, if your stove top is more than 15 years old and experiencing frequent problems, replacement becomes more cost-effective than ongoing repairs.
Repeated failures of the same components suggest underlying issues that repairs won’t solve permanently. When you find yourself calling for service every few months, those repair bills quickly add up to more than a new unit would cost.
Think of your kitchen as the heart of your home, much like a fireplace creates warmth and gathering space. A reliable, efficient cooktop ensures that heart keeps beating safely and effectively for years to come.
Understanding Your Electric Stove Top: What You’re Actually Replacing
Coil Burner vs. Smooth Glass Cooktops
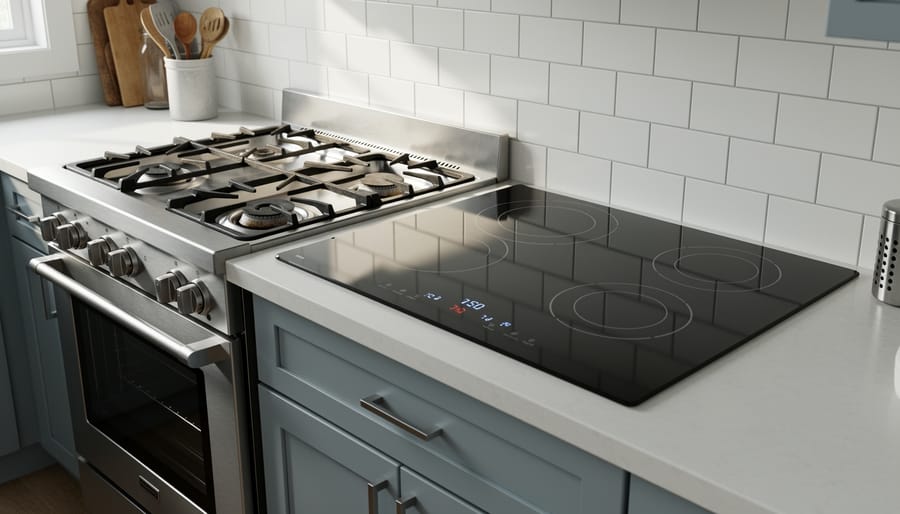
When you’re considering a replacement electric stove top, you’ll encounter two main types: traditional coil burners and sleek smooth glass cooktops. Understanding the differences between these options will help you make the best choice for your kitchen and cooking style.
Coil burner stove tops are the classic workhorses of electric cooking. These exposed heating elements sit directly on the cooktop surface and are incredibly straightforward to replace. If a single coil burns out, you can simply unplug it and snap in a new one within minutes, no professional help needed. They’re budget-friendly both in initial cost and for replacement parts, typically ranging from $15 to $40 per coil. The downside? They’re harder to clean around and don’t offer the modern aesthetic many homeowners desire today.
Smooth glass-ceramic cooktops bring a contemporary look to your kitchen with their flat, seamless surface. These cooktops hide the heating elements beneath a smooth glass panel, creating a streamlined appearance that’s easy to wipe clean after cooking. However, replacing components on glass cooktops is more complex. If the glass surface cracks or a heating element beneath fails, you’re often looking at a more involved repair or complete unit replacement. The glass can also be susceptible to scratches and cracks from heavy pots or accidental impacts.
From an eco-friendly perspective, both options have improved their energy efficiency over the years, though smooth-top models often distribute heat more evenly, potentially reducing cooking times and energy consumption. Consider your cooking habits, budget, and long-term maintenance comfort when choosing between these two reliable cooking companions.
Key Components That Make Up Your Stove Top
Understanding what makes up your electric stove top helps you make informed decisions about replacement and repair. Let’s break down the essential components in straightforward terms.
The heating elements are the workhorses of your cooktop. Whether you have traditional coil burners or a sleek glass-ceramic surface with radiant elements underneath, these components generate the heat for cooking. Coil elements typically plug into a receptacle, making them easier to replace individually. If you’re wondering whether electric stove burners interchangeable between different models, the answer varies depending on your specific stove type and manufacturer.
The cooktop surface itself can be either coil-style with separate burner units or a smooth glass-ceramic panel. Glass surfaces provide a modern look and easier cleanup, though they require more careful handling during replacement. Think of it like the difference between traditional warmth and contemporary design in your cooking space.
Control switches or knobs regulate temperature and power to each burner. These components connect to the internal wiring system, which delivers electricity throughout the unit. The wiring harness acts as the nervous system of your stove top, coordinating power distribution safely and efficiently.
Understanding these core components helps you assess whether you need a simple element replacement, control switch repair, or full cooktop replacement. Each part plays a vital role in creating that dependable cooking experience your household relies on daily.
Should You DIY or Call a Professional? (An Honest Assessment)
Let’s be real about this: replacing an electric stove top sits in that interesting gray area between “totally doable” and “maybe call someone.” The good news? This decision doesn’t have to stress you out.
If you’re comfortable working with basic tools, can follow detailed instructions carefully, and the job only involves unplugging your unit and swapping out surface elements or drip pans, you’re likely in DIY territory. Many homeowners successfully replace individual burner elements themselves—it’s essentially plug-and-play. Think of it like changing a light fixture, just with a bit more weight involved.
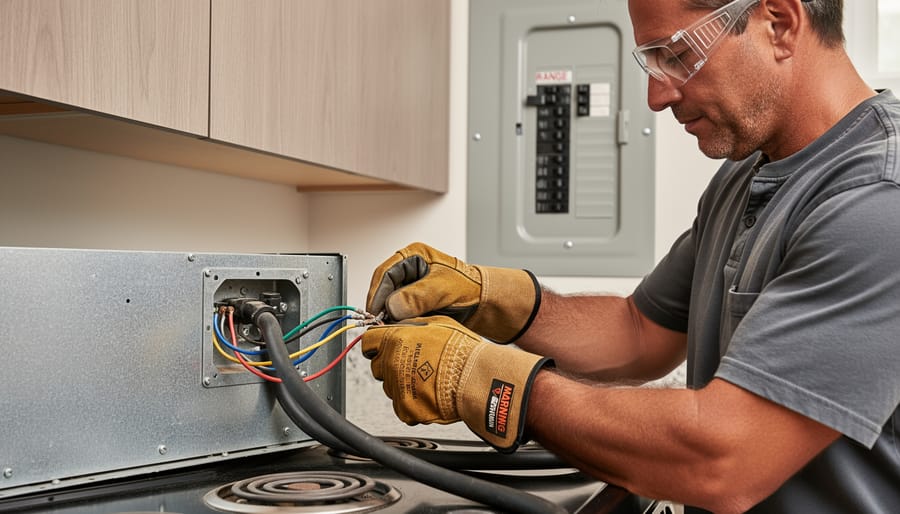
However, here’s where professional help becomes essential: anything involving hardwired electrical connections or your home’s circuit breaker requires a licensed electrician. Period. We’re talking about 240-volt circuits here, which demand respect and expertise. One wrong connection could create serious safety hazards, from electrical fires to personal injury. This isn’t about questioning your abilities—it’s about protecting your home and family.
Consider your warranty situation too. Some manufacturers require professional installation to maintain coverage, and that paperwork matters if something goes wrong down the line. Check those terms before you break out the screwdriver.
Budget plays a role in this decision. Professional installation typically runs between 100 and 300 dollars, depending on your location and job complexity. If you’re replacing a drop-in unit that requires modifications to cabinetry or electrical upgrades, that cost increases but so does the value of expert knowledge.
Ask yourself honestly: Do you have experience with electrical work? Are you comfortable shutting off power at the breaker and verifying it’s actually off? Can you lift 50-plus pounds safely? If you answered no to any of these, there’s zero shame in calling a pro. Sometimes the smartest DIY decision is knowing when not to DIY. Your kitchen is the heart of your home—treat this project with the care it deserves.
Finding the Right Replacement Electric Stove Top for Your Range
Identifying Your Stove Model and Compatible Parts
Before you can order a replacement electric stove top, you’ll need to play detective for a moment and locate your appliance’s model number. Think of this as finding your stove’s unique fingerprint—it’s the key to ensuring you get parts that fit perfectly.
Start your search at the most common hiding spots. For electric stoves, check the front panel area when you open the oven door. Many manufacturers place a metal identification plate along the doorframe or inside the storage drawer beneath the oven. You might also find it on the back panel of the unit, though this typically requires pulling the stove away from the wall slightly (be sure to unplug it first for safety).
The model number usually appears as a combination of letters and numbers, often alongside a serial number. Take a clear photo with your phone—you’ll thank yourself later when you’re shopping for parts. Some newer models even include QR codes that link directly to manufacturer resources when scanned.
Once you have your model number, visit the manufacturer’s website. Most major brands offer dedicated support sections where you can enter your model number and view compatible parts, complete with diagrams showing exactly what goes where. This visual guide is invaluable for identifying the specific component you need.
If you’ve misplaced your owner’s manual, don’t worry. Simply search online for your model number followed by “manual PDF,” and you’ll typically find a downloadable version. These manuals often include exploded-view diagrams that make identifying parts straightforward, even for first-timers tackling appliance repairs.
Where to Buy Replacement Stove Tops (And What to Watch Out For)
Finding the right replacement electric stove top requires knowing where to look and what questions to ask. Let’s explore your options so you can make a confident, informed purchase.
Start with the manufacturer’s authorized dealers, which are often your safest bet. These dealers carry original equipment manufacturer (OEM) parts specifically designed for your stove model. While OEM parts typically cost more than alternatives, they come with manufacturer warranties and the peace of mind that everything will fit and function exactly as intended. Visit the manufacturer’s website or call their customer service line to locate authorized dealers in your area.
Online retailers like Amazon, eBay, and specialty appliance parts websites offer convenience and competitive pricing. You’ll find both OEM and aftermarket options here. Aftermarket parts are made by third-party manufacturers and usually cost less than OEM versions. They can be perfectly adequate, but quality varies significantly between brands. Read customer reviews carefully and check seller ratings before purchasing.
Local appliance parts stores provide the advantage of face-to-face assistance. Bring your model number and any relevant photos, and the staff can help ensure you’re getting compatible parts. These stores often have relationships with local technicians who can install your new stove top if you decide professional help is the better route.
Before finalizing any purchase, examine the warranty coverage and return policy carefully. Some retailers offer only 30 days for returns, while others provide more generous windows. Understand whether you’re responsible for return shipping costs if the part doesn’t fit. Ask about warranty length and what it covers, as this protection becomes especially valuable for higher-priced components. Taking time to compare these details now can save you considerable frustration and expense down the road.
The Step-by-Step Replacement Process Made Simple
Safety First: Preparing Your Work Area
Before you begin your electric stove top replacement, taking a few important safety steps will make the entire process smoother and, most importantly, keep you protected. Think of this as setting the stage for success.
Your first move is to completely disconnect power to your stove. Head to your electrical panel and flip the dedicated breaker for your cooktop to the off position. If you’re not sure which breaker controls your stove, turn on a burner first so you’ll know immediately when you’ve found the right one. Double-check that the power is truly off by testing the cooktop controls after flipping the breaker.
Next, gather your tools. You’ll typically need a screwdriver set, a voltage tester to confirm there’s no electrical current, work gloves, and a flashlight for seeing into tight spaces. Having everything within reach means you won’t be tempted to skip steps or rush through the process.
Give yourself plenty of working space by clearing the countertop around your stove. This isn’t just about convenience; having room to maneuver prevents accidental bumps or drops that could damage your new cooktop or surrounding surfaces. If you’re working alone, consider having a friend available by phone for questions or an extra set of hands if needed.
Removing the Old Stove Top
Now that you’ve gathered your tools and confirmed the power is completely off, it’s time to remove your old electric stove top. Don’t worry—this process is straightforward when you take it step by step, and you’ll feel a real sense of accomplishment as you work through it.
Start by examining how your stove top attaches to the counter or cabinet. Most electric stove tops are secured from underneath with mounting clips or screws. You may need to open the cabinet doors below and use your flashlight to locate these fasteners. Typically, you’ll find four to six clips around the perimeter holding everything in place. Using your screwdriver, carefully loosen each one, but don’t remove them completely just yet.
Next, look for any caulk or sealant around the edges of the stove top where it meets your countertop. Over time, this creates a bond that needs breaking. Gently run your putty knife along the seam to separate the cooktop from the counter surface. Be patient here—forcing it could damage your countertop.
Once the perimeter is free, locate the electrical junction box underneath. You’ll see wire connections, usually secured with wire nuts. Take a photo with your phone before disconnecting anything—this will be your guide during installation. Carefully untwist the wire nuts and separate the wires, keeping the circuit wires capped for safety.
Now remove those mounting screws completely and have your helper support the stove top from above. Lift carefully and evenly, watching for any forgotten connections. With teamwork and patience, your old stove top is out and you’re ready for the next phase.
Installing Your New Electric Stove Top
Before installing your new electric stove top, ensure the power is completely shut off at the circuit breaker. Safety first, always! Once you’ve confirmed there’s no electrical current, carefully position your replacement unit into the cutout space. Take your time here – a proper fit ensures both efficiency and safety, much like how a well-fitted fireplace insert optimizes heating performance.
Gently lower the cooktop into place, making sure the edges sit flush with your countertop. Check that the unit is level using a simple bubble level; an uneven stove top can affect cooking performance and create unnecessary wear. Next, connect the electrical wiring according to your manufacturer’s instructions, matching wire colors precisely – typically black to black, white to white, and green or bare copper to ground.
Secure any mounting brackets or clips that came with your unit. These keep everything stable during daily use. Before restoring power, double-check all connections are tight and properly insulated. Once you’re confident everything is secure, flip the breaker back on and test each burner at various heat settings. Listen for unusual sounds and watch for even heating – these are signs your installation was successful and your kitchen is ready for action.
Cost Breakdown: What to Expect When Replacing Your Stove Top
Understanding the financial investment required for replacing your electric stove top helps you make a smart, informed decision for your home. Let’s break down what you can realistically expect to spend.
Replacement parts for electric stove tops typically range from $50 to $300, depending on your appliance’s make, model, and the specific component needed. Individual heating elements usually cost between $20 and $80, while glass cooktop surfaces run from $150 to $400. Control panels and switches fall somewhere in the middle at $75 to $200.
If you’re hiring a professional, labor costs generally add another $100 to $200 to your total, depending on your location and the complexity of the repair. This brings your complete repair investment to approximately $150 to $600 for most projects.
Now, here’s where it gets interesting. A brand-new electric range costs anywhere from $500 to $2,000 or more. When your stove top only needs a simple repair, replacing just that component makes tremendous financial sense. You’re looking at saving hundreds of dollars while keeping a perfectly functional oven and lower cabinet in service.
Beyond your wallet, there’s something equally important to consider: the environmental impact. Americans discard approximately 9.8 million tons of appliances annually, contributing to overflowing landfills. By choosing to repair rather than replace, you’re making an eco-friendly decision that reduces waste and conserves the resources needed to manufacture new appliances.
Think of it this way: repairing your stove top isn’t just fixing a cooking surface. It’s an investment in sustainable living that protects both your budget and our planet. That’s a win-win situation that warms more than just your kitchen.
Troubleshooting After Installation: Making Sure Everything Works
Once your new electric stove top is installed, taking a few minutes to test everything ensures you’ll be cooking safely and efficiently from day one. Start by turning on each burner individually, beginning at the lowest setting and gradually increasing to high. Watch for even heating and consistent glow across the element. This simple check helps you catch any connection issues early.
Listen for unusual sounds like buzzing, clicking, or popping, which might indicate loose connections or electrical issues and fuses that need attention. A properly functioning stove top should operate quietly, with only the gentle hum of electricity doing its work.
Check that all indicator lights illuminate correctly and that temperature controls respond smoothly. Place a pot of water on each burner to verify heating efficiency. Water should come to a rolling boil within a reasonable timeframe, similar to your old unit’s performance.
If a burner doesn’t heat, first ensure it’s fully seated in its socket. Sometimes elements need a gentle twist to click into place properly. For smooth-top models, verify that the surface is clean and making full contact with your cookware.
Should you notice the circuit breaker tripping, this signals an electrical overload or wiring issue requiring immediate professional attention. Don’t ignore this warning sign, as it’s both a safety concern and an opportunity to address problems before they worsen. Remember, a well-functioning stove top not only makes cooking enjoyable but also operates more energy-efficiently, reducing your environmental impact while keeping your kitchen running smoothly.
Replacing your electric stove top is more than just a repair project—it’s an investment in your home’s heart and soul. Just as a well-maintained fireplace brings people together and creates lasting memories, a fully functioning kitchen keeps your home warm and inviting. By tackling this project yourself, you’ve not only saved money but also reduced waste by giving your appliance new life rather than sending it to a landfill. That’s the kind of eco-conscious decision that benefits both your wallet and the planet.
Remember, every successful home improvement project builds your confidence for the next one. You’ve learned to identify parts, navigate safety protocols, and trust your abilities. If at any point you felt uncertain about electrical connections or encountered unexpected complications, there’s no shame in calling a licensed electrician. Professional help ensures your family’s safety and your home’s integrity—sometimes the smartest DIY decision is knowing when to hand things over to an expert.
Your kitchen is ready to welcome you back with working burners and renewed functionality. Enjoy the satisfaction of a job well done, and savor every meal you prepare in your refreshed cooking space.
")