

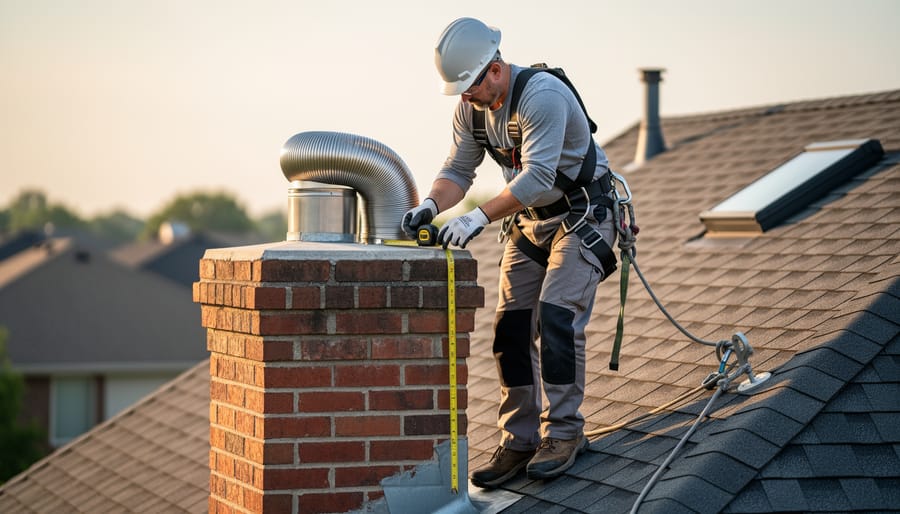

Verify your home’s structural capacity before installation begins—chimneys add significant weight, requiring proper foundation support and roof framing capable of bearing 1,000-3,000 pounds depending on materials chosen. Contact your local building department to obtain necessary permits and schedule inspections, as wood-burning chimney installations must meet specific clearance requirements, typically 2 inches from combustible materials and 3 feet above roof penetration points.
Choose between masonry chimneys, which offer traditional aesthetics and century-long durability but require substantial structural reinforcement, or prefabricated metal chimneys that install faster, cost 40-60% less, and work perfectly for most residential applications. Your decision impacts everything from installation timeline to long-term maintenance requirements.
Calculate proper chimney height using the 3-2-10 rule: extend at least 3 feet above the roof penetration point and 2 feet higher than any roof surface within 10 feet horizontally. Inadequate height creates draft problems, causing smoke to backdraft into your home and reducing heating efficiency by up to 30%.
Install a stainless steel liner even in new masonry chimneys to protect against creosote buildup and extend system longevity—unlined chimneys deteriorate three times faster from acidic combustion byproducts. This single upgrade prevents dangerous chimney fires and improves draft performance in all weather conditions.
The installation process demands precision because mistakes compromise both safety and efficiency. Understanding material options, structural requirements, and local building codes transforms this complex project from overwhelming to manageable. Whether hiring professionals or tackling portions yourself, knowing what proper installation entails protects your investment and your family. This guide walks you through every decision point, from initial planning through final inspection, ensuring your wood-burning fireplace delivers decades of reliable, efficient warmth while maintaining the highest safety standards.
Understanding Your Wood Burning Chimney System
The Three Essential Parts of Every Chimney
Understanding your chimney’s anatomy helps you appreciate how this remarkable system keeps your home safe and cozy. Think of your chimney as having three essential teammates, each playing a crucial role in bringing you those peaceful evenings by the fire.
The chimney liner is your first line of defense, acting as a protective barrier inside the chimney structure. This heat-resistant channel guides smoke and combustion gases safely out of your home while protecting your chimney walls from extreme temperatures and corrosive byproducts. Modern liners are typically made from stainless steel, clay tiles, or cast-in-place materials, each offering different benefits for longevity and performance.
Next comes the flue, which is the actual passageway where smoke travels upward and out. While people often use “flue” and “liner” interchangeably, the flue is technically the open space within the liner. This vertical highway must remain clear and properly sized for your specific wood-burning appliance to ensure efficient draft and complete combustion. Regular flue maintenance prevents dangerous creosote buildup and maintains optimal airflow.
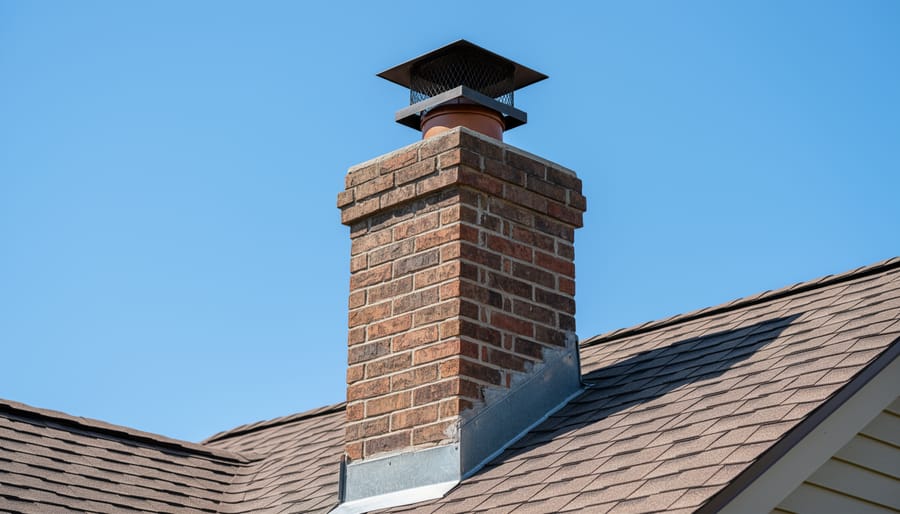
Finally, the chimney cap sits at the top like a protective hat, keeping rain, snow, debris, and curious animals out while still allowing smoke to escape freely. This simple component prevents water damage, blocks downdrafts, and often includes a spark arrestor screen for added safety. Together, these three components create an eco-friendly heating solution that’s both efficient and dependable when properly installed and maintained.
How Draft Makes Everything Work
Think of your chimney draft like the natural breathing system of your fireplace. When you light a fire, the smoke and hot gases need somewhere to go, and draft is the invisible force that pulls them up and out of your home. Understanding how this works isn’t just interesting—it’s essential for both your safety and getting the most from your wood-burning fireplace.
Here’s the simple science: hot air rises. As your fire burns, it creates hot gases that are lighter than the cool air outside. This temperature difference creates a pressure differential, causing the hot air to move upward through the chimney while fresh air is drawn into the firebox from below. This continuous cycle is your draft at work, and when it’s functioning properly, you’ll enjoy a clean-burning fire with minimal smoke in your living space.
Draft strength matters tremendously. Too little draft means smoke backs up into your room, creating an uncomfortable and potentially dangerous situation. Too much draft can pull the heat right up the chimney before it warms your home, wasting fuel and money while forcing your fire to burn too aggressively.
Several factors influence your chimney’s draft performance. Height plays a crucial role—taller chimneys generally create stronger draft because there’s more vertical distance for pressure differences to develop. Outside temperature affects it too; cold winter days actually improve draft compared to milder weather. The chimney’s interior size, smoothness, and whether it’s properly insulated all contribute to performance. Even nearby trees, roof lines, and wind patterns around your home can impact how well your chimney draws.
Getting the draft right during installation sets the foundation for years of cozy, eco-friendly heating and trouble-free operation.
Planning Your Chimney Installation: What You Need to Know First
Choosing Between Interior and Exterior Chimney Placement
When planning your wood-burning fireplace, one of the most important decisions you’ll make is where to place your chimney. This choice affects everything from heating efficiency to your wallet, so let’s explore what works best for your home.
Interior chimneys, running through the center of your house, are the efficiency champions. Because they’re surrounded by your living space, they stay warmer and create better draft. This means your fire burns more consistently and you’re not losing precious heat to the outdoors. Think of it as keeping all that warmth exactly where you want it. The downside? Installation typically costs more since you’re working within your home’s structure, and you’ll need to carefully plan around existing rooms and layouts.
Exterior chimneys offer their own advantages, particularly when it comes to simplicity and cost savings. They’re generally easier and less expensive to install since contractors work outside your living space, minimizing disruption to your daily routine. They also free up interior floor space and can add striking architectural character to your home’s exterior. However, because they’re exposed to the elements, exterior chimneys lose heat more quickly, which can lead to draft issues and increased creosote buildup. You might find yourself using more wood to achieve the same cozy warmth.
From an eco-friendly perspective, interior placement edges ahead due to better efficiency, meaning you’ll burn less wood overall. Consider your climate too. In colder regions, interior chimneys make especially good sense, while moderate climates may not see as dramatic a difference. Your choice ultimately depends on balancing your budget, home layout, and long-term heating goals.
Local Building Codes and Permit Requirements
Building codes aren’t created to frustrate homeowners—they exist to keep you, your family, and your home safe. When it comes to wood burning chimney installation, these regulations ensure your cozy fireside dreams don’t turn into safety nightmares. Understanding wood burning regulations is an essential first step in your installation journey.
Most local building codes address critical safety elements like proper clearances from combustible materials, minimum chimney heights, and specific construction standards. They typically require chimneys to extend at least three feet above the roof penetration point and two feet higher than any roof surface within ten feet. These aren’t arbitrary numbers—they’re carefully calculated to ensure proper draft and prevent dangerous situations.
Navigating the permit process doesn’t have to be overwhelming. Start by contacting your local building department early in your planning phase. They’ll provide specific requirements for your area and guide you through the application process. Many jurisdictions now offer online resources and checklists that make preparation straightforward.
Expect at least one inspection during construction and a final inspection upon completion. Think of inspectors as helpful partners in your project rather than obstacles. They’re ensuring your installation meets standards that protect your investment and create a safe, eco-friendly heating solution for years of enjoyment.
When to Hire a Professional vs. DIY Considerations
Installing a wood burning chimney system is a project that demands both precision and expertise. While the DIY route might seem appealing for cost savings, this isn’t typically a weekend warrior project. The reality is that chimney installation requires specialized knowledge of building codes, proper clearances, and fire safety standards that directly impact your family’s wellbeing.
Professional installation is strongly recommended for most homeowners. Licensed contractors bring essential expertise in navigating local permits, ensuring structural integrity, and meeting insurance requirements. They understand the nuances of draft performance, proper liner sizing, and waterproofing that even experienced DIYers might overlook. The investment typically ranges from $3,000 to $10,000, but this includes peace of mind and warranty protection.
That said, certain preparatory tasks are DIY-friendly. Researching your local building codes, planning your layout, and preparing the installation area can reduce labor costs. If you already have experience with a wood burning insert or similar heating systems, you’ll better understand what professionals need to accomplish.
Consider DIY only if you possess advanced carpentry skills, understand masonry work, and can commit to thorough research. However, when safety and home value are at stake, professional installation isn’t just recommended—it’s the responsible choice for creating a safe, efficient, and eco-friendly heating solution.
The Step-by-Step Installation Process
Foundation and Support Structure
Before you fall in love with that beautiful wood-burning fireplace, let’s talk about what’s holding it all up. Your chimney isn’t just a decorative element—it’s a substantial structure that can weigh anywhere from 6,000 to 10,000 pounds when fully constructed. That’s like parking a small car in your living room, which means you need a rock-solid foundation to support it.
Most masonry chimneys require their own dedicated concrete footing, completely separate from your home’s foundation. This footing typically needs to extend at least 12 inches beyond the chimney’s perimeter and sit below the frost line in your region to prevent settling and cracking. Think of it as giving your chimney its own sturdy platform to stand on.
If you’re adding a chimney to an existing home, you’ll need to ensure your floor joists and framing can handle the additional weight, or you may need to reinforce the structure. Pre-fabricated metal chimneys offer a lighter alternative, often requiring less extensive structural modifications while still providing efficient, eco-friendly heating solutions. Always consult with a structural engineer or experienced contractor to assess your specific situation—cutting corners on foundation work is where serious safety issues begin.
Installing the Chimney Liner
Your chimney liner is the unsung hero of your wood-burning system, creating a safe pathway for smoke and gases while protecting your chimney structure from heat and corrosive byproducts. Choosing the right liner is essential for both safety and efficiency.
Stainless steel liners are the most popular choice for good reason. They’re durable, versatile, and work beautifully with modern wood-burning appliances. These flexible liners can navigate bends in existing chimneys, making them ideal for retrofits. Look for liners that meet UL 1777 standards and match the specifications of your stove or insert.
Clay tile liners offer a traditional, budget-friendly option and work well in new construction with straight chimney runs. They’re excellent at withstanding high temperatures, though they can crack over time from thermal shock or moisture. If you’re building from scratch and prioritizing an eco-friendly heating solution, clay tiles provide natural insulation properties.
Cast-in-place liners involve pouring a cement-like mixture around a temporary form inside your chimney, creating a seamless, insulated liner. This option excels at rehabilitating damaged chimneys while improving structural integrity.
When selecting your liner, consider your appliance’s flue size requirements, chimney height, and any bends in the structure. Proper installation requires connecting the liner securely to your wood stove, insulating it where required by code, and sealing the top with an appropriate cap. While experienced DIYers might tackle straight stainless steel installations, complex situations benefit from professional expertise to ensure your system performs safely and efficiently for decades to come.
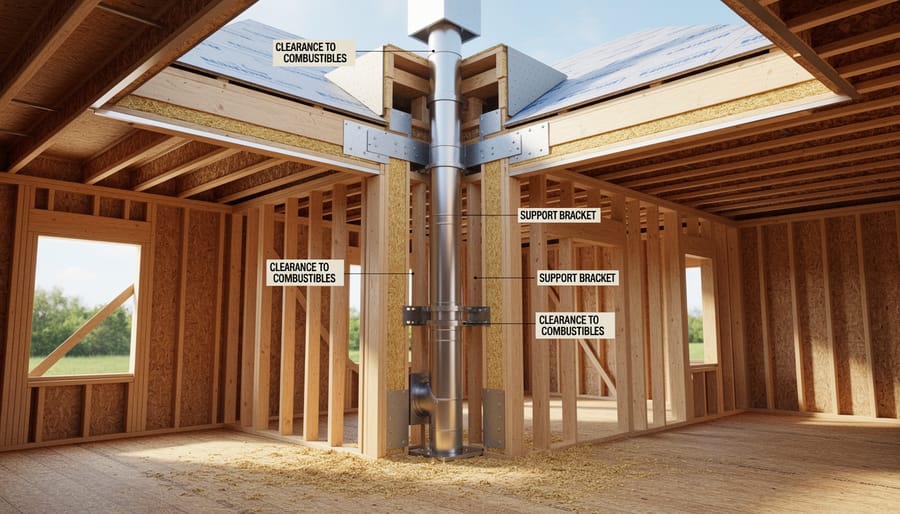
Building the Chase and Framing
The chimney chase serves as the protective enclosure that houses your chimney system, and building it correctly is essential for both safety and longevity. Think of it as creating a secure pathway for your chimney to travel safely through your home.
Start by constructing the chase frame using appropriately sized lumber, typically 2x4s or 2x6s depending on local building codes. Here’s where safety becomes paramount: maintaining proper clearances from combustible materials isn’t just a guideline, it’s a necessity. Most building codes require at least 2 inches of clearance between the chimney pipe and any combustible framing materials, though specific requirements vary by chimney type and manufacturer specifications. Always consult your chimney’s installation manual and local codes.
When framing around the chimney, create a secure box-like structure that maintains these clearances throughout its entire height. Use fire-resistant materials like cement board or sheet metal as barriers between the chimney and wood framing for added protection. This layered approach to safety gives you peace of mind while enjoying cozy fires.
Remember to include proper support at each floor level and provide adequate space for future inspections and maintenance. A well-constructed chase not only protects your home but also contributes to your fireplace system’s efficiency, helping you create that warm, inviting atmosphere you’re looking for while keeping your family safe.
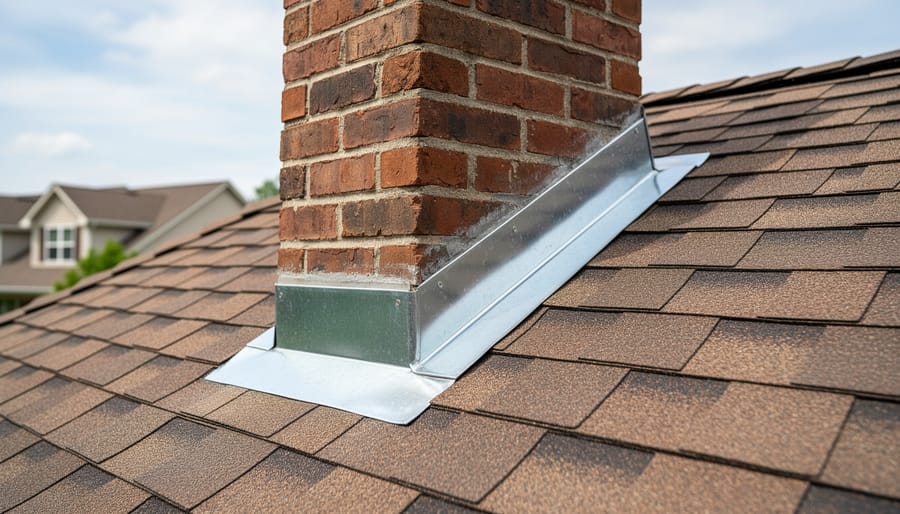
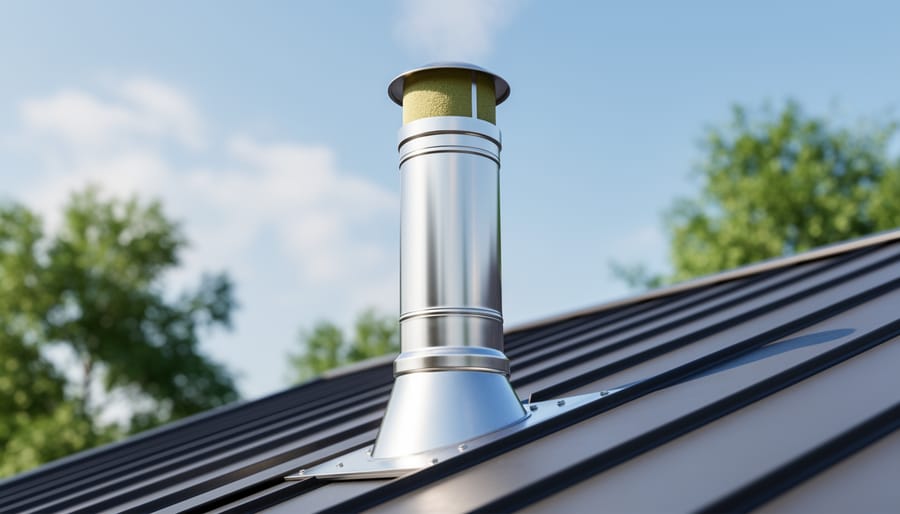
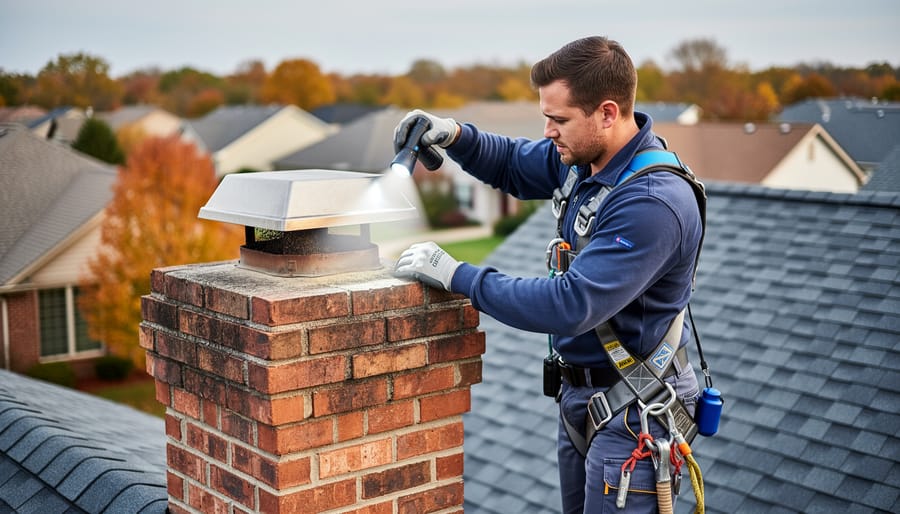
Finishing Touches: Cap, Crown, and Flashing
Once your chimney pipe extends through the roof, the final exterior components become your first line of defense against the elements. The chimney cap sits at the very top, serving double duty as both rain guard and wildlife barrier. Think of it as the umbrella for your chimney system, keeping water out while the mesh screening prevents birds, squirrels, and other critters from making a cozy home in your flue. Choose a stainless steel cap that can withstand years of weather exposure.
The storm collar fits snugly around the chimney pipe just above the flashing, creating a tight seal that sheds water downward. This simple metal band prevents moisture from seeping behind the flashing where it could cause hidden damage over time.
Flashing is perhaps the most critical component for leak prevention. This weather-tight seal where your chimney meets the roofing material requires careful installation with the base flashing tucked under shingles and the storm collar overlapping from above. Proper flashing creates a water-shedding system that protects your home’s interior and maintains your chimney’s structural integrity for decades. Taking time to install these finishing components correctly ensures your eco-friendly heating investment remains watertight and worry-free through countless seasons.
Critical Safety Standards You Can’t Ignore
Clearance Requirements and Fire Prevention
Getting the clearances right during your chimney installation isn’t just about following rules—it’s about creating a safe, warm gathering place for your family that will last for generations. These requirements exist because proper spacing between your chimney system and combustible materials can mean the difference between cozy winter evenings and a dangerous situation.
Most building codes require a minimum two-inch clearance between your chimney and any combustible materials like wood framing, insulation, or flooring. However, some manufacturers recommend even greater distances, so always check your specific chimney system’s installation manual. This air gap prevents heat transfer that could ignite surrounding materials over time, making it a cornerstone of fireplace safety.
When your chimney passes through floors, ceilings, or your roof, you’ll need proper fire-stops at each penetration point. These metal shields create a barrier and maintain your clearances while preventing flames or sparks from spreading between levels of your home. Think of them as insurance policies built right into your chimney structure.
Insulation around your chimney requires special attention too. Never pack standard insulation directly against your chimney pipe. Instead, use non-combustible materials specifically rated for chimney applications, or maintain that crucial air gap we mentioned earlier. Sheet metal shields can help protect nearby wooden studs while maintaining proper clearances.
Remember, these aren’t suggestions—they’re requirements that protect your investment and your loved ones. Working with a certified installer ensures every measurement meets code while creating an efficient, eco-friendly heating solution that enhances your home’s comfort and value.
Proper Height and Termination Standards
Getting your chimney height right isn’t just about following building codes—it’s about ensuring your fireplace draws properly and keeps your home safe from dangerous downdrafts. The most important guideline you’ll need to know is the 3-2-10 rule, which sounds complicated but is actually quite straightforward once you understand it.
The 3-2-10 rule states that your chimney must extend at least 3 feet above the point where it passes through your roof, rise at least 2 feet higher than any part of the roof within a 10-foot radius, and clear any nearby obstructions. Think of it this way: your chimney needs to be tall enough to escape the turbulent air currents created by your roofline and surrounding structures. When wind hits your roof, it creates swirling patterns that can push smoke back down a short chimney, filling your home with dangerous fumes and reducing the efficiency of your eco-friendly heating investment.
Beyond the 3-2-10 rule, most building codes require a minimum total chimney height of 15 feet from the fireplace opening to the top of the chimney cap. This ensures adequate draft—the natural upward flow of air that pulls smoke and gases out of your home while drawing fresh air into the firebox.
If you live in an area with tall trees or neighboring buildings, you may need additional height to overcome wind interference. A properly sized chimney enhances your fireplace experience, creating the cozy ambiance you’re looking for while maintaining safety and efficiency throughout the heating season.
Eco-Friendly Chimney Choices That Actually Work
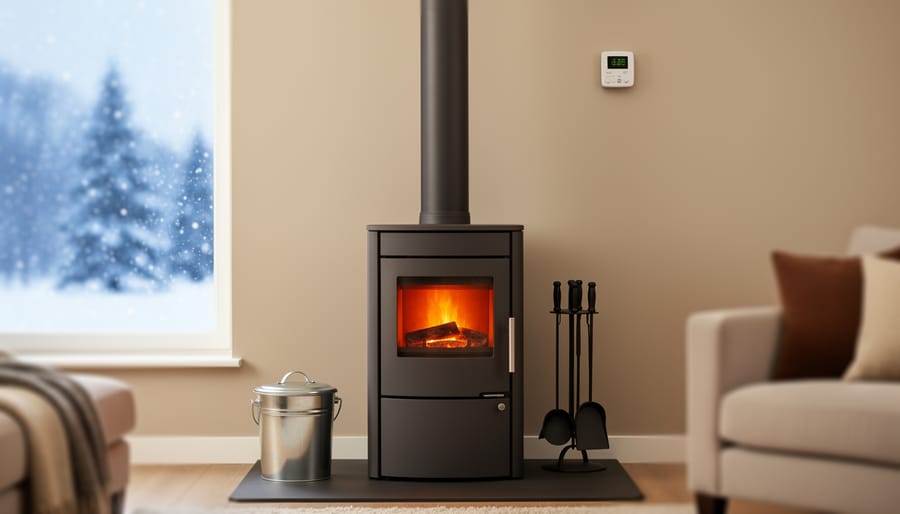
High-Efficiency Chimney Designs
Modern chimney technology has come a long way, and if you’re investing in a wood-burning system, choosing a high-efficiency design makes excellent sense for both your wallet and the environment. Insulated chimney systems are the gold standard today, featuring double or triple-wall construction that keeps heat where it belongs—rising through the flue rather than radiating into unused spaces like attics or exterior walls.
These insulated designs maintain higher internal temperatures, which creates stronger draft and more complete combustion. What does that mean for you? You’ll burn less wood to achieve the same cozy warmth, and your chimney will produce less creosote buildup since the gases stay hot enough to exit properly. Think of it as getting more heat from every log you feed the fire.
Class A chimney systems with ceramic wool or other advanced insulation materials are particularly effective at heat retention. They’re also safer, maintaining cool exterior temperatures even when your fire is roaring. Many homeowners find these systems pay for themselves within a few seasons through reduced wood consumption—typically 20-30% less than older designs. Plus, you’re making an eco-friendly choice that reduces emissions and makes the most of this renewable heating resource.
Sustainable Materials for Chimney Construction
When planning your wood-burning chimney installation, choosing sustainable materials makes both environmental and economic sense. Modern eco-friendly options deliver excellent performance while reducing your carbon footprint.
Stainless steel chimney systems lead the sustainable choices, offering durability that can last 30-50 years with minimal maintenance. They’re fully recyclable at the end of their lifespan and require less energy to produce than traditional masonry. Look for domestically manufactured options to further reduce transportation emissions.
For masonry chimneys, reclaimed bricks provide character while giving existing materials new life. These vintage options often outperform new bricks in heat retention. When new materials are necessary, opt for locally-sourced clay bricks or concrete blocks with high recycled content. These reduce transportation emissions and support regional economies.
Clay flue liners remain a time-tested eco-friendly choice, being completely natural and incredibly long-lasting. They’re non-toxic, require no chemical treatments, and handle extreme temperatures beautifully.
Consider cement alternatives like lime-based mortars, which are more breathable, easier to repair, and produce fewer carbon emissions during manufacturing. These traditional materials actually improve with age and complement the natural heating rhythm of wood burning.
Remember, the most sustainable choice is often the one that lasts longest, requiring fewer replacements and repairs over your home’s lifetime.
Common Installation Mistakes (And Their Expensive Consequences)
Undersized Chimneys and Poor Draft Problems
Getting the chimney size right is absolutely crucial for your wood-burning fireplace to work safely and efficiently. Think of your chimney as the engine that drives your entire heating system – when it’s undersized, everything suffers.
An undersized chimney simply can’t create the draft needed to pull smoke and gases up and out of your home. The result? Smoke spillage back into your living space, which isn’t just unpleasant – it’s a serious health hazard. You’ll notice smoke lingering in the room, difficulty getting fires started, and that acrid smell that clings to furniture and curtains.
Poor draft also causes another hidden danger: accelerated creosote buildup. When smoke moves slowly through a too-small chimney, it cools down before exiting, allowing sticky creosote to coat the chimney walls. This tar-like substance is highly flammable and the leading cause of chimney fires. In an undersized system, you might see dangerous creosote levels develop in just weeks rather than months.
Your fireplace performance takes a hit too. Fires burn inefficiently, producing less heat while consuming more wood – the opposite of an eco-friendly heating solution. Professional sizing calculations consider your fireplace opening dimensions, flue height, and fuel type to ensure proper draft. Getting this right from the start protects your investment and your family’s safety.
Inadequate Support and Structural Failures
A wood burning chimney is only as safe as the structure supporting it, and inadequate support can lead to serious problems down the road. Think of your chimney like a tall tower—it needs a solid foundation and proper reinforcement to stand safely for decades.
The most common issue is improper footing. Your chimney requires its own foundation, separate from your home’s foundation, to handle its substantial weight. This foundation should extend below the frost line in your area to prevent heaving and settling as the ground freezes and thaws. Without this, you’ll see cracks, separating mortar, and dangerous gaps where smoke and carbon monoxide can escape into living spaces.
Settling happens when the ground beneath your chimney shifts over time. Even a slight lean can compromise the entire system’s integrity. You might notice gaps between the chimney and your home’s exterior, tilting, or stress cracks running through the masonry. These aren’t just cosmetic concerns—they’re safety hazards that need immediate attention.
To avoid these problems, always work with experienced professionals who understand local soil conditions and building codes. Ensure your contractor uses proper reinforcement, including steel rebar in the foundation and appropriate tie-ins to your home’s structure. Regular inspections catch early warning signs before they become expensive disasters, keeping your cozy fireside haven both beautiful and safe.
Your wood burning fireplace journey begins with a single, crucial decision: to install your chimney system correctly from the start. While it might be tempting to cut corners or rush the process, remember that your chimney isn’t just a functional necessity—it’s the heart of one of your home’s most cherished gathering spaces. A properly installed chimney system ensures that cozy evenings by the fire remain exactly that: warm, safe, and worry-free experiences for you and your loved ones.
The investment you make in quality chimney installation pays dividends for decades to come. Beyond the immediate safety benefits, a well-installed system operates more efficiently, saving you money on fuel costs while reducing your environmental footprint. You’ll enjoy cleaner burns, easier maintenance (including routine tasks like cleaning fireplace ashes), and fewer repairs over the system’s lifetime. Most importantly, you’ll have peace of mind knowing that every crackling log and dancing flame represents a secure, code-compliant installation.
Whether you’ve chosen to tackle this project with professional help or carefully followed guidelines for a DIY installation, taking the time to do things right transforms your fireplace from a simple heat source into a genuine lifestyle enhancement. There’s something irreplaceable about gathering around a fire that you know is both beautiful and safe—where warmth and ambiance meet responsible home improvement.
So as you move forward, keep your focus on quality, prioritize safety, and don’t hesitate to seek expert guidance when needed. Your future self, warming cold hands on a winter evening while watching snowfall outside, will thank you for the care you’ve taken today.
")