


Dig a pit roughly three feet deep and two feet wide in well-drained soil away from structures and underground utilities. Line the bottom with volcanic rocks or fire bricks that won’t explode when heated, never use river stones or wet rocks. Build your fire directly in the pit using hardwoods like oak or hickory, letting it burn down to glowing coals over 2-3 hours before adding your seasoned meat wrapped in banana leaves, burlap, or foil.
This ancient technique, practiced by cultures from Polynesia to the American Southwest, transforms ordinary cuts into incredibly tender, smoky masterpieces while connecting you to thousands of years of cooking heritage. Underground smoking creates an enclosed environment where consistent low temperatures between 180-225°F work magic on tough cuts, breaking down collagen while infusing deep, earthy smoke flavors impossible to achieve in modern smokers.
The method requires patience and respect for fire safety, but rewards you with unmatched results. Unlike mastering meat smoking in conventional equipment, underground smoking harnesses geothermal principles, using the earth itself as insulation to maintain steady heat for 8-16 hours. The surrounding soil acts as a natural temperature regulator while sealing in moisture and smoke.
Whether you call it an imu, barbacoa pit, or earth oven, this technique offers adventurous cooks a chance to slow down, tend a fire with purpose, and create unforgettable meals that honor both tradition and the primal satisfaction of cooking with earth and ember.
What Makes Underground Meat Smoking Different
The Ancient Roots of Pit Smoking
Long before modern smokers and grills, cultures around the world discovered that cooking underground created something magical. The earth itself becomes an oven, transforming tough cuts of meat into tender, smoky masterpieces through slow, radiant heat.
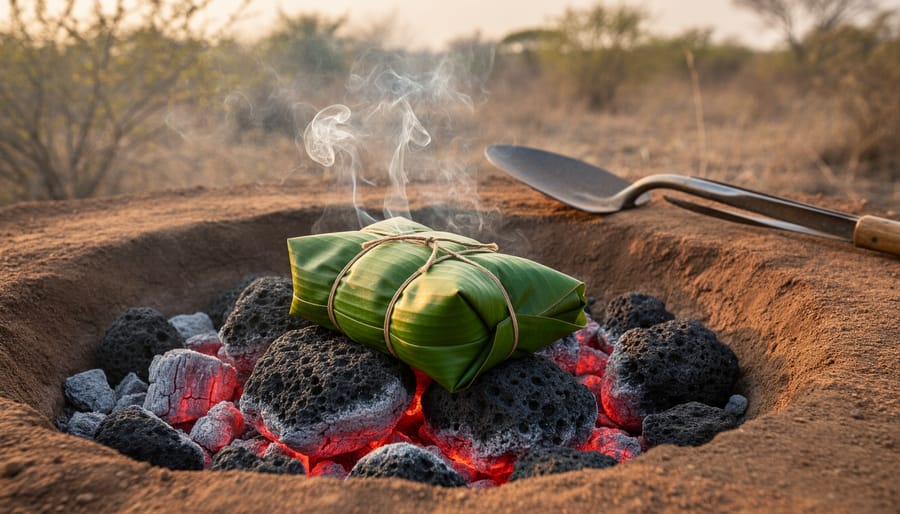
In Hawaii, the imu pit has been the centerpiece of community gatherings for centuries. Islanders would dig deep pits, line them with volcanic rocks, and create fire pits that could cook whole pigs wrapped in banana leaves for hours. The result? Kalua pork so tender it falls apart at the slightest touch, infused with earthy, smoky flavors you simply can’t replicate any other way.
Across Polynesia, the umu serves a similar purpose, bringing families together around the ancient ritual of underground cooking. Meanwhile, in Mexico, barbacoa transformed humble ingredients into celebrations, with meat slowly steamed in underground pits lined with maguey leaves.
These aren’t just cooking methods—they’re connections to our ancestral relationship with fire and earth. When you dig your own pit, you’re participating in a tradition that spans continents and millennia. It’s a reminder that the most profound flavors often come from the simplest, most primal techniques. And like any fire-based cooking method, it brings people together in ways that modern appliances simply cannot match.
How Heat Circulates Below Ground
When you dig into the earth to create your underground smoking pit, you’re tapping into nature’s own heat management system. The soil acts as a natural insulator, creating what’s essentially a living oven that distributes heat in a remarkably even way. Unlike traditional above-ground smokers where heat rises quickly and escapes, the earth surrounding your pit absorbs thermal energy and radiates it back consistently from all directions.
This underground environment offers exceptional moisture control, which is the secret to incredibly tender meat. The enclosed space traps steam released from your meat and any water-soaked wood, creating a humid cooking chamber. This moisture prevents the meat from drying out during the long smoking process, while the steady, moderate temperatures break down tough connective tissues without scorching the exterior.
The earth also acts as a buffer against wind and weather fluctuations that plague above-ground cooking. Temperature swings that would normally require constant monitoring become minimal underground. You’re working with radiant heat rather than direct flame exposure, resulting in that distinctive, evenly-cooked texture that makes underground smoking so special. Think of it as combining the best aspects of smoking, steaming, and slow-roasting all in one ancient, eco-friendly cooking method.
Choosing Your Underground Smoking Method
The Simple Fire Pit Method
If you’re new to underground smoking, the simple fire pit method is your perfect starting point. This approach connects you to an ancient tradition while requiring minimal equipment—just basic tools and natural materials you likely already have.
Start by digging a pit approximately three feet deep and two feet wide in an area away from structures and roots. Build a hardwood fire directly in the pit and let it burn down to glowing coals, which typically takes two to three hours. While your fire burns, wrap your meat in several layers of burlap or canvas that’s been soaked in water, then wrap again in aluminum foil to seal in moisture and smoke.
Once you have a thick bed of hot coals, place a grate or green branches across the pit to support your wrapped meat. Position the meat carefully, then cover everything with a piece of metal sheeting or a damp canvas tarp. Finally, shovel dirt over the covering, creating an insulated seal that traps heat and smoke inside.
This eco-friendly method uses the earth itself as your smoker, maintaining steady temperatures between 200-250 degrees Fahrenheit for hours. The slow, gentle heat creates incredibly tender results while the minimal fuel requirement makes it surprisingly sustainable. Plan on approximately one hour of cooking time per pound of meat, though checking periodically ensures perfect results.
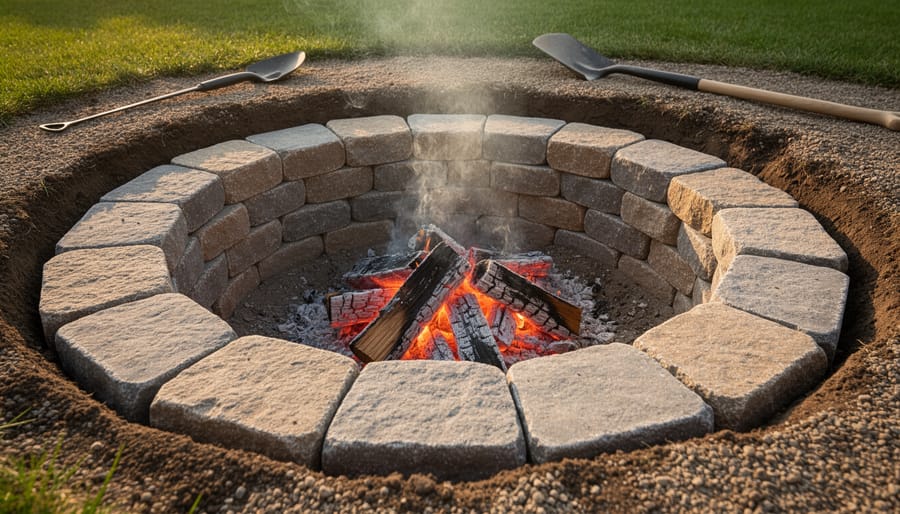
The Permanent Underground Smoker
If you’ve fallen in love with underground smoking and want to make it a lasting part of your outdoor cooking lifestyle, building a permanent underground smoker is a wonderful investment. Think of it as creating a dedicated fire feature in your backyard that combines tradition with modern convenience.
Start by selecting a location away from structures and underground utilities. Dig a pit approximately 3-4 feet deep and 2-3 feet wide, then line it with firebrick or natural stone. This lining provides excellent heat retention and protects surrounding soil from excessive heat damage. The stone work also creates a beautiful, rustic aesthetic that enhances your outdoor living space.
Ventilation is crucial for a permanent setup. Install a metal pipe or chimney system that allows smoke to escape while maintaining optimal temperature control. Many enthusiasts add adjustable dampers to fine-tune airflow, giving you precise control over your smoking environment.
Consider adding a sturdy metal grate system at multiple levels, allowing you to smoke different cuts simultaneously. A permanent cover made from heavy steel or a custom wooden frame with insulation keeps your pit protected between uses.
The long-term benefits are remarkable. Your permanent underground smoker becomes more seasoned with each use, developing flavors that enhance every cook. It’s an eco-friendly heating solution for outdoor entertaining that uses minimal fuel while creating memorable meals and gathering moments around the fire.
Semi-Permanent Earth Ovens
If you’re planning to smoke meat underground more than once or twice, consider building a semi-permanent earth oven that you can use season after season. This middle-ground approach offers the authenticity of traditional underground cooking while saving you the effort of digging a fresh pit each time.
Start by selecting a level spot in your yard where you can safely dig and maintain a dedicated cooking area. Line your pit with firebricks or heat-resistant stones to create a durable chamber that won’t collapse or erode over time. These materials retain heat beautifully and protect the surrounding earth from excessive degradation. Add a removable metal grate or platform to hold your meat above the coals, making loading and unloading much easier.
The key advantage here is consistency. Once you’ve perfected your pit dimensions and learned how it performs, you’ll achieve more predictable results with each cook. Cover your semi-permanent oven with a fitted piece of metal sheeting or a wooden board wrapped in foil between uses to keep debris out. This setup respects the eco-friendly spirit of fire-based cooking while offering modern convenience, making it ideal for homeowners who want to embrace this ancient technique as a regular part of their outdoor lifestyle.
Building Your Underground Smoking Pit Safely
Location and Safety Considerations
Before you break ground on your underground smoking pit, let’s talk about choosing the right spot—because location truly makes all the difference between a successful smoke session and a potential headache.
First and foremost, position your pit at least 25 feet away from your home, garage, or any wooden structures. While underground smoking is safer than many above-ground methods, you’re still working with live fire and smoke, and maintaining a safe distance protects your property. This also keeps smoke from drifting into windows or under eaves where it might cause unwanted odors in your living spaces.
Next comes a crucial step that many enthusiastic folks skip: call 811 before you dig. This free service marks underground utilities like gas lines, electrical cables, water pipes, and communication lines. Hitting any of these creates dangerous and expensive problems that are completely avoidable with a simple phone call made a few days ahead of your project.
Soil type matters more than you might think. You’ll want well-draining soil that won’t turn your pit into a muddy mess after rain. Sandy or loamy soil works beautifully, while heavy clay can retain too much moisture. Check your yard’s natural drainage patterns—avoid low spots where water collects.
Finally, verify local regulations with your city or county. Some municipalities require permits for outdoor cooking structures or have fire restrictions during dry seasons. Homeowners associations may have additional rules about backyard modifications. Taking thirty minutes to make these calls saves you from potential fines and ensures your underground smoking adventure stays purely enjoyable.
Digging and Lining Your Pit
Creating your underground smoking pit starts with choosing the right dimensions for your needs. A standard pit measuring 3-4 feet wide, 4-5 feet long, and 2-3 feet deep works beautifully for most backyard smoking projects. This depth provides excellent heat retention while remaining manageable to dig and maintain.
When excavating, consider your soil type. Sandy or loose soil may require additional support, while clay-rich earth holds its shape naturally. Shape your pit with slightly sloping sides to prevent cave-ins and ensure stability throughout the smoking process.
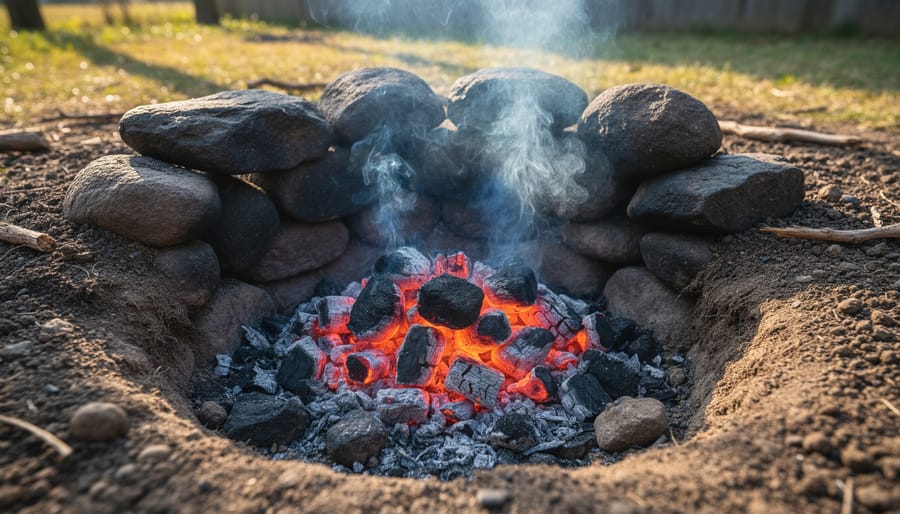
Lining your pit enhances heat efficiency and longevity. Natural volcanic rocks are exceptional choices, as they withstand high temperatures and distribute heat evenly. Firebricks offer similar benefits with more uniform sizing, making them easier to arrange. For a more rustic, traditional approach, you can leave the pit unlined, though this works best in dense clay soils.
Whatever lining method you choose, leave small gaps between materials to promote airflow. Proper ventilation prevents excessive moisture buildup and maintains consistent smoking temperatures. Position a few flat stones at the pit bottom to create a stable base for your coals, elevating them slightly for optimal air circulation. This foundation transforms your pit into an efficient, eco-friendly outdoor cooking space that channels centuries-old wisdom into your backyard experience.
Creating the Fire Base and Ventilation
Building a solid fire base is where your underground smoking adventure truly begins. Think of it as creating the beating heart of your pit, where live coals will generate the steady, clean heat needed for hours of smoking.
Start by lining your pit floor with flat rocks or firebricks, creating a stable foundation that distributes heat evenly and protects the earth below. This isn’t just practical—it’s an eco-friendly approach that maximizes fuel efficiency while minimizing environmental impact.
For wood selection, hardwoods are your best friends here. Oak, hickory, and fruitwoods like apple or cherry burn longer and cleaner than softwoods, producing that sought-after smoke flavor without excessive ash. Avoid treated lumber or resinous woods that create bitter flavors and potentially harmful fumes.
Now, here’s the clever part about ventilation: you need oxygen to keep those coals alive, but you can’t let all your precious heat escape. Create a small air channel on one side of your pit using stones or a metal pipe, positioning it at the base level. This draws fresh air in while the earth and your cover trap the heat above. The gentle airflow keeps combustion steady without turning your smoking chamber into a blast furnace. Monitor the smoke color—thin, bluish-white smoke means you’ve achieved that perfect balance of oxygen and temperature.
The Underground Smoking Process Step-by-Step
Preparing Your Fire and Creating Coals
The foundation of successful underground smoking begins hours before your meat goes into the pit. Your wood selection for smoking makes all the difference in flavor and heat consistency. Hardwoods like oak, hickory, and mesquite are ideal choices, burning slowly and producing steady, long-lasting coals. Avoid softwoods like pine or cedar, which create excessive smoke and impart bitter flavors.
Start your fire at least two to three hours before you plan to lower your meat into the ground. You’re aiming to create a deep bed of glowing coals rather than active flames. The wood should burn down completely until you have red-hot embers covered with a layer of white ash, indicating temperatures between 300 and 400 degrees Fahrenheit.
Test your coal bed by holding your hand about six inches above the surface. If you can only keep it there for three to four seconds, you’ve achieved the perfect heat level. This coal bed provides the gentle, consistent warmth that transforms tough cuts into tender, smoky perfection while embracing an eco-friendly approach to outdoor cooking that connects you with ancestral fire traditions.
Wrapping and Protecting Your Meat
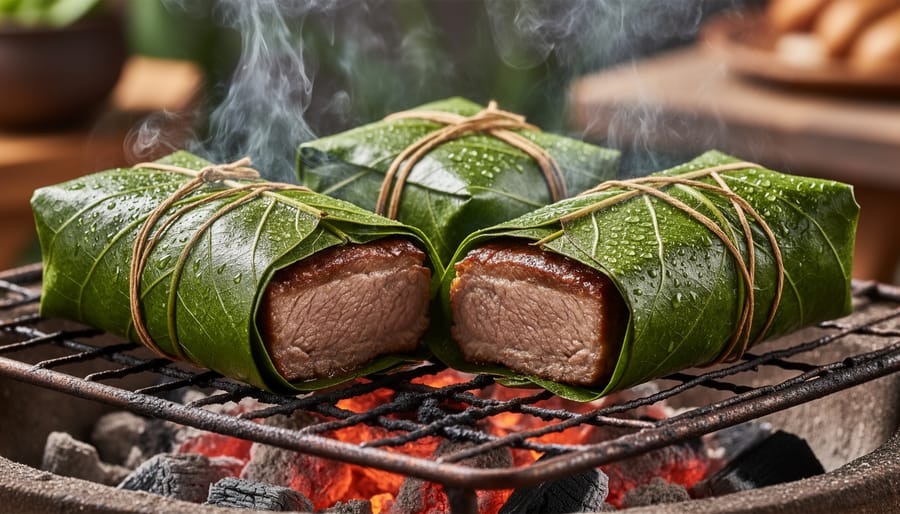
Properly wrapping your meat is essential for underground smoking success, protecting it from ash while allowing smoke to work its magic. Traditional methods involve wrapping meat in large, non-toxic leaves like banana, grape, or cabbage leaves, which add subtle flavor while creating a natural barrier. If you’re using modern materials, heavy-duty aluminum foil works beautifully, though it lacks that authentic touch.
Before wrapping, consider layering aromatics directly against the meat. Fresh herbs like rosemary, thyme, or bay leaves infuse wonderful fragrance during the long, slow cook. Citrus slices, garlic cloves, or aromatic wood chips tucked inside the wrapping add complexity to your final flavor profile.
Moisture is your friend in underground smoking. Add a splash of apple juice, wine, or broth to your wrapped package to prevent drying during the extended cooking time. Some pit masters swear by wrapping meat in cheesecloth soaked in marinade before adding the outer protective layer.
Whatever wrapping method you choose, seal it securely but not too tightly. You want to trap moisture and protect from direct contact with coals and ash, while still allowing gentle smoke penetration. Double-wrapping provides extra insurance against tears or punctures. Remember, this ancient technique connects us to generations of fire-based cooking traditions, bringing that same primal warmth and authenticity to your backyard gathering.
Layering and Burying Your Meat
Creating the perfect cooking environment is all about building your layers thoughtfully, much like tending a well-designed fire at home. Start by placing a foundation layer of hot rocks across your pit bottom, spacing them to distribute heat evenly. These radiating stones will maintain consistent temperatures throughout the cooking process.
Next, add a protective barrier of fresh green leaves, wet burlap, or damp canvas over the rocks. This insulating layer prevents direct contact between your meat packages and the hot stones while generating beneficial steam. Arrange your wrapped meat packages on this bed, positioning larger cuts in the center where heat concentrates most, with smaller pieces toward the edges.
Cover your meat with another insulating layer of the same damp materials, creating a moisture seal that keeps your food tender. Add a layer of clean earth or sand, about 4-6 inches thick, pressing it gently to eliminate air pockets. This earth blanket traps heat and smoke while protecting your food from debris.
Finally, cover everything with your tarp or canvas, weighing down the edges with additional soil. The goal is creating an enclosed cooking chamber where heat circulates slowly and evenly, transforming tough cuts into incredibly tender, smoky masterpieces over the next several hours. This ancient technique brings the warmth of traditional fire cooking right to your backyard.
Timing and Temperature Monitoring
Underground smoking is a beautifully patient process that rewards you with exceptional flavor. Plan on 4-6 hours for smaller cuts like chickens or fish, while larger roasts and pork shoulders need 8-12 hours. Briskets can take up to 14 hours depending on size. Unlike conventional smoking, checking temperature underground requires planning ahead. Before sealing your pit, insert a long-stem meat thermometer through the layers, leaving the dial visible above ground. Alternatively, use a probe thermometer with a heat-resistant cable that extends to the surface. Target internal temperatures of 165°F for poultry, 145°F for fish, and 195-205°F for pulled pork. Watch for subtle signs of progress: aromatic smoke seeping through the soil surface, slight settling of the ground as ingredients soften, and steam rising when you carefully uncover a corner. This ancient method connects you to generations of fire-based cooking traditions while delivering incredible results through earth’s natural insulation.
Best Meats and Cuts for Underground Smoking
Whole Animals and Large Cuts
Underground smoking truly shines when you’re working with whole animals and substantial cuts like pigs, lamb shoulders, or whole chickens. These large, fatty pieces of meat are perfectly suited to the gentle, enveloping heat that rises from below ground.
The beauty lies in how the fat content works to your advantage. As these cuts smoke slowly over several hours, the fat renders gradually, naturally basting the meat from within. This creates incredibly tender, juicy results that would be difficult to achieve with conventional smoking methods. The surrounding earth acts as a natural insulator, maintaining consistent temperatures that prevent the exterior from drying out while the interior cooks through completely.
Whole chickens emerge with crispy skin and succulent meat, while pork shoulders develop that coveted bark on the outside and pull-apart tenderness inside. Lamb benefits tremendously from the earthy, smoky flavors that permeate every fiber during the extended cooking time.
The even heat distribution means you don’t need to worry about hot spots or constant temperature adjustments. Your underground pit does the heavy lifting, transforming these substantial cuts into centerpiece-worthy dishes that’ll have everyone gathering around your outdoor cooking space, experiencing food preparation as both tradition and celebration.
Beef and Brisket Considerations
Beef cuts present unique challenges in underground smoking due to their density and fat content. Unlike pork, which becomes tender through extended low-and-slow cooking, beef brisket requires careful temperature management to break down tough connective tissues without drying out the meat. The earth’s natural insulation works beautifully here, creating that gentle, consistent heat that transforms a tough brisket into something fork-tender and memorable.
Start with quality meat selection. A well-marbled brisket with a thick fat cap will protect the meat during the long underground journey. Trim excess fat to about a quarter-inch, allowing enough to baste the meat naturally while preventing an overly greasy result. Season generously with your preferred rub at least two hours before smoking, or overnight for deeper flavor penetration.
Temperature control becomes even more critical with beef. Aim for an underground pit temperature between 225-250°F. Monitor closely during the first few hours, as beef’s moisture content affects cooking time significantly. Plan for roughly 90 minutes per pound for brisket, though the dense earth covering may extend this slightly.
Consider wrapping your brisket in butcher paper halfway through if you’re concerned about moisture retention. This technique helps preserve that beautiful bark while keeping the interior succulent—bringing ancient methods together with modern know-how for outstanding results.
Troubleshooting Common Underground Smoking Challenges
When Your Meat Comes Out Undercooked
Underground smoking is a beautifully traditional method, but it requires patience and attention to detail. If your meat emerges undercooked, a few common culprits are likely at play.
The most frequent issue is insufficient heat from your coal bed. Unlike modern smokers with precise temperature controls, underground pits rely entirely on the coals you’ve prepared. If you haven’t let your hardwood burn down completely to glowing embers, or if you simply didn’t use enough fuel for the size of meat you’re cooking, you won’t generate the sustained heat needed for achieving tender meat.
Poor insulation is another challenge. If your earth covering is too shallow or loosely packed, heat escapes rather than circulating around your meat. Aim for at least eight to twelve inches of firmly packed soil over your pit.
Excessive airflow can also sabotage your cook. Unlike above-ground smoking where controlled airflow matters, underground cooking needs to be nearly airtight. Check for gaps where you’ve layered your materials, and ensure your covering seals properly. Think of it as creating a natural, eco-friendly oven beneath the earth.
Dealing with Weather and Ground Conditions
Mother Nature doesn’t always cooperate with your underground smoking plans, but with a few adjustments, you can still achieve delicious results. Wet soil is your biggest challenge since moisture prevents proper heat circulation and can extinguish your fire. If rain is forecasted or the ground is saturated, consider postponing your smoke or choose a well-drained, elevated location. You can also line your pit with extra rocks to create better drainage channels.
Cold weather actually works in your favor for underground smoking since the earth naturally insulates your pit, maintaining steady temperatures longer than above-ground methods. However, you’ll need to add extra coals initially and extend your cooking time by 20-30 percent. Wind can be tricky, potentially drawing heat away from your pit or fanning flames too intensely. Position your pit in a naturally sheltered area or create a windbreak using stones or earth berms around the opening. Always have extra firewood and coals on hand to compensate for weather-related heat loss, and monitor your pit more frequently during challenging conditions.
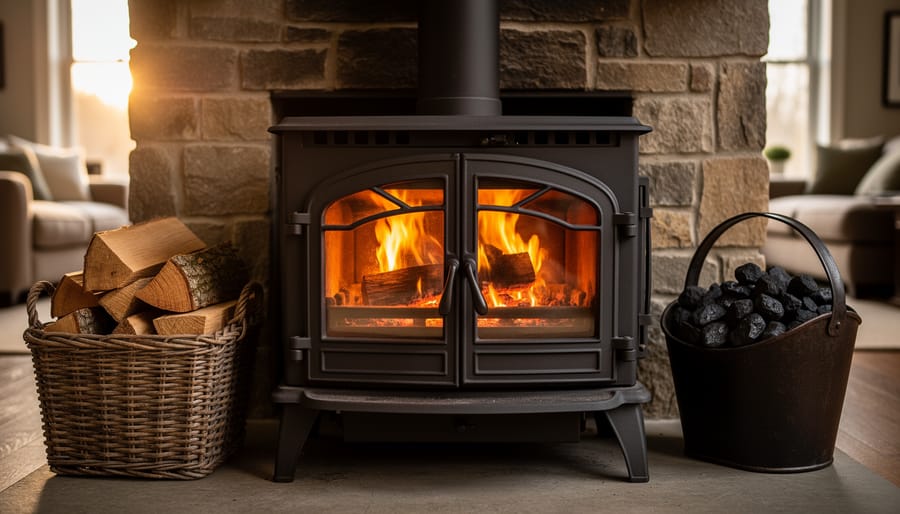
The Connection Between Underground Smoking and Home Heating Traditions
When you think about it, smoking meat underground shares a beautiful kinship with the fireplaces that have warmed homes for generations. Both traditions celebrate the timeless connection between fire, food, and fellowship. Just as families gather around a crackling hearth on cold evenings, outdoor cooks come together around an underground smoking pit, drawn by the same primal comfort that fire has provided since ancient times.
The parallel goes deeper than ambiance. Underground smoking, like your home fireplace, represents an eco-friendly approach to using wood as a sustainable resource. Instead of relying on electric smokers or gas-powered equipment, this method harnesses the natural properties of hardwood, transforming it into aromatic smoke and gentle, lasting heat. You’re tapping into the same renewable energy source that has heated homes and cooked meals for thousands of years.
Both practices also share a similar philosophy about patience and intention. Tending a fireplace requires attention to airflow, wood selection, and maintaining consistent temperatures—the exact skills you’ll use when managing an underground smoking pit. The slow burn that keeps your home cozy through winter evenings mirrors the low-and-slow cooking method that transforms tough cuts into tender, flavorful masterpieces.
There’s something deeply satisfying about being self-reliant with fire, whether you’re warming your living room or cooking a feast for friends. Underground smoking brings that same sense of connection to natural elements, creating not just food but memories around a fire-based tradition that feels both ancient and refreshingly relevant in our modern world.
There’s something profoundly satisfying about pulling tender, smoky meat from an earth oven you built with your own hands. Underground smoking connects us to generations of outdoor cooks who understood that the best flavors come from patience, fire, and a little dirt. While it requires more planning than your backyard smoker, the unique results and the experience itself make it absolutely worth the effort.
The meat you’ll produce has a distinctive character you simply can’t replicate with modern equipment. The earth’s insulation creates remarkably even heat, while the enclosed environment intensifies the smoke in ways that deliver incomparable depth of flavor. Beyond the food itself, you’re creating a memorable gathering experience. There’s magic in watching friends and family gather around as you unearth your creation, their anticipation building with each shovelful of soil.
Before you start digging, remember that safety always comes first. Choose your location thoughtfully, respect fire regulations in your area, and never rush the cooling process. Take your time learning the technique, starting with smaller projects before tackling that whole pig you’ve been dreaming about.
Underground smoking isn’t just about cooking meat. Like gathering around a crackling fireplace on a cold evening, it’s about creating warmth, connection, and lasting memories. This ancient technique invites you to slow down, work with fire and earth, and share something truly special with the people who matter most. Your first underground smoke might feel daunting, but trust the process and embrace the adventure.


")