


Turn off the power at your circuit breaker before touching any stove components—this single step prevents electrical shock and potential fire hazards. A malfunctioning electric stove burner doesn’t necessarily mean an expensive service call or appliance replacement. Most burner issues stem from simple problems you can diagnose and fix yourself in under thirty minutes with basic tools.
Check whether your burner element simply needs reseating in its socket, as loose connections cause most heating failures. If the element looks warped, cracked, or shows visible damage, replacement elements cost between $15-$40 and snap into place without any wiring knowledge. Test your burner in another socket on your stove to confirm whether the element itself or the socket has failed—this two-minute swap reveals exactly where the problem lies.
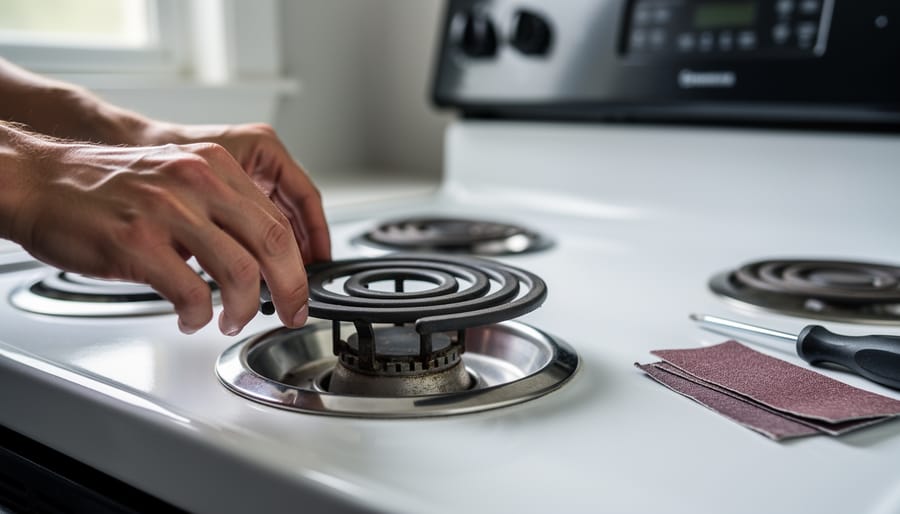
For coil-style burners, cleaning corroded terminals with fine sandpaper restores proper electrical contact. Glass-top stoves require gentler troubleshooting since the heating elements hide beneath the surface, but you can still check for tripped breakers, blown fuses, and loose wire connections underneath. Understanding your specific stove type guides you toward the right repair approach, saving both money and the frustration of a non-functional cooking surface. When electrical components show significant damage or you smell burning plastic, calling a licensed electrician protects your home’s safety and ensures proper repairs.
Why Electric Stove Burners Stop Working
Loose or Corroded Connections
Over time, the connection points where your burner plugs into the stove can become loose or develop that telltale greenish-white corrosion that blocks electrical flow. Think of it like how moisture affects fireplace tools left outdoors—exposure to heat, moisture, and repeated use takes its toll. When terminals lose their snug fit or accumulate oxidation, electricity can’t flow properly to heat your burner.
To check for this issue, first ensure your stove is completely unplugged or the circuit breaker is off. Remove the burner and examine both the burner prongs and the receptacle where it plugs in. Look for any crusty buildup, discoloration, or a wobbly connection. If you spot corrosion, gently clean the terminals using fine sandpaper or a wire brush—the same careful approach you’d use maintaining metal fireplace accessories. For stubborn buildup, a bit of baking soda paste works wonders.
If the connection feels loose even after cleaning, the receptacle itself may need replacement. This is a straightforward repair that involves disconnecting a few wires, but if you’re uncomfortable working with electrical components, calling a qualified electrician is always the safer choice for your home.
Burned-Out Heating Elements
Just like the cozy fireplace that provides warmth season after season, your electric stove burners work hard every time you cook. But here’s the thing: heating elements don’t last forever. With regular use, they gradually wear down and eventually burn out completely.
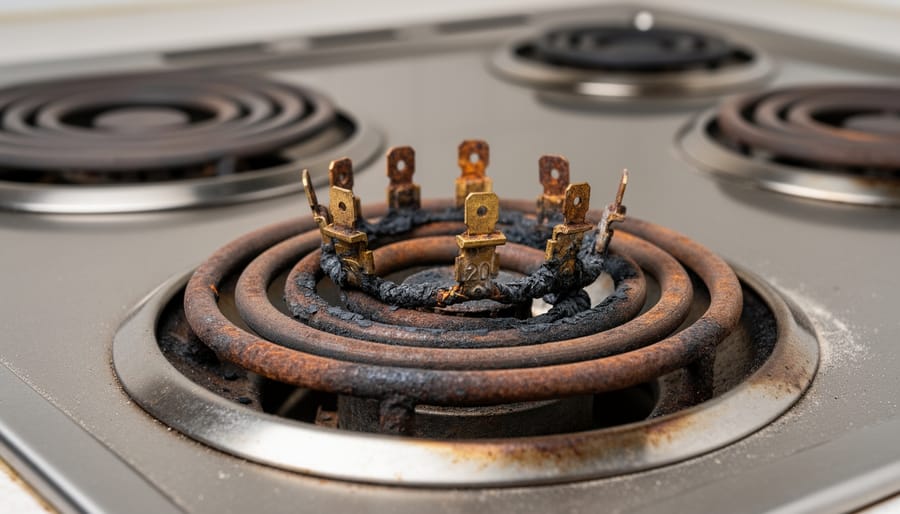
You’ll know a heating element needs replacing when you spot blistering or bubbling on its surface, visible cracks, or separated coils. Sometimes the element won’t heat up at all, while other times it might only glow in certain spots, leaving cold patches that won’t cook your food evenly. If you notice burn marks or discoloration that looks more serious than typical food residue, that’s another red flag.
The good news? Replacing a burned-out element is one of the simplest stove repairs you can tackle yourself. Most heating elements simply plug into a socket, making replacement as straightforward as changing a light bulb. Before purchasing a new element, write down your stove’s model number and take the old element with you to ensure you get the exact replacement. This DIY approach saves money and keeps your kitchen running smoothly without waiting for repair appointments.
Faulty Burner Sockets or Switches
Sometimes the burner element itself works perfectly fine, but the socket it plugs into or the control switch has failed. If your burner isn’t heating evenly or you notice a burner stuck on high regardless of the dial setting, the socket or switch might be the culprit. Start by inspecting the burner socket for any signs of burning, corrosion, or loose connections. These receptacles endure constant heat cycles and can deteriorate over time. Gently wiggle the burner in its socket—if it feels loose, that connection needs attention. For switch issues, test whether turning the dial produces consistent results. A faulty switch may cause erratic heating or complete failure. Replacing a socket typically requires disconnecting the old one and installing a new receptacle, which is straightforward with basic tools. Switch replacement is more involved and may require accessing the control panel. Always disconnect power at the breaker before attempting any repairs. If you’re uncomfortable working with electrical components, calling a qualified technician ensures both safety and proper function.
Safety First: Preparing for the Repair
Before we roll up our sleeves and get to work, let’s talk about staying safe during this repair. Working with electric stoves requires the same thoughtful approach you’d take with any home improvement project—respect for the equipment and a few smart precautions will keep everything running smoothly.
First and foremost, power down your stove completely. This isn’t just a matter of turning the burner dial to “off.” Head to your home’s electrical panel and flip the breaker that controls your stove. If you’re not certain which breaker it is, look for labels or test by turning off what you think is the right one and checking if your stove’s clock display goes dark. This step is absolutely essential—electricity and repairs don’t mix.
Next, patience pays off. Even after cutting the power, your burner needs time to cool down completely. If you’ve been using the stove recently, wait at least 30 to 45 minutes. Touch-test the surface gently before proceeding—there’s no prize for rushing into a repair with a hot element.
Now’s the time to gather your tools. You’ll typically need a screwdriver set, a multimeter for testing electrical connections, and possibly replacement parts like a new burner element or receptacle. Keep your phone handy with good lighting, and consider having someone nearby who can assist if needed. Having everything within reach before you start makes the process much more pleasant and efficient.
Diagnosing the Problem: Simple Tests Anyone Can Do
The Swap Test
Here’s a simple diagnostic trick that’ll save you time and help pinpoint exactly where the problem lies. Think of it like troubleshooting your heating system—you want to isolate the issue before diving into repairs.
Start by making sure your stove is completely cool and unplugged from the wall outlet. Safety first, always. Now, carefully lift out the burner that isn’t working. Most electric coil burners simply pull out from their socket with a gentle tug and slight twist. Take a mental note of which socket it came from.
Next, remove a burner from a position you know works perfectly. Plug your non-working burner into this good socket and turn on the stove. If the burner suddenly heats up, congratulations—you’ve discovered the original socket is faulty, not the burner itself. However, if the burner still doesn’t work in the good socket, you’ve confirmed the burner element needs replacing.
This swap test takes just a few minutes but provides incredibly valuable information. It’s similar to how you’d test different zones in a multi-zone heating system to identify which component needs attention. Once you know whether it’s the burner or socket causing trouble, you can move forward confidently with the right repair solution.
Visual Inspection Tips
Before you reach for any tools, let’s start with a careful visual inspection of your stove burner—think of it as getting to know the heart of your kitchen’s heating system. First, unplug your stove or turn off the circuit breaker for safety. Once it’s cool, gently remove the burner element by lifting it slightly and pulling it straight out from its socket.
Look closely at the burner element itself for any signs of trouble. Check for blistering, cracking, or burnt spots on the coil, which indicate internal damage. These imperfections disrupt the even heat distribution you need for cooking, similar to how a damaged fireplace grate affects heat flow.
Next, examine the metal prongs that plug into the socket. Are they bent, corroded, or showing signs of burn marks? These connection points are crucial—they’re like the chimney to your fireplace, allowing energy to flow properly. Even minor corrosion can interrupt the electrical current.
Finally, peek inside the socket where the burner connects. Look for carbon buildup, melted plastic, or blackened areas around the connection points. A damaged socket often causes intermittent heating or no heat at all. If you notice significant damage here, the socket itself may need replacement, which is a relatively straightforward fix that can restore your cooking capabilities.
How to Replace a Coil Burner Element
Removing the Old Element
Now that you’ve gathered your tools and ensured the power is completely off, it’s time to remove the faulty burner element. This step is simpler than you might think, and you’ll likely feel a sense of accomplishment once you see how straightforward it is.
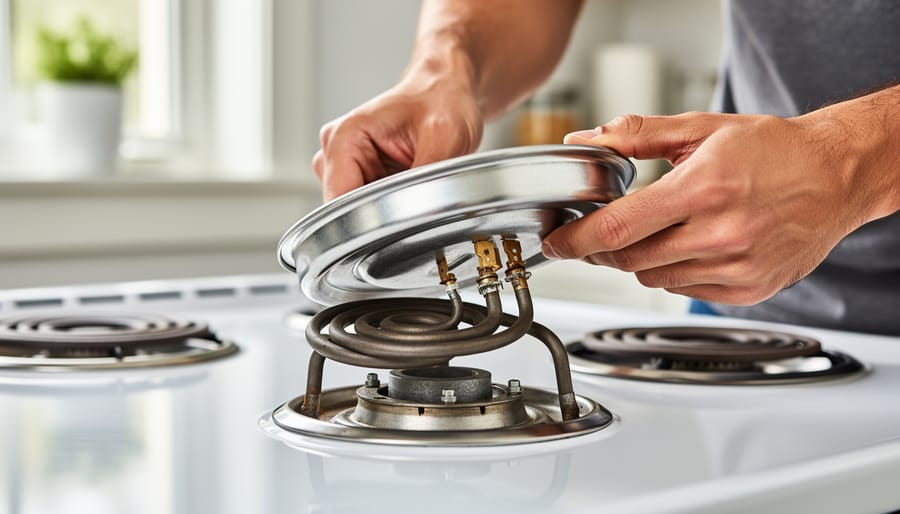
For coil burners, gently lift the burner coil away from the stovetop. You’ll notice it’s connected to the stove by a plug-in terminal block. Carefully pull the coil straight out from the receptacle, similar to unplugging a cord from an outlet. Don’t yank or twist it, just use steady, even pressure. If it feels stuck, wiggle it gently side to side while pulling. Once disconnected, set the old element aside.
For glass-top stoves, you’ll need to access the element from underneath. Remove any screws securing the stovetop glass, then carefully lift the glass panel if your model allows. Locate the wiring connected to the burner element and photograph it with your phone so you’ll remember how to reconnect the new one. Disconnect the wire terminals by pressing the release tabs or unscrewing the wire nuts, depending on your stove’s design.
Take a moment to inspect the receptacle or wiring connections for any signs of damage, corrosion, or burning. This quick check helps ensure your new element will work properly and safely.
Installing the New Element
Now comes the satisfying part—installing your new burner element and restoring warmth to your cooking routine. Begin by carefully aligning the metal prongs of the replacement element with the socket terminals in your stove. These prongs need to slide in smoothly and completely, much like ensuring proper airflow in an efficient heating system.
Gently but firmly push the element straight into the receptacle until you feel it seat securely. There should be no gap between the element’s connector block and the stove surface. This full connection ensures optimal electrical contact and prevents the sparking or poor performance that brought you here in the first place.
Once inserted, give the element a gentle tug to verify it’s locked in position. It should feel snug and stable, not loose or wobbly. If you removed any support brackets earlier, now’s the time to reattach them using the screws you set aside.
For drip pan-style burners, ensure the element rests evenly in the pan without tilting. An unbalanced element won’t heat properly and could create hot spots during cooking. Take a moment to double-check that all connections are clean and tight—this small attention to detail makes all the difference in performance and safety, giving you peace of mind as you return to creating delicious meals for your household.
Where to Find the Right Replacement
Finding the right replacement part doesn’t have to be complicated when you know where to look. Start by checking your stove’s model number, which you’ll typically find on a metal plate inside the oven door or along the front rim. Snap a photo of this plate with your phone—it contains everything you need.
Armed with your model number, visit the manufacturer’s website first. Most major brands have parts sections where you can order directly. Online retailers like PartSelect, RepairClinic, and AppliancePartsPros specialize in appliance components and offer helpful diagrams to confirm you’re ordering correctly. Before purchasing, verify whether burners are interchangeable with your specific model.
Local appliance parts stores can be lifesavers when you need a quick fix. Call ahead with your model number to check availability. Many staff members have extensive knowledge and can help troubleshoot if you’re unsure about the exact part needed. Having the old burner’s wattage rating and diameter measurements handy makes the process smoother and ensures you bring home the correct replacement the first time.
Fixing Glass-Top and Smooth Surface Burners
Glass-top and ceramic cooktops bring a sleek, modern look to your kitchen, much like how a well-designed fireplace becomes a stunning focal point in your living space. However, when these smooth surfaces stop heating properly, the repair approach differs significantly from traditional coil burners.
First, understand that the heating elements sit beneath the glass surface, making direct access impossible without specialized knowledge. If your glass cooktop isn’t heating, start with the simplest solution: check your circuit breaker and ensure the unit is receiving power. Sometimes what seems like a burner failure is actually an electrical supply issue.
For minor problems like uneven heating or slow warm-up times, you might be dealing with a faulty control switch or temperature sensor rather than the element itself. These components are sometimes accessible from beneath the cooktop and can be replaced by confident DIYers who carefully consult their owner’s manual. Always disconnect power at the breaker before attempting any inspection.
However, let’s be honest about when professional help makes sense. If the glass itself is cracked or damaged, replacement requires removing the entire cooktop assembly—a job best left to trained technicians. Similarly, if heating elements beneath the glass have failed, the repair involves carefully lifting the glass panel without breaking it, which demands experience and the right tools.
Think of it like maintaining an efficient, eco-friendly heating system in your home: sometimes DIY maintenance works beautifully, but complex repairs warrant expert attention to avoid costly mistakes. Cracked glass poses safety risks, and improper repairs can damage the entire unit.
If you’re uncomfortable working with the electrical components or lack confidence in your assessment, calling a qualified appliance repair professional protects your investment and ensures safe operation.
Repairing or Replacing Burner Sockets
Sometimes the burner element itself works perfectly fine, but the socket it plugs into has seen better days. Think of it like a light bulb that’s fine, but the lamp socket is damaged—no connection means no heat. Socket issues are surprisingly common in electric stoves, especially if you’ve been cooking up comfort in your kitchen for years.
Here’s how to tell if your socket needs attention. First, check for visible damage like burn marks, melted plastic, or corroded metal contacts inside the socket where the burner prongs connect. These signs mean heat has damaged the socket over time. You might also notice the burner wobbles excessively or doesn’t sit flush when plugged in. If you’ve already tested your burner element in another socket and it worked fine, that’s your clear signal that the socket is the culprit.
Before you begin any repair work, safety comes first. Unplug your stove or turn off the circuit breaker—never skip this step. Once the power is completely off, remove the burner element and use a flashlight to inspect the socket thoroughly.
Replacing a socket is refreshingly straightforward. You’ll need a screwdriver and a replacement socket that matches your stove model. Remove the chrome drip pan to access the socket underneath. You’ll find two or three wires connected to the socket with screw terminals or push-on connectors. Take a photo before disconnecting anything—this becomes your roadmap for reassembly. Disconnect the wires, remove the mounting screws holding the old socket, and install the new one by reversing these steps.
Most replacement sockets cost between ten and twenty dollars and can extend your stove’s life considerably, making this an eco-friendly alternative to replacing the entire appliance. If you notice multiple damaged sockets or feel uncomfortable working with electrical components, calling a professional ensures the job gets done safely.
Keeping Your Electric Stove Burners Running Longer
Regular Cleaning Without Damage
Keeping your electric stove burners clean isn’t just about appearance—it’s essential for maintaining their performance and preventing unnecessary repairs. Regular maintenance creates a safer, more efficient cooking environment for your home while extending the life of your appliance.
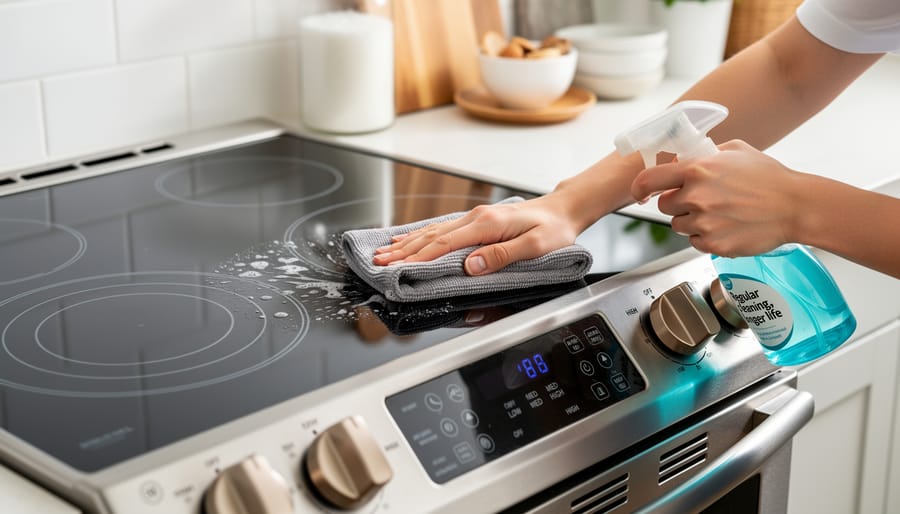
Start by ensuring the stove is completely cool and unplugged before cleaning. For coil burners, gently lift them from their socket and wipe away food debris with a damp cloth. Avoid submerging the electrical connections in water, as moisture can cause corrosion and electrical issues. Cleaning stove coils properly means using gentle motions and avoiding abrasive scrubbers that can damage the protective coating.
For the connection points, use a dry cloth or soft brush to remove any buildup. Never spray cleaning solutions directly onto electrical components. If you notice stubborn residue on the drip pans or burner surfaces, a paste of baking soda and water works wonders without harsh chemicals—an eco-friendly approach that protects both your appliance and indoor air quality. Once everything is dry, reconnect the burners securely and test them briefly to ensure proper function.
Using Your Burners Wisely
Extending the life of your electric stove burners starts with smart cooking habits. Choose flat-bottomed cookware that matches your burner size—pots that are too small or too large create uneven heat distribution and unnecessary strain on heating elements. Heavy-gauge pans with smooth bottoms make the best contact, allowing for efficient heat transfer and reducing energy waste.
Understanding proper heat settings is essential for burner longevity. Avoid cranking burners to maximum heat unnecessarily, as this accelerates element degradation. Instead, preheat gradually and adjust to medium settings once you’ve reached the desired temperature. This gentler approach not only preserves your burners but also reduces your energy footprint—an eco-friendly win for your home and budget. Keep burner surfaces clean by wiping away spills promptly, as hardened residue forces elements to work harder. These simple practices transform your cooking routine into a maintenance strategy, helping you avoid repairs while embracing efficient, sustainable kitchen practices.
When to Inspect Connections
Just like you wouldn’t wait for your home heating system to fail on the coldest night, don’t wait for burner connections to become a real problem. Make it a habit to inspect your electric stove burner connections every three to six months, especially if you cook frequently. This quick maintenance check takes just a few minutes but can prevent unexpected cooking interruptions and extend the life of your appliance.
Pay extra attention after any power surges or outages, as these events can loosen connections or cause hidden damage. If you notice any signs of trouble, like uneven heating, flickering burners, or unusual smells during cooking, inspect the connections immediately rather than waiting for your next scheduled check.
Seasonal inspections work well for most households. Consider checking your burner connections when you perform other home maintenance tasks, like testing smoke detectors or changing air filters. This routine approach helps you catch small issues before they escalate into costly repairs or safety hazards. Remember, a little preventive care keeps your kitchen running smoothly and safely, giving you peace of mind while you prepare meals for your family.
You’ve just walked through the process of diagnosing and repairing your electric stove burner, and that’s something worth celebrating. Most burner issues aren’t as intimidating as they first appear—whether it’s a loose connection, a worn heating element, or a faulty receptacle, you now have the knowledge to tackle these common problems yourself. Just like maintaining a fireplace keeps your home’s heart beating strong, keeping your stove in working order ensures your kitchen remains the warm, welcoming center of daily life.
The beauty of modern electric stoves is that they’re designed with homeowners in mind. Components are generally accessible and replaceable without specialized training. By taking on these repairs yourself, you’re not just saving money—you’re building confidence and self-sufficiency that extends to other aspects of home maintenance.
That said, knowing your limits is equally important. If you’ve followed troubleshooting steps and the problem persists, or if you encounter damaged wiring or complex control board issues, calling a qualified electrician is the smartest choice. There’s no shame in recognizing when professional expertise is needed. Safety should always be your top priority.
Your kitchen deserves the same care and attention you’d give any essential part of your home. Now get out there and bring that burner back to life.

")