


Check the pilot light first—if your burner won’t ignite, the pilot may have gone out due to a draft or debris buildup. Relight it following your manufacturer’s instructions, ensuring the thermocouple is properly positioned in the flame. Clean burner ports with a straightened paperclip or thin wire to remove food debris and grease that block gas flow, causing weak or uneven flames. Replace worn igniter switches if you hear clicking without sparking, as moisture or age can corrode these components. Verify gas supply by checking that your shutoff valve is fully open and other burners function properly, ruling out fuel delivery issues.
When your gas stove stops working reliably, it disrupts the heart of your home—that cozy gathering place where meals bring family together. Most common gas stove problems stem from simple maintenance issues rather than catastrophic failures, meaning you can often restore your cooking centerpiece without expensive service calls. Understanding what causes burners to malfunction empowers you to take control of your home’s comfort and functionality.
Gas appliances require respect and basic safety awareness, but troubleshooting doesn’t need to intimidate you. By methodically working through symptoms—whether constant clicking, yellow flames, or complete ignition failure—you’ll identify solutions quickly. This guide walks you through diagnosing issues based on what you’re experiencing, not what you’d need an engineering degree to understand. Think of your stove like your fireplace: both need regular attention and cleaning to perform safely and efficiently, creating the warm, inviting atmosphere that makes your house truly feel like home while supporting eco-friendly energy use in your daily routines.
Safety First: What You Need to Know Before Starting
Before you roll up your sleeves to troubleshoot your gas stove, let’s talk about safety—not to scare you, but to empower you. Understanding a few key precautions transforms you from worried to confident, and that’s exactly where we want you to be.
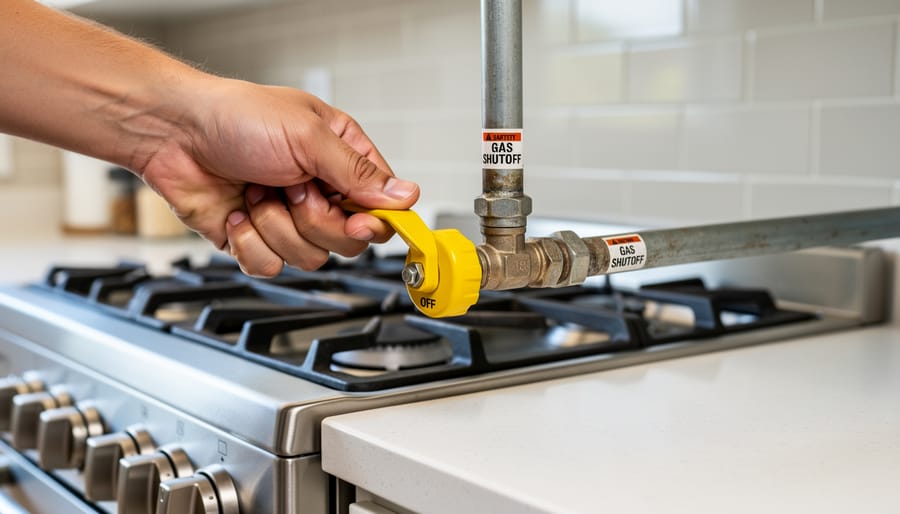
First things first: know where your gas shutoff valve is located. It’s typically behind or beside your stove, and you should be able to turn it clockwise to stop the gas flow completely. Before attempting any repairs beyond simple cleaning, turn off this valve. It’s your safety switch, and there’s no shame in using it—professionals do it every time.
Ventilation matters more than you might think. Open a window or turn on your range hood before you start working. Gas appliances need proper airflow, and if you smell gas (that distinctive rotten egg odor), don’t attempt any fixes. Instead, open windows, leave your home immediately, and call your gas company or emergency services from outside. This isn’t being overly cautious—it’s being smart.
Now, let’s talk about tools. You’ll need surprisingly little: a flashlight, a soft brush or toothbrush, mild dish soap, a screwdriver set, and a towel. These basics handle about 80 percent of common stove issues. Keep a spray bottle with soapy water handy too—it’s perfect for checking gas connections for leaks.
Finally, know when to call in the pros. If you smell gas persistently, notice damaged gas lines, or feel uncomfortable with any repair, stop. A service call costs less than a dangerous situation. Your instincts about safety are always worth listening to—they’re part of creating the warm, secure home environment you deserve.
The Burner Won’t Ignite: Your First Line of Defense
Clogged Burner Ports and Igniters
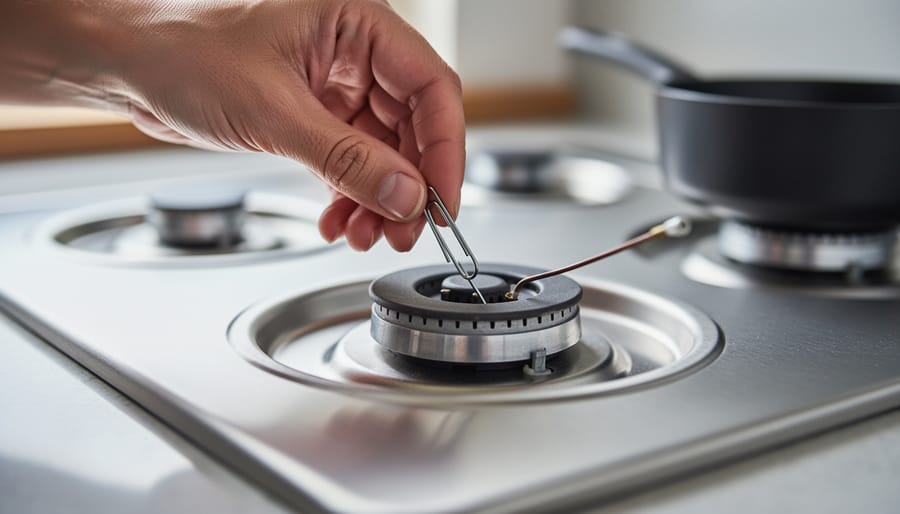
Over time, your gas stove’s burner ports and igniter electrodes can become clogged with food debris, grease, and everyday cooking residue. When these tiny openings get blocked, you’ll notice weak, uneven flames or burners that struggle to light at all. The good news? This is one of the easiest fixes you can tackle yourself with items you likely have in your kitchen right now.
Start by removing the burner caps and grates once your stove has completely cooled. Look closely at the burner head and you’ll see small holes or slots around its perimeter. These ports should be clear and visible. If they appear blocked or discolored, it’s cleaning time.
For the burner ports, straighten a paperclip or use a toothpick to gently clear each opening. Work your way around the entire burner, being careful not to enlarge the holes or damage the metal. A soft-bristled toothbrush dipped in warm, soapy water works wonders for removing surface buildup. For stubborn grease, create a paste with baking soda and water, let it sit for a few minutes, then scrub gently.
The igniter electrode, that small ceramic nub near the burner, also needs attention. Use a dry toothbrush or soft cloth to wipe away any residue. Moisture interferes with the spark, so ensure it’s completely dry before reassembling.
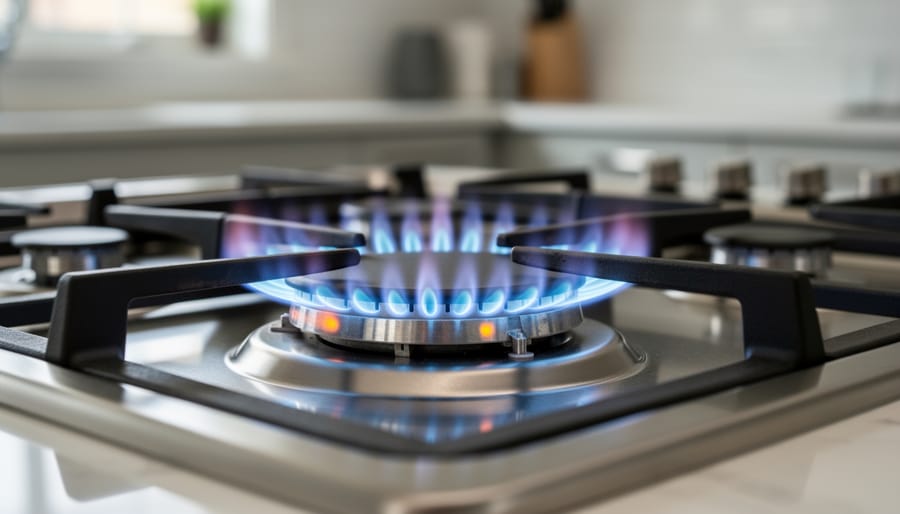
Once everything is clean and dry, reassemble your burner components and test. You should see even, blue flames dancing around the burner, bringing back that cozy cooking experience you love.
Wet or Damaged Igniter Issues
Moisture is one of the most common culprits behind igniter troubles. If you’ve recently cleaned your stovetop or if food has boiled over, water can interfere with the spark mechanism. Before you worry about replacement, try a simple fix: ensure the igniter is completely dry. Use a soft cloth or cotton swab to gently wipe around the igniter, then let it air dry for at least 30 minutes. Sometimes an igniter not sparking after cleaning just needs more drying time.
Position matters too. If your igniter cap is misaligned or sitting crooked after cleaning, it won’t spark properly. Check that all burner caps are seated correctly and centered over their bases. Even a slight tilt can prevent proper ignition.
When drying and repositioning don’t solve the problem, your igniter may need replacement. Signs include visible cracks, a dull orange glow instead of a bright white spark, or complete failure to click. While igniters are relatively inexpensive parts, replacing them requires some technical know-how. If you’re uncomfortable working with electrical components, calling a professional ensures your safety and keeps your home’s cozy warmth uninterrupted.
Gas Flow Problems
Sometimes the issue isn’t with your stove’s ignition system but with the gas supply itself. Before diving into complex repairs, let’s check the basics that often get overlooked.
Start by ensuring your main gas supply valve is fully open. This valve is typically located behind or beneath your stove, and it should be turned parallel to the gas line when open. A partially closed valve restricts gas flow, leading to weak flames or burners that won’t light at all. If you’ve recently moved your stove for cleaning or renovation work, the valve may have been accidentally bumped.
Check if other gas appliances in your home are working properly. If your water heater or furnace is also affected, you might have a broader gas supply issue that requires contacting your utility company. They can verify there’s adequate pressure coming into your home.
For individual burner problems, examine the gas ports on the burner head for blockages. Food debris, grease, or cleaning product residue can obstruct these tiny openings, preventing proper gas flow. Use a straightened paper clip or thin wire to gently clear any clogs.
If you smell gas or suspect a leak, immediately turn off the gas supply, open windows, avoid creating any sparks, and call a professional. Your family’s safety always comes first when dealing with gas appliances.
Weak or Yellow Flames: Getting Your Burner Back to Blue
Air Shutter Adjustment
If your gas stove is producing yellow or orange flames instead of crisp blue ones, adjusting the air shutters can restore proper combustion and efficiency. Think of air shutters as the breathing mechanism for your burners—they control how much oxygen mixes with the gas for that perfect, clean-burning flame.
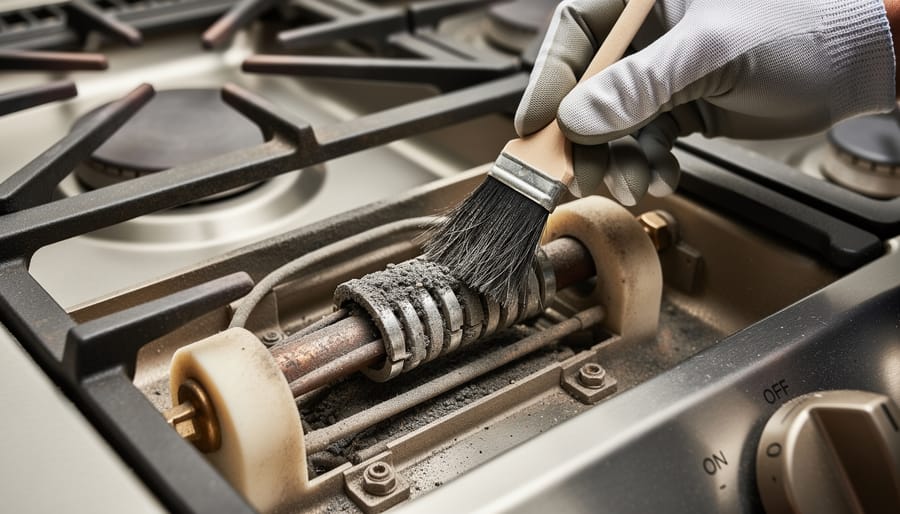
Start by turning off all burners and letting them cool completely. Remove the burner grates to access the burner tubes underneath. Look at the base of each burner where it connects to the gas supply line. You’ll find a small collar or sleeve with an opening—that’s your air shutter. Some models have a small screw holding the shutter in place.
To adjust, light the burner and observe the flame color. Loosen the screw slightly and rotate the collar to open or close the air intake. Opening it wider allows more air in, which reduces yellow tips and creates a bluer flame. Make small adjustments—a little goes a long way. Your goal is a steady blue flame with just a hint of yellow at the very tip.
Repeat this process for each burner, as they may need individual adjustments. If you’re uncomfortable making these tweaks or notice no improvement, it’s wise to call a professional. Proper flame color isn’t just about aesthetics—it ensures efficient, eco-friendly operation and prevents carbon buildup that can affect your home’s air quality.
Burner Cap Alignment and Cleaning
Sometimes the simplest solutions make the biggest difference in your stove’s performance. Burner caps, those removable covers that sit atop each burner, play a crucial role in directing gas flow and creating even flames. When they’re misaligned or dirty, you’ll notice uneven yellow flames, weak heat output, or flames that seem to “dance” unpredictably around the burner.
Start by ensuring your stove is completely cool, then remove the burner grates and lift off each burner cap. Take a moment to inspect them closely. Look for food debris, grease buildup, or any blockages in the small slots and openings. These passages are designed to distribute gas evenly, so even minor obstructions can disrupt your flame pattern.
Clean the caps using warm, soapy water and a soft brush or old toothbrush to gently scrub away residue. For stubborn, baked-on grime, let them soak for 15-20 minutes before scrubbing. Avoid harsh abrasives that might scratch the surface. Dry them thoroughly before replacing.
Here’s the key: proper alignment. Each burner cap has a specific orientation, usually indicated by alignment notches or tabs. When reinstalling, ensure the cap sits flat and centered on the burner base. A cap that’s even slightly off-center will create irregular flames and waste energy. Give it a gentle wiggle to confirm it’s seated correctly. This small maintenance step ensures efficient heating while reducing gas consumption.
Clicking That Won’t Stop: Silencing the Spark
Moisture and Spill Cleanup
If your gas stove keeps clicking even after the burner lights, moisture is likely the culprit. Spills, boil-overs, and even excessive steam from cooking can seep into the igniter system, creating a continuous sparking cycle that’s both annoying and wasteful. The good news? This is one of the easiest issues to resolve at home.
Start by turning off the burner and letting it cool completely. Remove the burner caps and grates, then gently dry around the igniter with a clean, absorbent cloth. For stubborn moisture, use a hairdryer on the cool or low setting, keeping it moving to avoid overheating any components. Pay special attention to the small igniter ports where water tends to hide.
If you’ve had a significant spill, allow the stovetop to air dry for several hours or overnight. Sometimes patience is your best tool. To prevent future issues, wipe up spills promptly and avoid using excessive water when cleaning your stovetop. A slightly damp cloth is better than a soaking wet one.
This simple maintenance keeps your cooking space functional and comfortable, ensuring your kitchen remains the warm, inviting heart of your home where family and friends naturally gather.
Faulty Igniter Switch or Module
When you hear clicking but see no spark, or notice a weak, intermittent spark at the burner, you’re likely dealing with a faulty igniter switch or module. These electrical components are the heart of your stove’s lighting system, and like any hardworking part of your home, they can wear out over time.
Start by checking if the clicking sound happens when you turn the knob. If there’s no clicking at all, the igniter switch itself may have failed. If you hear clicking but see no spark, the igniter module or the spark electrode might be the culprit. Sometimes you’ll notice that only one burner won’t light while others work fine, suggesting an issue with that specific igniter.
Before calling a professional, try cleaning around the igniter with a dry toothbrush to remove any debris that might be interfering with the spark. Ensure all burner caps are properly seated, as misalignment can prevent ignition.
However, electrical components require specialized knowledge and tools to replace safely. If cleaning doesn’t solve the problem, it’s time to call a qualified appliance technician. Working with electrical parts without proper expertise can create safety hazards and void your warranty. A professional can quickly diagnose whether you need a new igniter switch, module, or electrode, restoring your cozy cooking space safely.
Uneven Heating and Temperature Control Issues
When your gas stove burner heats unevenly or won’t respond to temperature adjustments, it can turn meal preparation into a frustrating guessing game. The good news is that these issues typically stem from a few common causes you can address yourself.
Start by examining your burner caps and heads for proper alignment. If these components shifted slightly during cleaning or got bumped, they can create uneven flame distribution. Remove the grates and burner caps, then carefully reposition them according to the grooves or notches on your stovetop. Even a small misalignment can cause hot spots or weak flames.
Clogged burner ports are another frequent culprit behind inconsistent heating. Food spills, grease buildup, and normal use can block the tiny holes around the burner head where gas flows out. Turn off your stove completely and let it cool, then use a straightened paperclip or thin wire to gently clear each port. Follow up with a soft brush to remove loosened debris. This simple cleaning often restores even heating immediately.
If one side of your burner flames up higher than the other, check for moisture in the gas lines or burner assembly. This sometimes happens after cleaning or in humid conditions. Allow your stove to air dry completely, and consider running the burner on low for a few minutes to evaporate any trapped moisture.
Temperature control problems may also indicate a failing valve or thermocouple. If your burner only operates at high heat regardless of the knob position, the valve might need professional attention. However, first try turning the knob through its full range several times to work through any stiffness.
Remember, consistent maintenance prevents most heating issues. Make it part of your kitchen routine to wipe down burners after they cool and perform a thorough cleaning monthly. This simple habit keeps your cooking experience smooth and your home’s heart functioning beautifully.
Gas Smell: When to Act Immediately
Let’s be absolutely clear: if you smell gas, this isn’t a DIY moment. Your safety comes first, always.
Natural gas is odorless by nature, so utility companies add a distinctive sulfur or rotten egg smell as a warning system. This smell exists for one reason—to get your attention immediately. Here’s how to respond correctly.
If you detect a strong, persistent gas odor, don’t try to troubleshoot. Don’t light matches, operate light switches, or use your phone near the smell (the spark could ignite gas). Instead, open windows if you can do so quickly, evacuate everyone from your home, and call your gas company or 911 from outside. They have emergency response teams available 24/7 for exactly these situations.
Now, there’s an important distinction to make. A faint gas smell when you first turn on a burner, which disappears within seconds, is typically normal—it’s residual gas igniting. However, if you smell gas leaking from burner when everything is off, or if the smell lingers after ignition, that’s your red flag.
Some situations absolutely require professional intervention: continuous hissing sounds near gas lines, visible damage to connections, or recurring gas odors. Your home’s warmth and ambiance depend on safe, properly functioning appliances. When it comes to gas safety, there’s no shame in calling the experts—it’s the smart, responsible choice that protects your household and your peace of mind.
Preventive Maintenance: Keep Your Gas Stove Running Smoothly
A little regular attention goes a long way toward keeping your gas stove reliable and preventing those frustrating moments when it won’t light or cook properly. Think of preventive maintenance as an investment in your home’s comfort—much like tending a fireplace, caring for your gas stove ensures it’s ready when you need it most.
Start with a monthly quick-check routine. Remove the burner grates and caps, then inspect the burner ports for any food debris or buildup. These tiny openings can become blocked surprisingly fast from everyday cooking. While you’re at it, check that the igniter looks clean and isn’t coated with grime—a dirty igniter is one of the most common culprits behind lighting problems.
For cleaning, skip the harsh chemical sprays that can damage components and leave residue that affects performance. Instead, create a simple eco-friendly solution using warm water mixed with a few drops of dish soap. For stubborn, baked-on food, make a paste from baking soda and water—it’s gentle yet effective on all stove surfaces. Use an old toothbrush to carefully clean around burner ports without pushing debris further inside. A straightened paperclip works wonders for gently clearing individual port holes.
Weekly wipe-downs prevent buildup from becoming a bigger issue. After cooking, once everything cools down, give surfaces a quick clean to remove spills before they harden. This five-minute habit saves hours of scrubbing later.
Every six months, check the gas connections for any signs of wear or looseness, and ensure proper ventilation around your stove. These simple practices keep your appliance running smoothly while supporting an eco-conscious approach to home maintenance. When your stove works efficiently, it uses less energy and creates that warm, functional heart-of-the-home atmosphere we all cherish.

You’ve taken an important step toward reclaiming the heart of your home. With these troubleshooting techniques in your toolkit, many common gas stove issues are well within your ability to resolve safely and confidently. Remember, there’s genuine satisfaction in understanding how your appliances work and keeping them running smoothly—just as you’d tend to any element that makes your home welcoming and comfortable.
That said, trust your instincts. If you smell gas, encounter problems beyond surface cleaning and simple adjustments, or feel uncertain about any repair, calling a qualified professional is always the right choice. There’s wisdom in knowing your limits, and safety should never be compromised.
A well-maintained gas stove isn’t just an appliance—it’s where you create warmth, nourishment, and cherished memories around the dinner table. By keeping it in top condition, you’re investing in countless cozy evenings and delicious meals to come. Here’s to many more years of trouble-free cooking in your wonderfully warm home.


")