


Inspect your 7-inch wood stove pipe monthly during heating season, checking for creosote buildup that appears as flaky brown residue or glossy black tar—both indicate it’s time for cleaning before dangerous accumulation occurs. Clean the system at least twice annually using a properly sized 7-inch chimney brush, working from the top down in a twisting motion to dislodge deposits, then vacuum thoroughly from the bottom cleanout door to remove all debris.
Check all connection points where pipe sections meet for gaps or loosening, tightening clamps and replacing worn gaskets immediately since even small air leaks reduce heating efficiency by up to 30 percent and create backdraft risks. Replace any sections showing rust perforation, warping, or cracks larger than hairline thickness—compromised pipes cannot safely contain the high temperatures your wood stove generates.
Monitor the exterior pipe temperature during operation; if it feels uncomfortably hot to briefly touch, you’re likely burning wood that’s too wet or creating incomplete combustion that accelerates creosote formation. Your 7-inch system requires specific maintenance attention because its diameter affects draft strength and cleaning technique, making size-appropriate tools and understanding essential for both safety and the efficient, eco-friendly heating performance your home deserves.
What Makes 7-Inch Stove Pipe Different
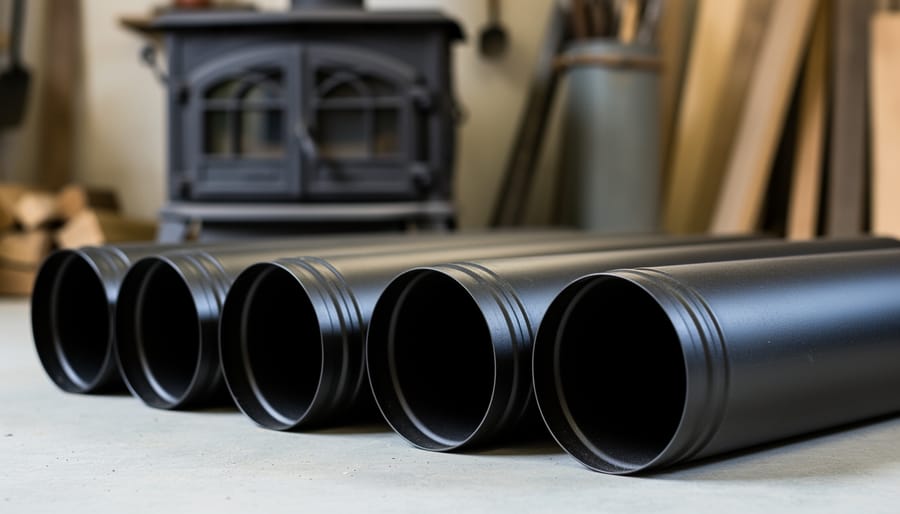
The 7-inch diameter pipe occupies a special place in the wood stove world, serving as the standard connection size for medium to large heating appliances. If you’re living with a wood stove that heats between 1,500 and 3,000 square feet, chances are you’re working with a 7-inch system.
Understanding how wood stoves work helps explain why this particular size matters so much. The diameter of your stove pipe directly relates to your stove’s BTU output and its ability to create proper draft. Think of it like this: a larger stove burning more fuel produces more exhaust gases that need an adequate highway to travel upward and out of your home.
Most wood stoves rated between 60,000 and 100,000 BTUs require a 7-inch pipe. This sizing isn’t arbitrary. It’s carefully calculated to balance several critical factors. Too small a pipe restricts airflow, causing smoke to back up into your living space and reducing your stove’s efficiency. Too large, and the exhaust gases cool too quickly before exiting, weakening the natural draft that keeps your fire burning cleanly.
Proper sizing also impacts your heating costs and environmental footprint. A correctly matched 7-inch system allows your stove to burn fuel completely and efficiently, extracting maximum heat while producing minimal creosote buildup. This means you’ll use less wood throughout the season while enjoying more consistent warmth.
When manufacturers specify a 7-inch outlet on their stoves, they’ve engineered that dimension based on extensive testing. Deviating from this specification by using adapters or mismatched components compromises both safety and performance. Your pipe diameter serves as a fundamental component in creating the balanced system that makes wood heating both effective and eco-friendly.
The Weekly Quick Check That Prevents Disaster
Think of your weekly inspection as a quiet conversation with your heating system—a simple five-minute check that keeps your home safe and your fires burning beautifully throughout the season.
Start your routine while the stove is completely cold, ideally before lighting your first fire of the day. Stand back and visually scan your entire 7-inch pipe system from the stove connection point upward, following it as far as you can see without climbing or stretching dangerously. You’re looking for anything that seems different from last week.
Check the pipe connections where sections meet. They should remain tight and properly aligned—no sagging, no gaps, and no visible movement when you gently examine them from a safe distance. If you notice any black staining or discoloration around joints, that’s your system telling you something needs attention.
Look for creosote buildup visible from the ground level. Through the glass of your stove door, observe whether you’re seeing excessive black, tarry deposits forming. This glossy, dark accumulation is your cue to schedule a cleaning soon, as it indicates your fires may be burning too cool or your wood isn’t properly seasoned.
Inspect the floor protector and surrounding walls for any new discoloration, warping, or heat damage. These subtle changes often reveal clearance issues before they become dangerous.
Finally, use your nose. Any unusual smells—especially smoky odors when the stove isn’t burning—deserve immediate investigation. This simple sensory check catches problems your eyes might miss, keeping your eco-friendly heating solution operating safely all winter long.
Cleaning Your 7-Inch Pipe: The Right Way
How Often Should You Clean?
The frequency of cleaning your 7-inch wood stove pipe depends largely on how you use your heating system and what you’re burning. If you’re burning seasoned hardwoods and maintaining hot, efficient fires, you might get away with annual cleaning. However, those burning softer woods or green wood should inspect their system twice per season, as these create significantly more creosote buildup.
Here’s a simple rule to live by: the quarter-inch creosote rule. If you notice creosote accumulation reaching one-quarter inch thick anywhere in your pipe system, it’s time for an immediate cleaning. This buildup creates a serious fire hazard that shouldn’t wait for your regular maintenance schedule.
Watch for these warning signs that demand immediate attention: reduced draft causing smoke to enter your living space, visible flakes of creosote falling into your stove, difficulty starting or maintaining fires, or a strong, tar-like odor when the stove is operating. These indicators suggest dangerous buildup that could ignite.
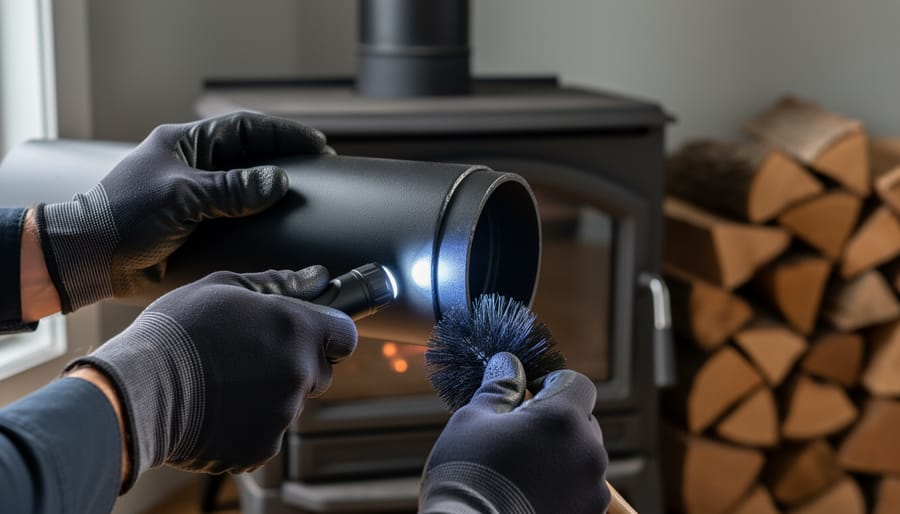
For most homeowners who embrace their wood stove as both an eco-friendly heating solution and lifestyle element, inspecting the pipe monthly during burning season provides peace of mind. Use a flashlight to check for buildup through the cleanout tee. This proactive approach keeps your home safe while maximizing your stove’s efficiency and warmth throughout the colder months.
Tools and Materials You’ll Actually Need
Keeping your 7-inch wood stove pipe clean doesn’t require a garage full of specialized equipment. Here’s what you genuinely need to maintain your system safely and effectively.
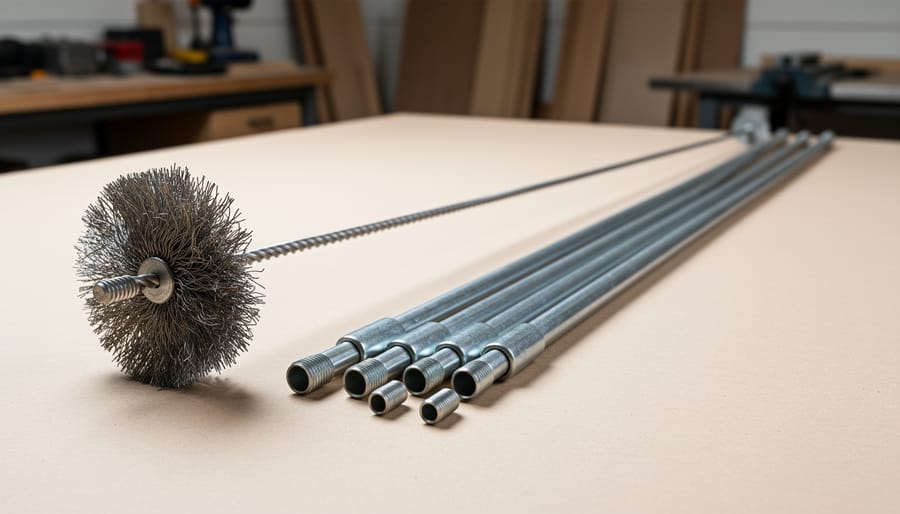
Start with a 7-inch wire chimney brush designed specifically for your pipe diameter. This is non-negotiable – using the wrong size won’t clean properly and could damage your pipe. You’ll also need flexible rods that connect together, allowing you to reach the full length of your chimney from either top or bottom. Plan for at least 15 feet of rod length, though longer systems need more.
For protecting your space, grab a heavy-duty drop cloth or old sheets to cover your floor and furniture near the stove. A quality shop vacuum with a fine dust filter makes cleanup considerably easier than a household vacuum.
Safety equipment matters: wear a dust mask or respirator to avoid breathing creosote particles, safety goggles to protect your eyes, and work gloves for handling sooty materials. Keep a sturdy ladder on hand if you’re cleaning from the rooftop.
Finally, have a bucket ready for collecting debris and a flashlight for inspecting the pipe interior. That’s really all you need – no fancy gadgets required, just the right-sized tools and common-sense safety gear.
Step-by-Step Cleaning Process
Before diving into your 7-inch stove pipe cleaning project, let’s walk through the process step-by-step to ensure you tackle this essential maintenance task safely and effectively. Think of this as your friendly guide to keeping that chimney working beautifully while protecting your home.
Start with thorough preparation. Choose a clear, calm day without wind, and gather all your supplies: brushes specifically sized for 7-inch pipes, drop cloths, a vacuum with HEPA filter, ladder (for top-down approach), safety goggles, gloves, and a dust mask. Cover your floors and furniture generously with drop cloths, extending at least 10 feet around the stove area. Seal off the room with plastic sheeting if possible to contain dust.
For the top-down method, secure your ladder and ensure the roof surface is completely dry. Carefully remove the chimney cap and attach your 7-inch brush to flexible rods. Work the brush down through the pipe using steady, controlled strokes, adding rod sections as you go deeper. This approach lets gravity work with you, allowing creosote and debris to fall down naturally.
The bottom-up approach works well when roof access is challenging. After cleaning your wood stove and removing the pipe section nearest the stove, work your brush upward through the system. This method contains mess better but requires more physical effort pushing against gravity.
Regardless of your chosen method, wait at least 30 minutes after brushing before cleanup to let dust settle. Vacuum thoroughly using your HEPA filter to capture fine particles, then dispose of creosote debris according to local regulations. This eco-friendly approach to maintenance ensures your heating system runs efficiently all season long.
Spotting Trouble Before It Becomes Dangerous
Your 7-inch wood stove pipe system will give you plenty of warning signs when trouble is brewing, and learning to recognize these early indicators can save you from dangerous situations down the road. Think of it as your heating system’s way of asking for help before things get serious.
Creosote buildup is public enemy number one for wood stove owners, and it has a distinctive appearance you’ll want to recognize. Run your hand along the inside of a disconnected pipe section (when the stove is completely cold, of course). Fresh creosote feels flaky and somewhat crispy, like burnt cornflakes. As it progresses, it becomes tar-like and sticky. The really dangerous stage looks shiny and hardened, almost like black glass. In 7-inch systems, you’ll typically see heavier accumulation along the top section of the pipe where temperatures drop. If you notice more than an eighth of an inch buildup anywhere, it’s cleaning time.
Corrosion often starts where you least expect it. Check the bottom sections of your pipe where condensation tends to collect. Look for rust spots, particularly around seams and joints. Small rust patches might seem harmless, but they indicate moisture problems that will only worsen. White or gray staining on the exterior suggests acidic condensation is eating through from the inside, often caused by burning wet wood or inadequate temperatures related to proper air control.
Seal failures show up as black soot stains around pipe joints or the collar where your pipe connects to the stove. Even tiny gaps can leak smoke and dangerous gases into your living space. Give each connection a gentle wiggle during your inspection. Any movement means the connection needs tightening or the gasket needs replacement.
Draft problems announce themselves clearly. Smoke puffing back into your room, difficulty starting fires, or a fire that won’t stay lit all point to draft issues. Sometimes the problem is external blockage, but often it’s internal buildup restricting that 7-inch diameter your system depends on for proper airflow.

Seals, Joints, and Connections: The Weak Points
Every wood stove system is only as strong as its weakest point, and with 7-inch pipe installations, those vulnerable spots are typically found where sections meet. Think of your stove pipe connections as the gatekeepers of your home’s safety – when they fail, dangerous smoke and gases can escape into your living space rather than venting safely outdoors.
The connection points between your 7-inch pipe sections deserve regular attention, ideally during your annual cleaning routine. Over time, the high-temperature sealant that creates an airtight seal can deteriorate from repeated heating and cooling cycles. Check each joint carefully, looking for any gaps, cracks, or separated areas. If you spot damage, removing the old sealant and applying fresh high-temperature sealant rated for at least 2000 degrees Fahrenheit is essential for maintaining safe operation.
The collar connection where your pipe meets the stove itself requires special care. This junction experiences the most extreme temperatures in your entire system. Gaskets at this point can compress and harden over seasons of use. If you notice smoke leaking from this area during operation, replacing the gasket is likely your solution. Make sure you’re using gaskets specifically designed for 7-inch diameter applications to ensure a proper fit.
Don’t overlook penetration points where your pipe passes through ceilings or walls. These areas need secure, properly installed thimbles or pass-through kits that maintain required clearances from combustible materials. The connections here should remain stable and tight – any shifting or looseness indicates a problem requiring immediate attention.
Taking time to inspect and maintain these critical connection points transforms your wood stove from a potential hazard into a reliable, eco-friendly heating solution that keeps your home warm and your family safe throughout countless cozy winter evenings.
When to Replace vs. Repair Your Pipe
Knowing when to repair versus replace your 7-inch wood stove pipe is crucial for both safety and your budget. While it’s tempting to patch things up and save money, some damage simply can’t be fixed safely.
Terminal damage includes visible rust holes, seams that have separated, metal that crumbles when touched, or sections that no longer fit together securely. If you notice daylight peeking through your pipe connections or see significant warping, it’s time for replacement, not repair. Safety should always trump cost concerns—a compromised pipe can leak dangerous carbon monoxide into your living space or, worse, spark a house fire.
Consider the age of your system too. Most quality stovepipe lasts 10-15 years with proper care, but high-use systems may need replacement sooner. If you’re constantly patching and repairing different sections, you’re likely throwing good money after bad. Add up those repair costs over a season, and you’ll often find that replacement makes better financial sense.
The cost-benefit calculation becomes clearer when you factor in efficiency. Damaged pipes leak heat and reduce draft, making your stove work harder and burn more wood. A new pipe system pays for itself through improved heating efficiency and reduced wood consumption, while giving you peace of mind about your family’s safety.
When in doubt, have a certified chimney professional inspect your system. They can spot problems you might miss and give you an honest assessment of whether repair or replacement is the safer, smarter choice for your home’s heating needs.
Maintenance That Actually Improves Efficiency
Regular maintenance of your 7-inch wood stove pipe isn’t just about safety—it’s your ticket to a more efficient, eco-friendly heating system that puts money back in your pocket. When creosote builds up inside your pipe, it acts like insulation in all the wrong ways, blocking heat from escaping properly and forcing your stove to work harder. A clean pipe means better draft, which translates to hotter, cleaner burns that consume less wood while producing more warmth.
Think of it this way: homeowners who maintain clean pipes typically use 15-20% less firewood per season compared to those who neglect this crucial task. That’s real savings you can feel in your wallet and your woodpile. Clean pipes also reduce smoke output and particulate emissions, making your heating practice genuinely better for the environment. When your system runs efficiently, you’ll notice the difference immediately—fires start easier, burn steadier, and improve heat circulation throughout your home.
The beauty of proper maintenance is that it creates a positive cycle: efficient burns produce less creosote, which means your pipe stays cleaner longer, which keeps your system running at peak performance. You’re not just maintaining a heating system; you’re investing in sustainable, cost-effective home comfort.
Maintaining your 7-inch wood stove pipe doesn’t have to be a daunting task. When you establish a regular seasonal routine, you’ll find that keeping your system clean and safe becomes second nature. Just a few hours of attention each year, split between fall preparation and spring wrap-up, can deliver tremendous peace of mind and noticeable performance improvements. You’ll enjoy more consistent heat, cleaner burns, and the confidence that your family is protected from potential hazards.
Think of stove pipe maintenance as an investment in both your home’s comfort and your heating system’s longevity. Regular inspections help you catch small issues before they become expensive problems, while proper cleaning ensures your wood stove operates at peak efficiency, reducing fuel costs and environmental impact.
Set reminders on your calendar for those seasonal check-ups, and don’t hesitate to reach out for professional wood stove service when you spot concerning creosote buildup, structural damage, or simply want expert verification that everything’s working properly. Your warm, cozy home is worth that commitment.

")