


Assess whether your installation qualifies as DIY-friendly before purchasing any materials. Direct-vent gas fireplaces with existing gas lines and exterior wall access typically allow handy homeowners to handle cosmetic elements like surround installation and finishing work, while a licensed professional must connect gas lines, test for leaks, and verify proper venting. This division keeps you safe while potentially saving $1,500-$3,000 in labor costs on tasks you can legally and safely complete yourself.
Secure permits and schedule inspections before breaking ground. Most municipalities require permits for gas appliance installations, with inspections needed after gas line work and again upon completion. Skipping this step risks failed home inspections during future sales, voided manufacturer warranties, and potential insurance claim denials if problems arise. Contact your local building department early, as permit approval can take 2-4 weeks in some areas.
Choose your fireplace type based on your home’s existing infrastructure and your heating priorities. Direct-vent models work best for exterior walls and provide excellent energy efficiency by drawing combustion air from outside, making them ideal for tight, well-insulated homes. Vent-free options offer placement flexibility anywhere with gas access but require adequate room ventilation and aren’t permitted in all states. Natural vent fireplaces need existing chimneys and work well for those prioritizing ambiance over heating efficiency.
Calculate total project costs including professional services you cannot skip. Beyond the $1,200-$5,500 fireplace unit, budget $500-$2,000 for gas line installation or extension, $200-$800 for permits and inspections, $300-$1,500 for venting materials, and $800-$3,000 for professional installation if you’re not handling DIY elements. Understanding these numbers upfront prevents mid-project budget surprises and helps you evaluate contractor quotes accurately.
Before You Start: Understanding Gas Fireplace Types and Your Home
Which Gas Fireplace Type Fits Your Space?
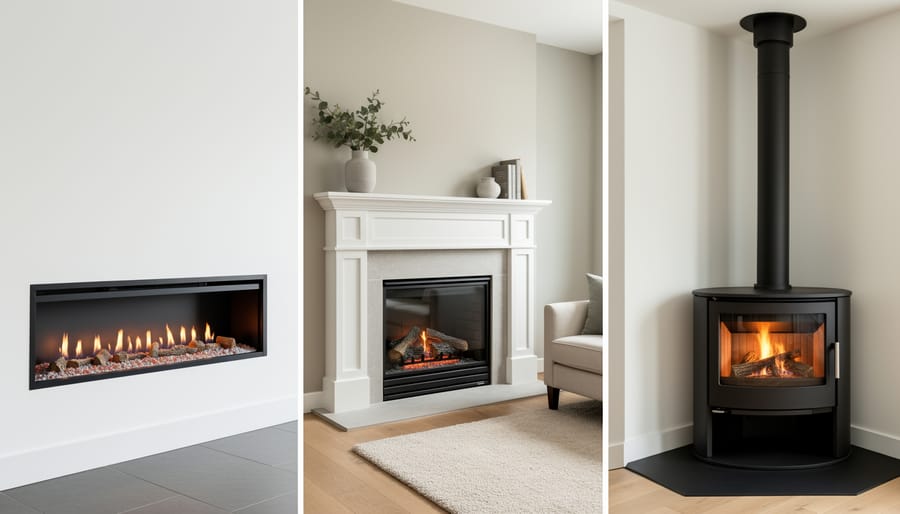
Choosing the right gas fireplace type is like finding the perfect piece of furniture for your room—it needs to fit both your space and lifestyle. Let’s explore three popular options to help you make the best decision.
Gas fireplace inserts slide directly into your existing wood-burning fireplace, transforming it into an efficient heating solution. They’re ideal if you already have a traditional fireplace but want cleaner, more convenient warmth. The pros? You’re working with existing fireplace components and structure, which typically means lower installation costs and less construction work. However, you’re limited by your current fireplace dimensions, and some older chimneys may need liner upgrades.
Built-in units offer maximum flexibility and create that stunning focal point you’ve always dreamed of. These are installed directly into your wall, allowing you to design the perfect surround and mantel to match your home’s aesthetic. They provide excellent heat output and can be vented through exterior walls. The trade-off? Expect higher installation costs and more extensive construction, especially if you’re starting from scratch.
Freestanding gas fireplaces, also called stoves, bring vintage charm with modern efficiency. They require minimal installation, need only wall venting, and can be positioned almost anywhere in your room. They’re wonderful space-savers and often the most budget-friendly option. The downside is they won’t have that seamless, built-in appearance some homeowners prefer, and they do occupy floor space.
Consider your budget, existing structure, and design vision when making your choice.
Assessing Your Home’s Gas Line and Ventilation
Before diving into installation, you’ll need to evaluate whether your home can accommodate a gas fireplace. Start by having a licensed professional inspect your existing gas line to determine its capacity. Most gas fireplaces require a 1/2-inch gas line, though larger models may need 3/4-inch piping. Your technician will check the gas meter size and calculate whether it can handle the additional BTU load from your new fireplace while maintaining adequate pressure for other appliances.
Ventilation is equally crucial for both safety and efficiency. You have three main options: direct-vent systems that draw air from outside and exhaust combustion gases through an exterior wall, vent-free models that require excellent room ventilation, and traditional chimney venting. Direct-vent fireplaces are the most popular eco-friendly choice because they’re highly efficient and don’t pull heated air from your home. The relationship between gas fireplaces and chimneys varies by model, so understanding your options helps you choose the right system for your space. Consider factors like exterior wall access, ceiling height, and local building codes when making your decision.
Permits, Codes, and When You Actually Need a Professional
Let’s be straightforward here: installing a gas fireplace isn’t like hanging a picture frame. This is serious business that involves natural gas or propane, and the law has plenty to say about who can do what.
In virtually every jurisdiction across North America, you’ll need permits for gas fireplace installation. Your local building department wants to ensure your installation meets safety standards, and honestly, that’s a good thing. The permit process typically involves submitting plans, scheduling inspections during and after installation, and receiving approval before you light that first fire. Skipping permits isn’t just illegal—it can void your homeowner’s insurance and create liability nightmares if something goes wrong.
Here’s where you need a licensed professional, no exceptions: Any work involving gas lines must be performed by a licensed gas fitter or plumber. This includes running new gas lines, making connections, and pressure testing the system. Similarly, if your fireplace requires electrical work beyond plugging into an existing outlet, you’ll need a licensed electrician. These aren’t suggestions—they’re legal requirements in most areas, and attempting this work yourself could result in fines, insurance complications, or dangerous situations.
You’ll also want professionals handling venting system installation. While some experienced DIYers might manage certain aspects, improper venting can lead to carbon monoxide buildup, a silent killer that gives no second chances. The surround code requirements also specify clearances and materials that must meet local fire codes.
What can you potentially handle yourself? Finishing work like installing mantels, decorative surrounds, and interior trim—assuming they meet code requirements. You might also manage the research, planning, and coordination between professionals.
Think of professional installation not as an expense but as an investment in your family’s safety and your home’s value. A properly installed gas fireplace becomes a beautiful, eco-friendly heating solution that enhances your lifestyle for decades. Cut corners now, and you’re compromising everything that makes a fireplace worthwhile.
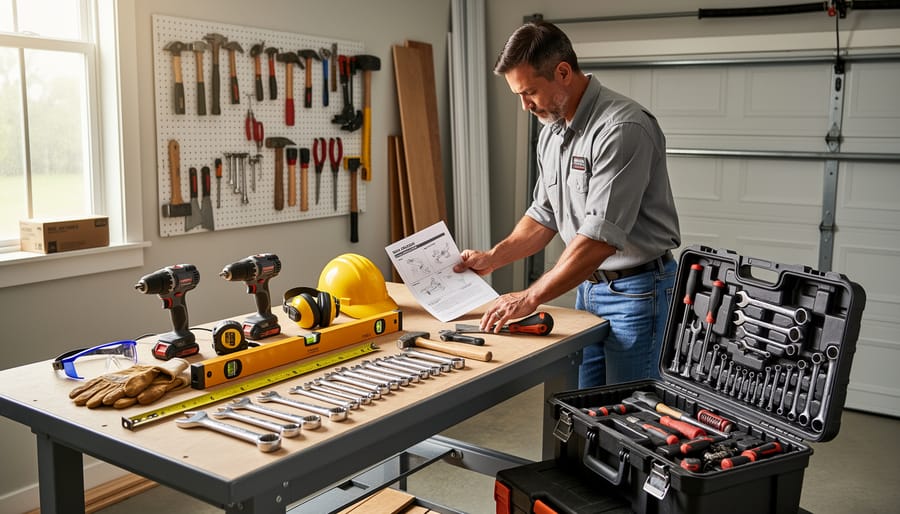
Tools and Materials You’ll Need
Before you begin your gas fireplace installation journey, gathering the right tools and materials will make the process smoother and safer. Think of this as setting yourself up for success, whether you’re tackling certain phases yourself or simply want to understand what your contractor needs.
For the initial assessment and preparation phase, you’ll need a stud finder ($20-40), measuring tape ($10-15), and a level ($15-30). These help you locate framing and ensure proper positioning. A flashlight or headlamp ($15-25) is essential for inspecting tight spaces and existing venting systems.
When it comes to the actual installation, professional-grade equipment becomes necessary. Most homeowners will hire a licensed technician for this phase, but here’s what’s involved: pipe wrenches and adjustable wrenches ($40-80), a drill with masonry bits if working with brick or concrete ($80-150), tin snips for cutting vent pipes ($15-25), and screwdrivers of various sizes ($20-40). You’ll also need caulking guns and high-temperature sealant ($15-30).
Safety equipment is non-negotiable and represents an investment in your wellbeing. A carbon monoxide detector with digital display ($30-50) should be installed nearby, work gloves rated for handling metal ($10-20), safety glasses ($10-15), and a fire extinguisher rated for gas fires ($40-75) are absolute essentials.
Material costs vary based on your fireplace model and venting requirements. Budget for the gas fireplace unit itself ($1,500-5,000), venting materials including pipes and caps ($300-800), gas line supplies ($100-300), and finishing materials like trim and facing ($200-600). A gas pressure gauge ($40-80) helps verify proper installation.
Remember, this list covers standard installations. Your specific situation may require additional specialized equipment, particularly for direct-vent or zero-clearance models.
Step-by-Step Installation Process
Preparing the Installation Site
Before diving into the installation, creating a properly prepared space is essential for both safety and optimal performance of your gas fireplace. This crucial step sets the foundation for a successful installation and ensures your new focal point will function beautifully for years to come.
Start by carefully measuring your installation area. Gas fireplaces require specific clearances from combustible materials, typically ranging from 6 to 12 inches on the sides and top, though your specific model’s manual will provide exact requirements. Mark these clearance zones clearly on your wall using painter’s tape, giving yourself a visual guide throughout the process.
Next, protect your flooring with drop cloths or cardboard, especially if you’re working with an existing fireplace opening that might release dust and debris during preparation. Your floors are part of your home’s warmth and character, so keeping them safe is worth the extra effort.
If you’re installing into an existing masonry fireplace, you’ll need to ensure the chimney is properly lined or prepared for direct venting. Clean out any ash, debris, or old damper components. For new wall installations, locate and mark studs where you’ll anchor the unit, and verify there’s adequate space behind the wall for venting components.
Check that the area provides proper access to your gas supply line and electrical outlet if required. While a professional will handle the actual gas connections, having these utilities nearby simplifies the installation. Remember, this eco-friendly heating solution deserves a well-prepared home that maximizes both efficiency and safety.
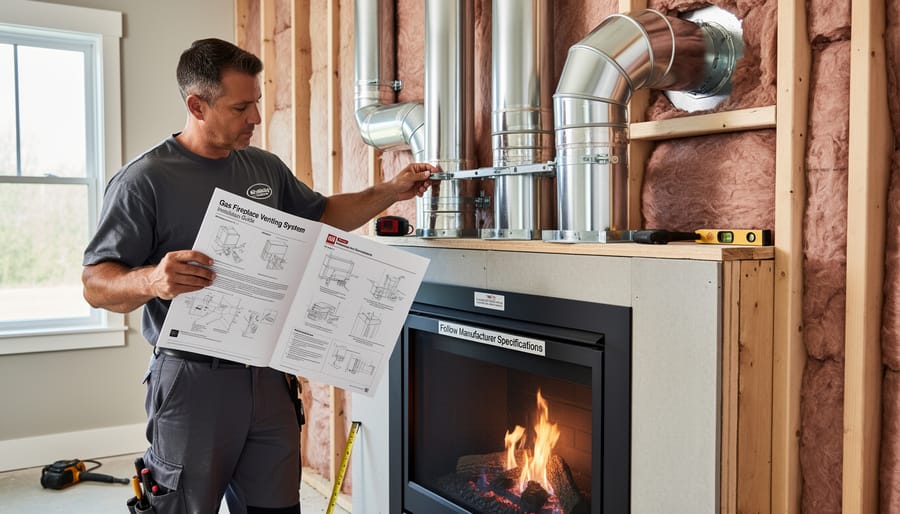
Installing the Venting System
Installing your venting system correctly is absolutely essential for both safety and efficiency. The good news? With careful attention to detail and following manufacturer specifications, this crucial step becomes manageable.
First, determine which venting type your gas fireplace requires. Direct vent systems are the most popular choice for their efficiency and flexibility. These units draw combustion air from outside while expelling exhaust gases through a sealed system, meaning they won’t affect your indoor air quality. Direct vent pipes typically consist of a coaxial design with an inner exhaust pipe surrounded by an outer intake pipe. You’ll need to route this from your fireplace through an exterior wall or up through your roof, depending on your home’s layout.
Begin by marking your vent termination point on the exterior wall, ensuring it meets clearance requirements from windows, doors, and air intakes. Most codes require at least 12 inches from windows and 9 inches above grade. Cut the opening carefully, following the template provided with your fireplace kit.
Assemble the venting components according to manufacturer instructions, applying high-temperature silicone sealant to all joints. This creates an airtight seal that prevents dangerous gases from entering your home. Secure each section with the provided screws or locking bands, working from the fireplace outward. When installing through a wall, ensure the pipe maintains proper slope for condensation drainage.
For vertical installations requiring proper B-vent ventilation, you’ll need additional support straps every 4-6 feet and proper roof flashing to prevent leaks.
Vent-free models skip the venting altogether but require adequate room ventilation and oxygen depletion sensors. While they’re simpler to install, consider that they release all combustion byproducts into your living space, making them less eco-friendly than vented alternatives.
Always seal penetrations with fire-rated caulk and install the exterior termination cap securely to prevent weather infiltration and pest entry.
Positioning and Securing Your Gas Fireplace
Proper positioning sets the foundation for a safe, efficient fireplace that becomes a cherished focal point in your home. Before moving your unit into place, double-check the manufacturer’s clearance specifications, which typically require 6 to 12 inches from combustible materials like wood framing, furniture, or cabinetry. These aren’t suggestions but critical safety requirements that prevent heat buildup and potential fire hazards.
Position your fireplace where you’ve planned, ensuring adequate ventilation access and gas line proximity. Using a quality level, check both side-to-side and front-to-back positioning. An unlevel fireplace not only looks unprofessional but can affect proper venting and create operational issues. Most units include adjustable feet or shims to achieve perfect leveling on uneven floors.
Once level, secure the unit according to manufacturer instructions. Many models require anchoring to wall studs using brackets provided with your fireplace. This step prevents tipping and ensures the unit stays properly aligned with your venting system. Use a stud finder to locate solid anchoring points, and don’t skimp on hardware quality.
Create a clear zone around your fireplace by maintaining proper clearances from curtains, mantels, and decorative items. This not only satisfies building codes but enhances safety for your family. Remember, your fireplace is an investment in your home’s comfort and ambiance, so taking time to position it correctly ensures years of cozy, worry-free enjoyment. If you’re uncertain about clearances or anchoring requirements, consulting with a professional prevents costly mistakes and potential safety issues down the road.
Connecting the Gas Line (With Professional Help)
Connecting your gas fireplace to your home’s gas supply is the most critical step in the installation process, and here’s why it absolutely requires a licensed professional. Gas line work involves precise measurements, proper fitting connections, and thorough leak testing to ensure your family’s safety. A certified gas technician will connect the fireplace to your existing gas line or run a new line from your meter if needed, ensuring all connections meet local building codes and manufacturer specifications.
During the connection process, the technician will install a dedicated shut-off valve near the fireplace for easy access during maintenance or emergencies. They’ll also pressure-test all connections using specialized equipment to detect even the smallest leaks, then verify proper gas flow and pressure levels for optimal fireplace performance.
To prepare for the professional’s arrival, clear a path from your gas meter to the fireplace location and remove any obstacles from the work area. Have your fireplace model number and installation manual readily available, as these contain crucial specifications the technician will need. Confirm that you’ve obtained all necessary permits beforehand, as most municipalities require inspection of gas line work before approving the installation. This professional touch not only guarantees safe operation but also protects your home insurance coverage and validates manufacturer warranties.
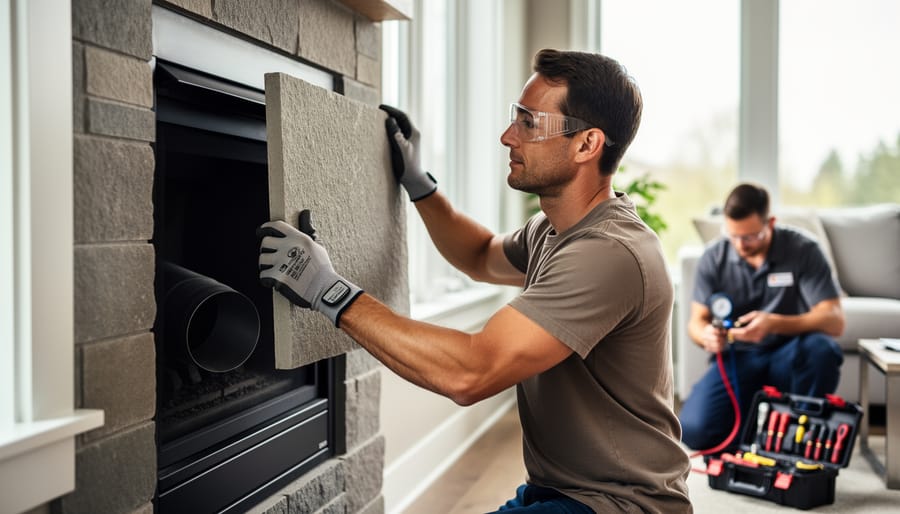
Finishing Touches and Surround Installation
Now comes the fun part where your fireplace truly becomes a lifestyle centerpiece. Installing mantels, surrounds, and facing materials transforms your functional unit into a stunning focal point, but safety clearances remain non-negotiable.
Before selecting materials, consult your fireplace manual for minimum clearance requirements. Combustible materials like wood mantels typically need 6-12 inches of space from the firebox opening, while non-combustible stone or tile can be installed closer. These aren’t suggestions, they’re essential safety guidelines.
When installing your surround, use a level and secure mounting brackets designed for your chosen material’s weight. Stone and tile surrounds require heat-resistant mortar and proper substrate backing. For mantels, locate wall studs and use appropriate anchors, ensuring they can support decorative items you’ll display.
Consider eco-friendly facing options like reclaimed wood (properly treated and installed at safe distances), natural stone, or sustainable ceramic tiles. These materials add character while supporting environmentally conscious design choices.
If you’re uncomfortable with masonry work or precise carpentry, this is an excellent time to bring in a professional. The installation itself might seem straightforward, but mistakes here affect both safety and aesthetics for years to come.
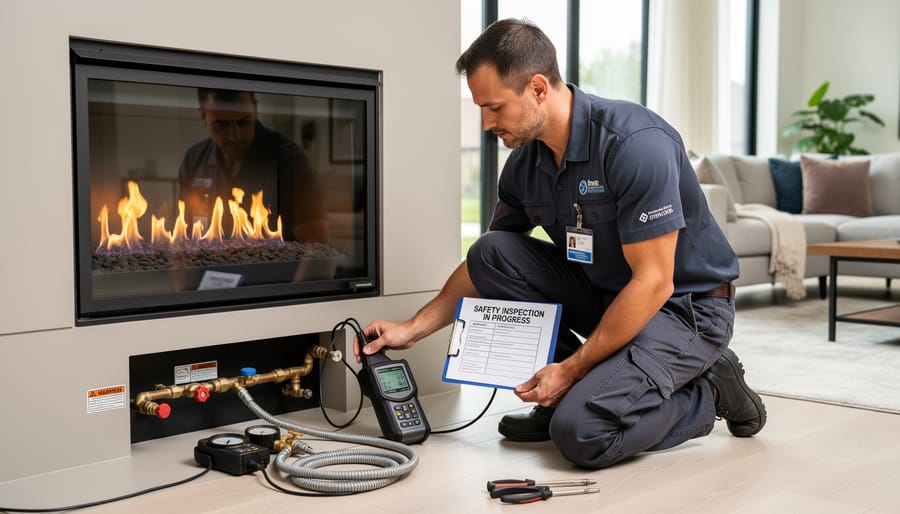
Safety Testing and System Checks
Once your gas fireplace is installed, safety testing becomes the most critical step before you can cozy up and enjoy those dancing flames. This isn’t the time to rush through—proper testing protects your home and family.
Start with a thorough leak test, which absolutely requires professional attention. A certified technician will use specialized equipment to detect even the smallest gas leaks at every connection point. They’ll check the main gas line, the gas fireplace safety valve, and all fittings. Never assume connections are secure without professional verification—gas leaks pose serious risks including fire hazards and carbon monoxide poisoning.
Next comes ventilation verification. Your technician will ensure proper draft and confirm that combustion gases exit safely through the venting system. They’ll check for blockages and verify that fresh air intake is adequate. This step is essential for maintaining healthy indoor air quality and preventing dangerous fume buildup.
The pilot light test comes next. Your installer will demonstrate proper lighting procedures and ensure the pilot stays lit consistently. They’ll adjust the flame height and verify that the thermocouple or thermopile functions correctly, shutting off gas flow if the flame extinguishes unexpectedly.
Plan for an initial burn-in period during the first few uses. You might notice a slight odor as manufacturing oils burn off—this is normal and temporary. Keep windows slightly open during these first burns.
Before the technician leaves, request a complete walkthrough of all safety features and operating procedures. Ask questions about maintenance schedules and emergency shutdown procedures. Remember, while some homeowners handle basic installation tasks, final safety testing and system commissioning should always involve a licensed professional. This investment in professional inspection provides peace of mind and ensures your fireplace operates safely for years to come.
Common Installation Mistakes That Could Cost You
Even seasoned DIY enthusiasts can stumble when installing a gas fireplace, and some mistakes carry serious consequences. Understanding these common pitfalls will help you stay safe and avoid costly repairs down the road.
One of the most frequent errors involves improper venting. Some homeowners assume all gas fireplaces vent the same way, but direct-vent, B-vent, and vent-free models each have specific requirements. Installing the wrong venting system or positioning the termination cap too close to windows, doors, or air intake vents creates dangerous carbon monoxide risks. Always follow the manufacturer’s venting specifications exactly—this isn’t an area for improvisation.
Clearance violations represent another critical mistake. That beautiful fireplace might look perfect against your wood-paneled wall, but combustible materials need proper spacing. Many DIYers underestimate required clearances for mantels, cabinetry, and wall surfaces. Check your model’s clearance specifications before finalizing placement, as these requirements vary significantly between units.
Gas line sizing errors frequently plague DIY installations. Using undersized pipes restricts fuel flow, causing inefficient operation and potential safety hazards. Your existing gas line may not provide adequate pressure for an additional appliance, especially if you’re running a long distance from the meter. This is where professional assessment becomes invaluable.
Finally, skipping the permit process might seem like a time-saver, but it’s a gamble with serious implications. Unpermitted work can void warranties, complicate home sales, and leave you liable for damages. Permits exist to ensure inspections catch problems before they become disasters. Taking shortcuts on paperwork isn’t worth risking your family’s safety or your home’s value.
Eco-Friendly Considerations for Your Gas Fireplace
When choosing and installing a gas fireplace, making environmentally conscious decisions can significantly reduce your home’s carbon footprint while keeping your energy bills manageable. Gas fireplaces are already more efficient than traditional wood-burning options, but there’s still room to maximize their eco-friendly potential.
Start by looking at efficiency ratings. Modern gas fireplaces typically display an Annual Fuel Utilization Efficiency (AFUE) rating, which tells you how much fuel converts directly to heat. Look for models with ratings above 70 percent, with some high-efficiency units reaching 85 percent or higher. Direct-vent models generally offer better efficiency than ventless options while maintaining excellent indoor air quality.
Proper installation plays a crucial role in efficiency. Even the most efficient fireplace loses its advantage if installed incorrectly. Ensure your venting system is properly sealed to prevent heat loss and that the unit sits in a location where it can effectively distribute warmth throughout your living space. Poor installation can waste up to 30 percent of the heat your fireplace generates.
Compared to other heating options, gas fireplaces strike an impressive balance. They produce fewer emissions than wood-burning fireplaces and offer more ambiance than electric heating. While not quite as clean as electric heat powered by renewable sources, they’re considerably more efficient than oil furnaces and create less particulate matter than wood smoke, making them a responsible middle-ground choice for homeowners seeking both warmth and atmosphere with environmental mindfulness.
Maintenance Schedule to Keep Your Fireplace Safe and Efficient
Once your beautiful gas fireplace is up and running, a consistent maintenance schedule will keep it performing safely and efficiently for years to come. Think of it as caring for any important investment in your home’s comfort and ambiance.
Schedule a professional inspection annually, ideally before the heating season begins. A certified technician will check gas connections, test the pilot light and ignition system, inspect the venting for blockages, and ensure carbon monoxide levels remain safe. This expert oversight is essential and not something to skip or attempt on your own.
Between professional visits, you can handle several maintenance tasks yourself. Clean the glass doors monthly during regular use with a specialized fireplace glass cleaner to maintain that warm, welcoming glow. Gently vacuum or dust the logs and burner area when the unit is completely cool to prevent buildup that can affect flame appearance and efficiency. Check that vents remain unobstructed, both inside and outside your home.
Keep an eye out for warning signs like unusual odors, yellow flames instead of blue, soot accumulation, or strange noises. These indicate it’s time to call a professional immediately. Remember, proper maintenance not only ensures safety but also keeps your fireplace running as an eco-friendly heating solution, maximizing efficiency while minimizing energy waste and emissions.
Installing a gas fireplace represents a wonderful opportunity to enhance both the comfort and character of your home. While we’ve explored the various steps involved, the most important takeaway is this: know your limits and never compromise on safety. Yes, some tasks like site preparation, finishing work, and basic maintenance fall comfortably within DIY territory. But the technical aspects—gas line installation, venting, and final connections—belong firmly in the hands of licensed professionals.
Think of it this way: your gas fireplace isn’t just a heating appliance. It’s a lifestyle investment that will anchor countless family gatherings, quiet evenings with a good book, and energy-efficient warmth for years to come. Cutting corners on professional installation might save money today, but it risks your family’s safety and could cost far more down the road in repairs, voided warranties, or worse.
Your next steps are straightforward: obtain necessary permits, gather quotes from certified installers, and if you’re tackling DIY elements, create a realistic timeline. Ask plenty of questions, verify credentials, and ensure your installer understands both local codes and manufacturer requirements.
Remember, a properly installed gas fireplace offers eco-friendly heating that reduces your carbon footprint while creating the warm ambiance that makes a house truly feel like home. Take the time to do it right, and you’ll enjoy the rewards for decades.
")