


Review manufacturer schematics before any installation conversation begins—these technical blueprints show precise clearance requirements, venting configurations, and gas line specifications that determine whether your chosen fireplace fits your space. Understanding these diagrams transforms you from passive homeowner to informed collaborator when working with installers.
Locate the venting system illustration first, as this single element dictates feasibility more than any other factor. Direct-vent systems require two pipes (one for combustion air intake, one for exhaust), while vent-free models eliminate exterior penetrations entirely but demand strict room volume calculations. The diagram reveals whether your exterior wall allows proper termination or if complex horizontal runs become necessary.
Identify gas supply requirements by examining the BTU rating and pipe sizing charts included in most diagrams. Your existing gas line may need upgrading from half-inch to three-quarter-inch diameter depending on fireplace demand and distance from the meter. These specifications prevent the frustrating scenario where installation day arrives but your home’s infrastructure cannot support the unit.
Study clearance measurements showing minimum distances from combustible materials—typically 6 to 12 inches from side walls and specific spacing above mantels. These aren’t suggestions but code-mandated safety requirements that protect your home and family. Measure your intended location against these parameters before purchasing equipment.
Installation diagrams serve as your roadmap to realistic expectations, accurate quotes, and confident decision-making. They bridge the gap between your vision of a warm, inviting living space and the technical realities that make it possible, ensuring your fireplace project proceeds smoothly from concept to that first cozy evening by the flames.
Why Your Installation Diagram Matters More Than You Think
You might be tempted to gloss over your gas fireplace installation diagram, thinking it’s just paperwork for the professionals. But here’s the thing: understanding this document can save you thousands of dollars and prevent serious safety hazards down the road.
Think of your installation diagram as a roadmap for creating the warm, inviting hearth you’ve been dreaming about. When you take time to review it carefully, you’re positioning yourself to catch potential problems before they become expensive nightmares. Maybe your contractor suggests a venting route that conflicts with structural elements, or perhaps the proposed placement doesn’t account for furniture clearances. Spotting these issues early means adjustments happen on paper, not after walls are opened up.
Beyond cost savings, your diagram empowers you to make truly informed decisions about your fireplace’s placement and venting configuration. You’ll understand why certain locations work better than others, how venting impacts both efficiency and your home’s aesthetic, and what trade-offs might exist between convenience and performance. This knowledge transforms you from a passive homeowner into an engaged partner in the process.
Communication improves dramatically when you speak the same language as your installer. Walking through the diagram together ensures everyone shares the same vision, reducing misunderstandings and installation delays. You’ll ask better questions and receive more meaningful answers.
Most importantly, understanding your diagram gives you peace of mind. Gas fireplaces bring wonderful warmth and ambiance to your home, but they require proper installation for safe operation. When you grasp what’s happening behind the scenes, you’re not just trusting blindly. You’re confidently creating an eco-friendly heating solution that your family will enjoy for years, knowing it was done right from the start.
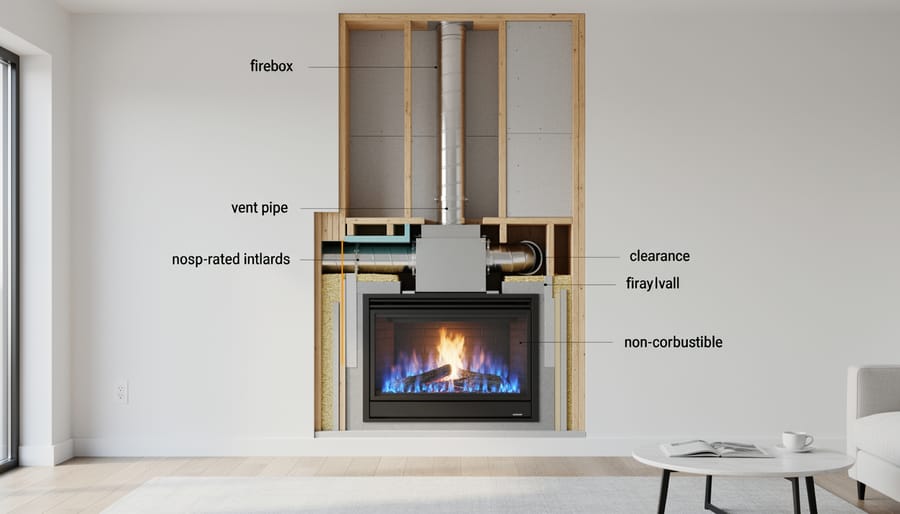
Breaking Down the Basic Components in Every Gas Fireplace Diagram
The Firebox and Surround
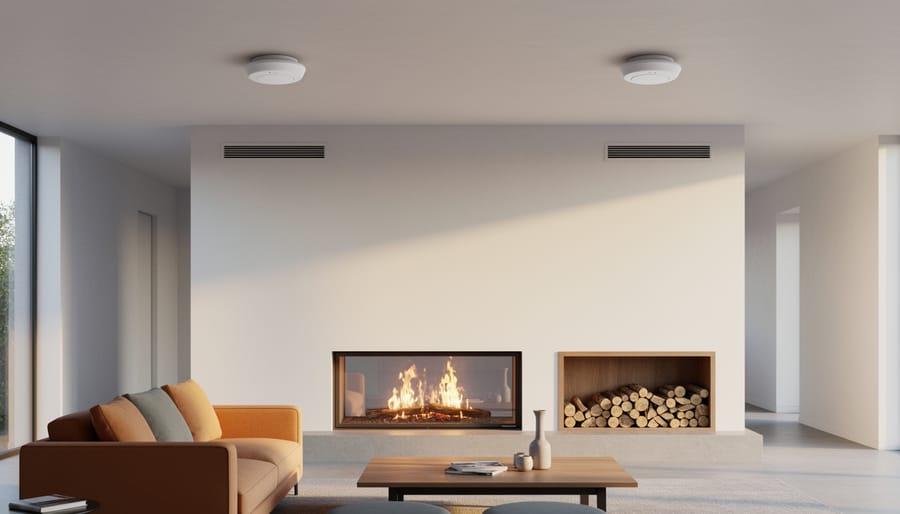
The heart of any gas fireplace installation diagram is the firebox and surround illustration, which shows you exactly what you’re bringing into your home. This section depicts the main viewing unit where flames dance and warmth radiates into your living space. Think of it as the centerpiece that transforms a wall into a cozy focal point.
Your diagram will clearly mark the firebox dimensions and the surround materials, but what’s equally important are the clearance measurements shown around these elements. These aren’t arbitrary numbers – they’re critical safety specifications that keep combustible materials like wood framing, drywall, and mantels at safe distances from heat sources. You’ll typically see measurements indicating minimum distances above, beside, and below the unit.
Pay special attention to how the diagram illustrates different zones around the firebox. Some areas can handle decorative surrounds made from tile or stone, while others require maintaining open space. These clearances ensure your fireplace operates safely and efficiently, preventing heat buildup that could damage your home’s structure or nearby furnishings.
Understanding these clearance requirements early helps you plan your fireplace’s aesthetic integration while maintaining safety standards. When you meet with your installation professional, you’ll be able to discuss surround options confidently, knowing exactly what space you’re working within.
Venting Systems: Direct Vent, B-Vent, and Vent-Free
When reviewing your gas fireplace installation diagram, understanding the venting system is crucial because it directly impacts both safety and placement options. Think of venting as your fireplace’s breathing system—it needs the right setup to function safely and efficiently.
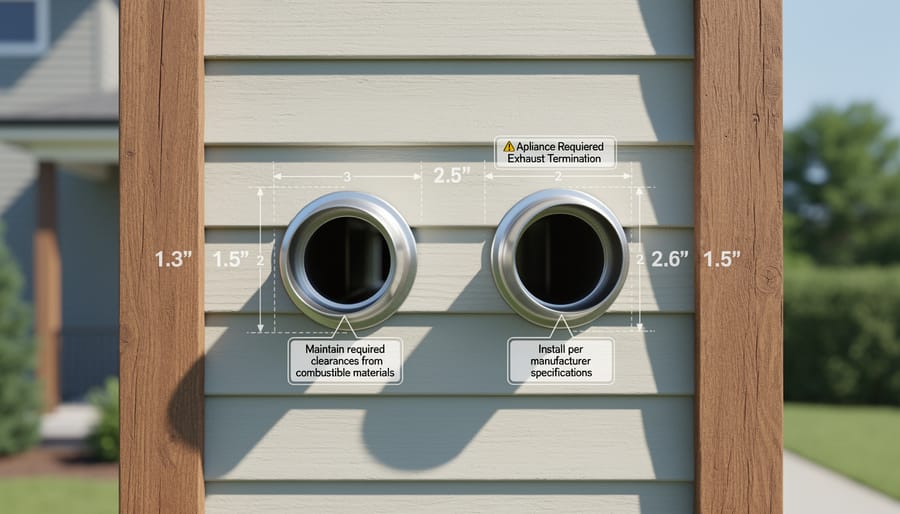
Direct vent systems are the most popular choice for good reason. In your diagram, you’ll notice a two-pipe configuration: one pipe draws fresh air from outside for combustion, while the other exhausts gases outward. These typically run horizontally through an exterior wall or vertically through the roof. The diagram will show specific clearances from windows, doors, and other openings—usually at least 12 inches—to prevent exhaust gases from re-entering your home. This sealed system makes direct vent fireplaces remarkably efficient and eco-friendly, as they don’t pull heated air from your living space.
B-vent systems appear simpler in diagrams, showing a single pipe that must terminate vertically through the roof. These units draw combustion air from inside your home and require adequate room ventilation. You’ll see termination points positioned well above the roofline with specific height requirements to ensure proper draft.
Vent-free systems are the simplest visually, showing no external venting at all. However, diagrams will emphasize room size requirements and may include oxygen depletion sensors. While they offer maximum efficiency by releasing all heat into your space, they’re not permitted everywhere due to indoor air quality concerns.
Each venting type affects where your fireplace can live in your home, so understanding these diagram elements helps you make informed decisions that balance aesthetics, efficiency, and environmental responsibility.
Gas Line Connections and Shut-Off Valves
Understanding the gas supply elements in your installation diagram is crucial for both safety and peace of mind. These symbols and lines tell an important story about how fuel reaches your fireplace and, more importantly, how to quickly shut it off if needed.
In most diagrams, you’ll spot the gas supply line represented as a solid or dashed line leading to your fireplace unit. This line typically originates from your home’s main gas supply and connects to the fireplace through a series of fittings. Look for connection points marked with small circles or T-junctions, which indicate where pipes join together.
The shut-off valve is your safety hero in this setup. Diagrams usually show it as a rectangular box or a small perpendicular line crossing the gas supply line, positioned within six feet of the fireplace for easy access. Building codes require this proximity so you can quickly cut the gas supply during emergencies or maintenance. Some installations feature two shut-off valves: one near the fireplace and another at the main supply line for added security.
Your diagram may also indicate the gas pressure regulator, often shown as a diamond or special symbol, which ensures consistent fuel delivery to create that perfect, cozy flame. Understanding these connection points helps you communicate effectively with your installer and ensures your new fireplace operates safely and efficiently.
Decoding Those Mysterious Measurements and Clearances
Combustible vs. Non-Combustible Material Clearances
Understanding the difference between combustible and non-combustible materials is essential for safe gas fireplace installation and creating the warm, inviting space you envision. Combustible materials include wood framing, drywall, furniture, mantels, and decorative elements that can catch fire when exposed to heat. Non-combustible materials, like metal, brick, stone, and cement board, can withstand high temperatures without igniting.
Your installation diagram specifies minimum clearances to combustibles for a critical reason: even if surfaces don’t touch flames directly, radiant heat can cause materials to reach ignition temperature over time. This process, called pyrolysis, can turn even treated wood dangerous when repeatedly exposed to heat. That’s why manufacturers require specific distances between your fireplace and any combustible materials.
These clearances vary significantly based on your fireplace model. Some zero clearance fireplaces use advanced insulation allowing closer proximity to combustibles, while traditional models need more space. Your diagram will show exact measurements for sides, top, bottom, and front clearances. Never reduce these distances, even if it seems like minor adjustments wouldn’t matter. These specifications aren’t suggestions; they’re engineered safety requirements that protect your home and family while you enjoy your fireplace’s cozy ambiance.
Framing and Rough Opening Requirements
When you look at your gas fireplace installation diagram, those precise measurements translate directly into real construction work in your home. The rough opening dimensions shown in the diagram aren’t suggestions—they’re essential specifications that ensure your fireplace operates safely and efficiently.
Most gas fireplaces require a rough opening that’s slightly larger than the unit itself, typically adding 1-2 inches on each side for proper clearance. Your diagram will specify exact height, width, and depth measurements that your contractor will need to create. These measurements account for ventilation needs, heat dissipation, and manufacturer specifications that keep your warranty intact.
Understanding framing requirements helps you grasp what your contractor is doing behind the scenes. The framing must support significant weight while maintaining those critical clearances from combustible materials. Many diagrams indicate where non-combustible materials are required, usually showing different line styles or shading to distinguish safe zones from restricted areas.
Your diagram may also show header requirements—the structural support beam above the opening—which varies based on your home’s construction and the fireplace’s weight. Some models require reinforced flooring underneath, particularly heavier units or those with substantial stone surrounds.
By understanding these specifications before installation begins, you can have informed conversations with your contractor and ensure your cozy new gathering space is built correctly from the foundation up.
Common Installation Diagram Symbols and What They Actually Mean
When you first glance at a gas fireplace installation diagram, it might look like a foreign language filled with mysterious symbols and lines. But here’s the good news: once you understand what these common symbols represent, the entire diagram becomes much more approachable. Think of it as learning a simple visual vocabulary that helps you communicate effectively with your installer and ensures your new fireplace becomes a safe, beautiful addition to your home.
Let’s start with the basics. Those solid black lines you see typically represent walls and structural elements, while dashed lines often indicate hidden components like gas lines running behind walls or under floors. A circle with an X through it usually marks the center point of your fireplace unit, helping installers position everything precisely.
Electrical symbols are pretty straightforward once you know them. A circle with two lines extending from it represents an electrical outlet, while a symbol that looks like a small light bulb indicates where switches or junction boxes are located. These matter because modern gas fireplaces often need electricity for fans, ignition systems, and those convenient remote controls that make adjusting your ambiance effortless.
You’ll also encounter arrows showing airflow direction, which is crucial for both venting combustion gases safely outside and bringing fresh air into your living space. Wavy lines typically indicate insulation barriers, those important protective layers that keep heat where it belongs and maintain your home’s energy efficiency. This aligns perfectly with eco-friendly heating practices that make your fireplace both comfortable and responsible.
Small rectangles or squares often represent venting components like termination caps or elbows in the venting system. Meanwhile, a symbol resembling a zigzag or spring indicates flexible gas connectors, which allow for safe connection between your gas supply and the fireplace unit.
Understanding these symbols empowers you to have informed conversations with professionals, spot potential issues before they become problems, and appreciate the thoughtful engineering that makes your gas fireplace both a practical heating solution and a lifestyle element that transforms your home’s atmosphere.
Reading Your Specific Fireplace Model’s Diagram
Think of your fireplace’s installation diagram as a personalized roadmap created specifically for your model. While general diagrams provide helpful overviews, your manufacturer’s documentation contains the precise specifications that ensure your fireplace operates safely and efficiently in your home.
Start by locating your model number, typically found on a metal plate inside the firebox or on the original packaging. With this information in hand, visit the manufacturer’s website and navigate to their support or downloads section. Most reputable manufacturers maintain comprehensive libraries of installation manuals, diagrams, and specification sheets available as free PDF downloads. If you’re having trouble finding your specific documentation, don’t hesitate to contact customer service directly—they’re accustomed to helping homeowners locate the right materials.
When you open your model-specific diagram, you’ll notice it includes measurements, clearances, and venting requirements tailored to your exact unit. Pay special attention to the clearance specifications, which indicate how far your fireplace must be from combustible materials like walls, ceilings, and flooring. These aren’t suggestions—they’re safety requirements that protect your home and family.
Your diagram will also detail the approved venting configurations for your model. Some fireplaces offer flexibility in venting options, while others require specific setups. Understanding these variations helps you communicate effectively with your installation professional and ensures you’re purchasing the correct components.
Keep both digital and printed copies of your documentation readily accessible. You’ll reference these throughout the installation process and in future years for maintenance and troubleshooting. This personalized information transforms you from a passive observer into an informed participant who can make educated decisions about creating a warm, eco-friendly heating solution that perfectly suits your home’s unique layout and your lifestyle needs.
Red Flags to Watch For (That Could Save You Thousands)
Your installation diagram is more than just a blueprint—it’s your first line of defense against costly mistakes and potential safety hazards. By familiarizing yourself with what proper installation looks like on paper, you’ll be better equipped to spot issues before they become expensive problems.
One of the most critical red flags involves venting paths. If your diagram shows vent pipes running through areas they shouldn’t—like enclosed soffits without proper termination, or making too many turns that restrict airflow—speak up. Improper venting can lead to dangerous carbon monoxide buildup and void your warranty. Your diagram should clearly show a direct, unobstructed path to the exterior with proper termination caps.
Clearance violations are another warning sign that deserves immediate attention. Every gas fireplace has specific clearance requirements from combustible materials like wood framing, drywall, and cabinetry. If your diagram shows measurements that seem tight or don’t match the manufacturer’s specifications, question it. These safety considerations aren’t suggestions—they’re requirements that protect your home and family.
Watch for missing or inadequate components too. Your diagram should include proper gas line sizing, shut-off valves in accessible locations, and correct electrical connections if your unit requires them. If something seems absent or unclear, don’t assume the installer will figure it out—ask for clarification.
Here’s the balance: trust your instincts when something looks wrong, but also trust qualified professionals to interpret complex technical requirements. You don’t need to become a gas fitting expert, but you should feel empowered to ask questions like “Why is the vent routed this way?” or “Does this clearance meet code?” A reputable installer will welcome your engagement and explain their choices.
Remember, catching issues at the diagram stage costs nothing but a conversation. Fixing them after installation can cost thousands. Your informed participation creates a partnership that results in a safer, more efficient fireplace that warms your home for years to come.
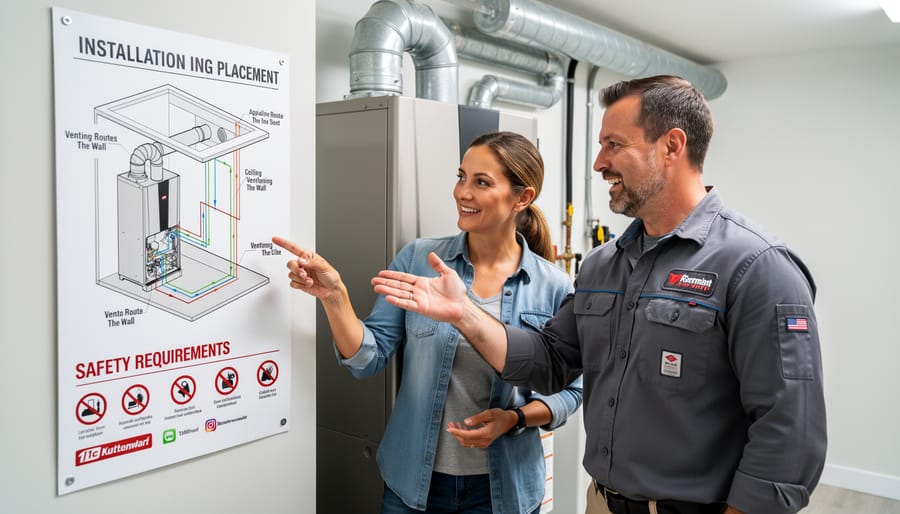
Working With Your Installer: Questions Your Diagram Will Help You Ask
Now that you’ve familiarized yourself with the basic components of a gas fireplace installation diagram, you’re ready to have meaningful conversations with your installer. Understanding these diagrams transforms you from a passive observer into an informed collaborator, helping ensure your new fireplace becomes the warm, inviting centerpiece you’ve been dreaming of.
Start by asking your installer to walk through the diagram with you, pointing out specific elements in your home. Questions like “Where exactly will the venting terminate on our exterior wall?” or “How will the gas line route from our meter to the fireplace location?” show you’re engaged and help you visualize the final installation. Don’t hesitate to ask about clearance requirements: “Can you show me on the diagram why we need this much space from the mantel?” Understanding these specifics protects your investment and your family’s safety.
If you’re considering eco-friendly heating solutions, ask how the installation diagram accounts for maximum efficiency. Questions about sealed combustion systems or direct venting options demonstrate your commitment to both comfort and environmental responsibility. You might ask, “Does this venting configuration help minimize heat loss?” or “What makes this design more efficient than other options?”
Finally, request clarification on anything that seems unclear. A quality installer welcomes questions and appreciates working with informed homeowners. Ask about the timeline: “Which parts of this diagram get completed first?” This collaborative approach ensures everyone’s on the same page, creating the warm, safe hearth your home deserves.
Understanding your gas fireplace installation diagram has given you more than just technical knowledge—it’s empowered you to be an informed participant in creating the cozy, welcoming home you’ve always envisioned. While the diagrams may have seemed intimidating at first, you now recognize them as your roadmap to safe, efficient heating that enhances both your daily comfort and your home’s long-term value.
Remember, safety isn’t just a checkbox—it’s the foundation of everything we’ve discussed. Whether you’re working with a professional installer or simply wanting to understand what’s happening in your home, this knowledge helps you ask the right questions and ensure everything is done correctly.
Your gas fireplace represents more than warmth on a cold evening. It’s an investment in sustainable, eco-friendly heating that brings your family together and transforms your living space into a haven of comfort. As you move forward with your installation, embrace the confidence you’ve gained while respecting the expertise of qualified professionals. Here’s to many cozy evenings ahead, knowing your fireplace was installed with care, precision, and an eye toward creating a truly sustainable living space for years to come.

")