

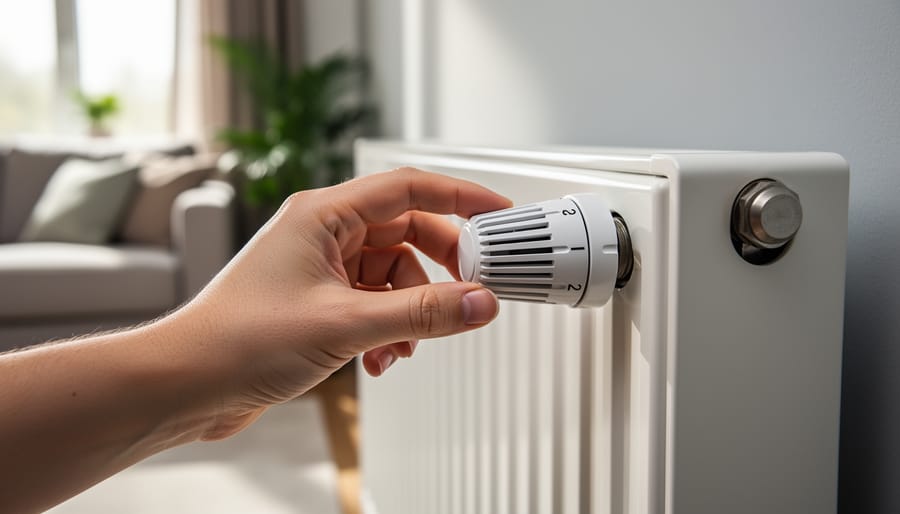

Turn your radiator’s thermostatic valve clockwise to reduce heat output or counterclockwise to increase it, testing the response over 30-60 minutes since these systems adjust gradually. Check if your knob displays numbers (typically 1-5) or symbols—each number represents roughly 4°F increments, with 3 usually maintaining around 68°F in most rooms.
Balance multiple radiators by starting with those farthest from your boiler, opening their valves fully while partially closing valves on radiators closest to the heat source. This simple adjustment ensures even heat distribution throughout your home, addressing common uneven heating issues that leave some rooms frigid while others become uncomfortably warm.
Bleed trapped air from your radiators if they feel cold at the top but warm at the bottom—this single maintenance step often restores proper function better than any valve adjustment. Use a radiator key to open the bleed valve slightly until water flows consistently, improving your system’s efficiency and reducing energy waste.
Modern thermostatic radiator valves offer room-by-room temperature control that can lower heating bills by 10-20 percent compared to running all radiators at maximum capacity. Understanding these controls transforms your hydronic heating from a frustrating guessing game into a customizable comfort system that adapts to how you actually live in your space, creating warm zones where you need them most while conserving energy elsewhere.
What Your Radiator Heat Knob Actually Does
The Numbers on Your Knob Decoded
Those mysterious numbers on your radiator knob aren’t random – they’re your guide to comfortable, personalized heating throughout your home. Let’s decode what they actually mean for your living space.
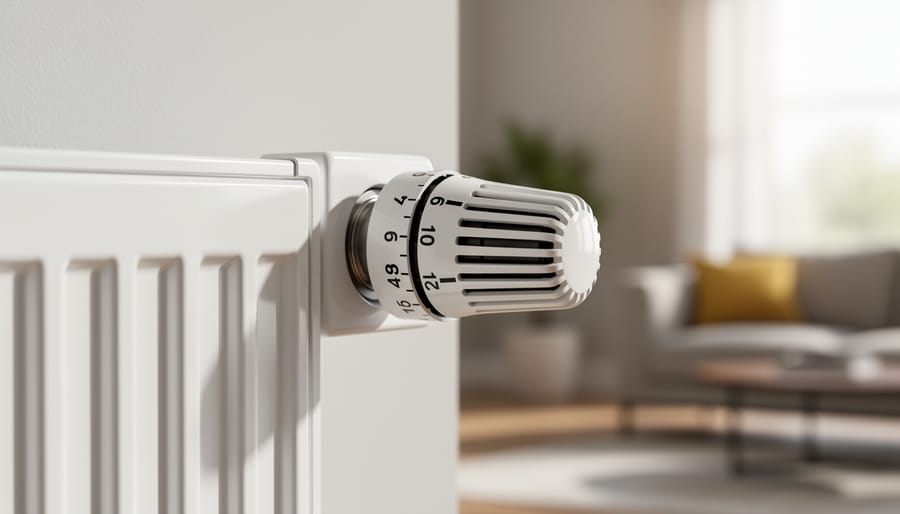
Most thermostatic radiator valves use a 1-5 scale, where each number represents a specific temperature range rather than intensity. Setting 1 typically maintains around 54-59°F, perfect for hallways or spaces you want frost-free but not toasty. Number 3, the middle ground, aims for a comfortable 68-72°F – ideal for living rooms where you spend quality time. Setting 5 pushes temperatures to 75-79°F, best for bathrooms or when you need extra warmth.
That snowflake symbol you’ve noticed? It’s your frost protection mode, keeping the room around 41-46°F to prevent pipe freezing without wasting energy heating unused spaces. Some modern valves include a sun symbol for maximum heat or a moon for nighttime energy-saving modes.
Understanding these settings helps you balance comfort with eco-friendly heating practices. Rather than cranking every radiator to 5, you’re creating customized zones that heat efficiently while reducing your energy footprint. Each room becomes part of a thoughtfully managed system that keeps your entire home comfortable without overworking your boiler.
How the Valve Responds to Room Temperature
The magic behind your radiator heat knob lies in a surprisingly elegant component called a thermostatic element, typically filled with wax, liquid, or gas. Think of it as a tiny thermostat that lives right inside the valve head, constantly monitoring the air temperature around your radiator.
Here’s how this clever mechanism works in practice: when your room temperature rises, the substance inside the thermostatic element expands. This expansion pushes a pin downward, which gradually closes the valve and reduces hot water flow to your radiator. Conversely, when the room cools down, the material contracts, pulling the pin back up and allowing more hot water to flow through.
This process happens continuously and automatically, creating a self-regulating cycle that maintains your desired comfort level without any input from you. It’s an eco-friendly solution that prevents energy waste by ensuring your radiator only produces heat when your room actually needs it. The beauty of this system is its simplicity – no electricity, no complex programming, just basic physics working quietly in the background to keep your home comfortable while reducing your heating bills and environmental impact.
Why Some Rooms Stay Cold While Others Overheat
The Pressure Problem Nobody Talks About
Here’s something most homeowners discover the hard way: cranking up every radiator knob in your home won’t magically solve cold spots. In fact, it often makes things worse. Why? It all comes down to water pressure and how your heating system distributes flow.
Think of your home’s heating system like a network of connected streams. When you open all the valves wide, water naturally takes the path of least resistance, flooding the radiators closest to your boiler while barely trickling to those farther away. This is why your bathroom radiator might be blazing hot while the bedroom at the end of the hall stays chilly, even when both knobs are turned to maximum.
The real solution lies in understanding balance rather than simply seeking more heat. Your system has a finite amount of hot water circulating at any given time, and proper radiator control means thoughtfully directing that flow where it’s needed most. By slightly restricting flow to radiators that heat up quickly, you actually improve circulation to those struggling units. It’s a bit like adjusting individual instruments in an orchestra to create harmony rather than having everyone play at full volume and creating chaos.
Balancing Your Radiators: The Step-by-Step Method
What You’ll Need Before You Start
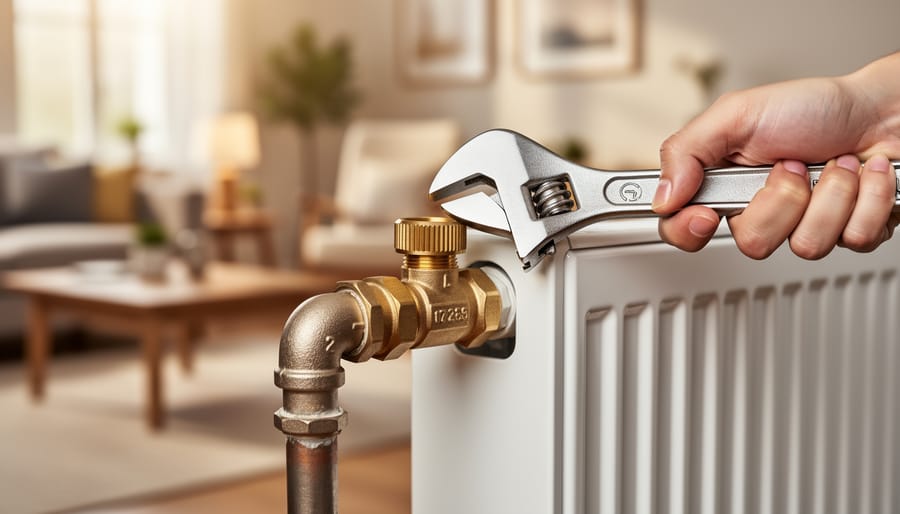
Before you start adjusting your radiator heat knobs and balancing your heating system, you’ll want to gather a few simple tools that will make the process much easier. First, grab a basic room thermometer to measure temperature differences between rooms—this helps you identify which spaces need more or less heat. You’ll also need a radiator key, that small square-shaped tool designed specifically to open radiator bleed valves and release trapped air. Most hardware stores carry these inexpensive keys, and they’re essential for proper radiator maintenance. Finally, keep an adjustable wrench handy for tightening or loosening any lockshield valves you’ll encounter during the balancing process. These valves control water flow and are crucial for achieving even heat distribution throughout your home. With these three straightforward tools at your side, you’ll be well-equipped to optimize your radiator system for comfortable, efficient heating.
The Balancing Process That Actually Works
Getting your radiator system properly balanced might sound intimidating, but it’s actually a straightforward process that can transform your home’s heating comfort. Think of it as tuning an instrument – each radiator needs its own adjustment to create harmony throughout your space.
Start by turning all your radiator heat knobs to their maximum setting. Yes, all of them. This creates a baseline and helps you understand how heat naturally flows through your system. Next, locate the lockshield valve on each radiator. This is typically on the opposite end from your regular heat knob and is usually covered by a plastic cap. You’ll need an adjustable wrench or special lockshield key to adjust it.
Now comes the systematic approach. Begin by closing all lockshield valves completely – turn them clockwise until they stop. Then, working from the radiator closest to your boiler, open that lockshield valve fully by turning it counterclockwise. For the next radiator in line, open it three-quarters of the way. Continue this pattern, opening each subsequent radiator slightly less than the previous one based on its distance from the boiler.
The radiators farthest from your heat source should have their lockshield valves opened almost fully, while those nearest might only need a quarter turn. This approach ensures that water doesn’t just rush to the closest radiators, leaving distant rooms cold.
Give your system about an hour to stabilize, then check each room’s temperature. Fine-tune by making small quarter-turn adjustments to the lockshield valves. Remember, this eco-friendly optimization not only improves comfort but also reduces energy waste, helping your heating system work smarter rather than harder. Patience during this process pays dividends in consistent warmth throughout your home.
How to Test If Your Balancing Worked
Once you’ve adjusted your radiator heat knobs, give your system about 24 to 48 hours to stabilize. Start by checking the rooms furthest from your boiler first—these should now heat up more quickly than before. Use a simple thermometer to track temperature changes in each room, aiming for consistent warmth throughout your home within 30 to 45 minutes of your system starting up.
Walk through your living spaces and pay attention to how each radiator feels. They should all reach similar temperatures, though radiators with lower settings will naturally feel cooler. If you notice one room still heating faster than others, slightly close the balancing valve in that radiator and open it a touch more in the slower-heating spaces.
Listen to your system too. Properly balanced radiators operate quietly without gurgling or banging sounds. If you hear these noises, you might need minor adjustments or have trapped air that needs bleeding. The goal is creating a comfortable, energy-efficient heating system that distributes warmth evenly—making your whole home the cozy sanctuary you deserve while reducing unnecessary energy consumption.
Fine-Tuning Your Thermostatic Valves for Maximum Comfort
Room-by-Room Settings That Make Sense
Different rooms in your home have different comfort needs, and your radiator knobs give you the power to customize heating throughout your space. Understanding these room-by-room preferences helps you create a comfortable, energy-efficient home.
Bedrooms benefit from cooler temperatures, typically around 65-68°F. Set your radiator knobs to lower settings here, as most people sleep better in cooler environments. This also reduces energy waste in spaces you’re not actively using during the day.
Living areas and family rooms should stay warmer, around 68-72°F, since you spend more active time there. These spaces become the heart of your home, much like a cozy fireplace creates natural gathering spots. You can also improve air circulation to distribute warmth more evenly throughout these larger spaces.
Bathrooms need flexible settings. Keep them at moderate temperatures normally, but turn them up before morning routines or evening showers for added comfort. The beauty of thermostatic radiator valves is this easy adjustability.
Kitchens typically need less heat since cooking appliances generate warmth naturally. Start with lower settings and adjust based on how the room feels during daily use.
This room-by-room approach creates comfort where you need it while reducing energy consumption in less-used spaces, making your heating system work smarter for your lifestyle.
When to Adjust Throughout the Year
Your radiator heat knobs aren’t a set-it-and-forget-it solution. As seasons shift, so should your settings. When fall arrives and temperatures begin dropping, start by setting your radiators to medium levels rather than cranking them to maximum right away. This gradual approach helps you find the sweet spot without wasting energy.
Mid-winter typically demands your highest settings, especially in rooms you use most frequently. However, as spring approaches and outdoor temperatures warm, begin dialing back your knobs to lower numbers. You’ll notice you need less heat to maintain comfort when it’s 50 degrees outside versus 20 degrees.
Pay attention to sudden weather changes too. An unexpected warm spell means temporarily lowering your settings, while a cold snap might require a quick adjustment upward. This mindful approach to seasonal tweaking keeps your home comfortable while supporting eco-friendly heating practices. Your wallet and the environment will thank you for not overheating spaces when outdoor conditions naturally provide some warmth.
Common Radiator Heat Knob Problems and Quick Fixes
The Stuck Valve That Won’t Budge
Sometimes your thermostatic valve pin gets stuck in one position, preventing you from adjusting your radiator’s heat output. This happens when the pin inside the valve body seizes up from mineral deposits or simply from sitting in one position too long. The good news? You can often fix this yourself without calling in a professional.
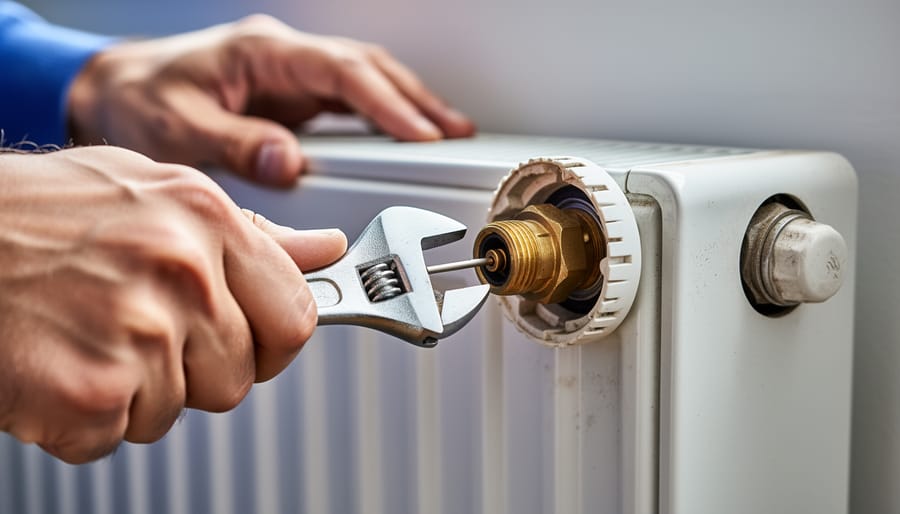
First, remove the temperature control knob by turning it counterclockwise or releasing any set screws. You’ll see a small metal pin protruding from the valve body. If your radiator isn’t heating properly, this pin might be stuck in the closed position.
Try the gentle tapping method: Using a pair of pliers with a cloth wrapped around them to protect the pin, gently tap it with a small hammer or the handle of a screwdriver. Tap lightly and rhythmically, never forcing it. The pin should move freely in and out when working correctly. You can also try applying a bit of penetrating oil around the pin’s base, letting it sit for a few minutes before attempting movement again.
Once freed, work the pin back and forth several times to ensure smooth operation. This simple maintenance task can restore comfort to your home while avoiding wasteful energy use from an inefficient heating system.
When Your Knob Turns But Nothing Happens
There’s nothing more frustrating than turning your radiator knob only to discover it’s spinning freely without actually doing anything. This usually means the valve pin inside has broken off or become disconnected from the knob mechanism itself. Think of it like a car’s steering wheel disconnecting from the steering column—you’re going through the motions, but there’s no connection to what you’re trying to control.
Before calling a professional, try removing the knob (usually just a gentle pull or a small screw) and taking a peek inside. You should see a small metal pin sticking up from the valve body. If the pin moves when you gently press it with pliers, the valve itself is fine—you just need a new knob. This is absolutely a DIY-friendly fix that costs under twenty dollars at most hardware stores.
However, if the pin is broken flush with the valve or won’t move at all, you’re looking at a valve replacement. While handy homeowners can tackle this, it requires draining that section of your heating system and working with pipe fittings. If you’re not confident with plumbing tasks, this is where calling a heating professional makes sense. They’ll have the job done in about an hour, ensuring your home’s warmth and comfort are quickly restored.
Saving Money While Staying Warm
The Real Cost of Unbalanced Radiators
Improperly balanced radiators aren’t just an inconvenience—they’re quietly draining your wallet. When some radiators run too hot while others barely warm up, your boiler works overtime trying to compensate, potentially wasting 15-30% of your heating energy. That translates to hundreds of dollars annually for the average home. You’re essentially heating your home inefficiently, pumping excess heat into already-warm rooms while cold spaces stay uncomfortable. Beyond the financial hit, this imbalance forces your system to cycle more frequently, accelerating wear on your boiler and reducing its lifespan. Taking thirty minutes to properly adjust your radiator heat knobs can dramatically improve your home’s energy efficiency and comfort. Think of it as fine-tuning your heating system—a small investment of time that pays dividends every heating season while creating a more comfortable, evenly warmed home environment.
You now have everything you need to take control of your home’s heating comfort. Understanding your radiator heat knob and how thermostatic valves work transforms what once seemed like mysterious dials into powerful tools for creating the perfect temperature in every room. The beauty of hydronic heating lies in its flexibility, and you hold the key to unlocking that potential.
Don’t hesitate to experiment with your settings. Adjust those knobs, feel the difference, and fine-tune until each room feels just right. Remember that proper balancing serves as the foundation for everything else. When your system is balanced correctly, those individual radiator controls can work their magic, delivering efficient, comfortable warmth throughout your home.
These adjustments aren’t complicated plumbing projects requiring professional expertise. They’re accessible DIY tasks that put you in the driver’s seat of your home comfort. By taking a few minutes to understand and optimize your radiator settings, you’re not just improving comfort; you’re also embracing an eco-friendly approach to heating. You’re reducing energy waste, lowering utility bills, and making your hydronic system work smarter, not harder. Your home deserves balanced, efficient warmth, and now you have the knowledge to make it happen.


")