


Check your kerosene heater’s wick every 2-3 weeks during active use by examining it for black crusting, uneven burning, or a height reduction of more than half an inch from its original size. Replace the wick immediately if you notice decreased heat output, excessive smoke, or difficulty adjusting the flame, as these signs indicate your heater isn’t burning fuel efficiently and may pose risks to your indoor air quality and liquid fuel safety.
Match your replacement wick to your heater’s exact model number, found on the manufacturer’s label, since wicks vary significantly in diameter, height, and material composition. Cotton-fiberglass blends offer the best balance of heat output and longevity for most modern kerosene heaters, typically lasting one to two heating seasons with proper care.
Dry-burn your wick for 20 minutes every three to four weeks by running the heater outdoors without fuel until the remaining kerosene evaporates, which removes carbon deposits and extends wick life. This simple maintenance step restores your heater’s efficiency and prevents the acrid odors that develop when carbon buildup interferes with complete combustion, keeping your home’s warmth clean and comfortable throughout the heating season.
What Makes a Kerosene Heater Wick Work
Understanding how your kerosene heater wick works is like discovering the hidden magic behind a cozy evening at home. At its heart, a wick functions through a fascinating natural process called capillary action—the same principle that helps trees draw water from their roots to their leaves.
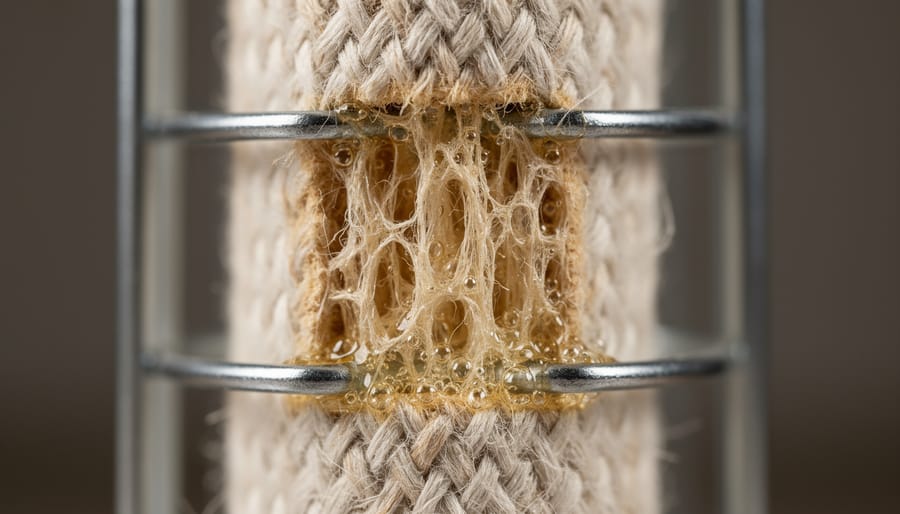
When your wick sits in the kerosene reservoir, tiny spaces between the woven fibers create narrow channels. These channels literally pull the fuel upward against gravity, similar to how a paper towel soaks up a spill. The tighter and more uniform these channels are, the more efficiently fuel travels to the flame. This is why high-quality wicks made from fiberglass or tightly woven cotton perform so much better than cheaper alternatives.
As the kerosene reaches the top of the wick, it encounters heat from your flame. Here’s where the wick material becomes crucial for clean, efficient heating. A proper wick holds just enough fuel to maintain consistent combustion without flooding the flame or creating smoke. Think of it as a delivery system that needs to be perfectly calibrated—too much fuel leads to sooty, incomplete burning, while too little starves the flame and reduces heat output.
The weave pattern and fiber composition also determine how evenly heat distributes across the wick surface. Quality materials withstand high temperatures without deteriorating quickly, maintaining their capillary structure season after season. This structural integrity directly impacts your indoor air quality and heating efficiency—a well-functioning wick produces a clean, blue flame that heats your space without unwanted odors or pollutants.
When your wick works properly, it creates an eco-friendly heating solution that maximizes every drop of fuel. The complete combustion means you’re converting more kerosene into useful heat rather than wasting energy through incomplete burning. This efficiency not only saves you money but also reduces environmental impact, making your kerosene heater a responsible choice for supplemental home warmth.
Finding the Right Wick for Your Heater
Identifying Your Heater Model and Wick Size
Finding the right wick for your kerosene heater starts with identifying your heater’s specific model. Begin by checking the front or back panel of your heater for a manufacturer’s label or metal plate. This typically displays the brand name, model number, and sometimes the wick size. You’ll often find this information near the fuel tank or on the heater’s base.
If the label has worn off over time, don’t worry. Check your owner’s manual, which usually lists the model number on the cover or first page. No manual? Many manufacturers now provide digital copies on their websites. Simply search for your heater’s brand name followed by “owner’s manual” to access these helpful resources.
For those with existing wicks, measuring is straightforward. Remove the old wick and measure its width and thickness with a ruler or tape measure. Most residential kerosene heaters use wicks ranging from 7 to 12 inches in width. Write down these measurements along with the material type, whether it’s fiberglass or cotton blend.
Discontinued models present unique challenges, but solutions exist. Online forums and kerosene heater communities often have members who’ve found compatible replacements for older units. Additionally, some specialty retailers maintain cross-reference charts matching discontinued models with current wick options. Consider taking photos of your heater and wick to share with suppliers, making identification easier.
Remember, using the correct wick size ensures efficient burning and maintains your heater’s eco-friendly performance. An ill-fitting wick can create unnecessary emissions and waste fuel, diminishing both your comfort and your heater’s environmental benefits.
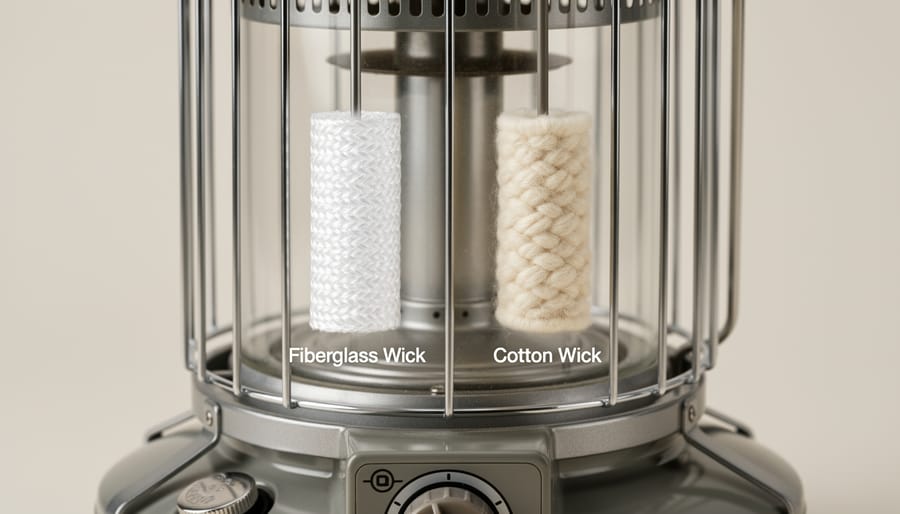
Fiberglass vs. Cotton Wicks: Which Should You Choose?
When shopping for a replacement wick, you’ll encounter two primary materials: fiberglass and cotton. Understanding the differences between them helps you choose the best option for your heating needs and lifestyle.
Cotton wicks are the traditional choice and remain popular for good reason. They deliver excellent heat output and create that warm, comforting glow that makes kerosene heaters such a cozy addition to your home. Cotton wicks typically cost less upfront and are widely available for most heater models. However, they do require more attention. You’ll need to replace cotton wicks every one to two heating seasons, depending on usage. They’re also more prone to carbon buildup, which means you’ll spend more time on regular maintenance and trimming to keep your heater performing efficiently.
Fiberglass wicks offer a modern alternative that appeals to those seeking lower-maintenance heating solutions. These wicks can last three to five seasons or even longer with proper care, making them a smart investment despite their higher initial price. They produce less odor during operation and resist carbon buildup better than cotton, which means less frequent trimming and cleaning. This makes fiberglass an excellent eco-friendly option since you’re replacing wicks less often and dealing with fewer byproducts. The downside? Some users report slightly lower heat output compared to cotton, though the difference is minimal in most quality heaters.
For occasional use or emergency backup heating, cotton wicks make economic sense. But if your kerosene heater serves as a primary heat source or lifestyle element in your home, fiberglass wicks offer better value over time. Consider your heating frequency, maintenance preferences, and budget when making your choice. Either option will serve you well when properly maintained and matched to your specific heater model.
Signs Your Wick Needs Attention (Or Replacement)
Your kerosene heater’s wick is like the heart of your heating system—when it’s not functioning properly, you’ll notice the difference quickly. Recognizing the warning signs early can save you money, improve your indoor air quality, and keep your home safely warm throughout the colder months.
One of the most obvious indicators that your wick needs attention is excessive smoke. While a small amount of smoke during startup is normal, billowing black smoke or continuous smoking during operation signals trouble. This typically means the wick is either too high, clogged with carbon deposits, or has deteriorated to the point where it’s not burning cleanly. A good cleaning might resolve the issue if caught early, but persistent smoking usually calls for replacement.
Unpleasant odors are another red flag that shouldn’t be ignored. If your heater produces a strong, acrid smell beyond the typical kerosene scent, your wick likely has carbon buildup or is burning unevenly. This affects both your comfort and indoor air quality—something every eco-conscious homeowner should prioritize. Try cleaning the wick first, but if the odor persists, it’s time for a new one.
Watch for uneven or irregular flames as well. A healthy wick produces a uniform, blue-tipped flame around its entire circumference. If you notice flames that dance wildly, burn only on one side, or appear yellow and weak, your wick may be worn, damaged, or improperly adjusted. Uneven burning not only reduces heating efficiency but can also create dangerous carbon monoxide levels.
Difficulty lighting your heater or flames that repeatedly go out indicate a wick that’s either saturated with deposits or has worn too thin to draw fuel properly. This frustrating symptom often appears gradually as the wick ages.
Finally, reduced heat output is perhaps the most practical concern. If your heater isn’t warming your space like it used to, despite proper fuel and ventilation, a compromised wick is likely the culprit. The wick’s ability to efficiently vaporize fuel diminishes over time, making replacement the most effective solution.
Generally, if cleaning doesn’t resolve these issues within one or two attempts, investing in a replacement wick will restore your heater’s performance and keep your home comfortably warm.
How to Maintain Your Kerosene Heater Wick for Maximum Life
The Weekly Wick Care Routine
Keeping your kerosene heater’s wick in top shape doesn’t require hours of work—just a few minutes each week can make all the difference in performance and longevity. Think of this weekly routine as a small investment that keeps your home cozy and your heater running efficiently throughout the heating season.
Start with a dry burn session once a week. This simple practice helps remove carbon deposits that naturally build up during operation. Turn off your heater and let it cool completely, then remove the fuel tank and run the heater until the wick burns dry. This process typically takes about ten minutes and burns away those crusty black deposits that can interfere with proper combustion. You’ll notice your flame burning cleaner and brighter afterward.
While you’re tending to your heater, check the wick height. The top edge should be level and positioned according to your manufacturer’s specifications—usually just below the wick adjuster’s top edge. An uneven wick height creates an irregular flame pattern and wastes fuel, so take a moment to adjust if needed.
Finally, give your wick a quick visual inspection. Look for fraying edges, significant black buildup that dry burning didn’t remove, or any signs of hardening. These are early warning signs that replacement might be on the horizon. Catching these issues early means you won’t be caught without heat on the coldest night of winter.
This weekly routine takes less time than brewing your morning coffee but delivers months of reliable, eco-friendly warmth for your home.
Deep Cleaning Your Wick (When and How)
Sometimes a dry burn and regular cleaning aren’t enough to restore your wick’s performance. When you notice persistent odors, uneven burning, or stubborn carbon buildup that won’t come off with gentle brushing, it’s time for a deeper clean. This typically becomes necessary once or twice per heating season, depending on how frequently you use your heater.
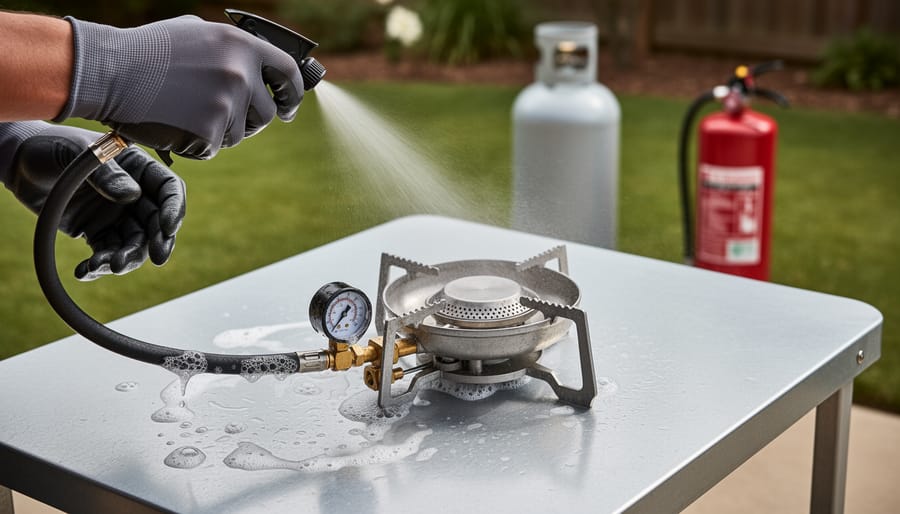
Before you begin, gather your supplies: a bucket of kerosene or mineral spirits, rubber gloves, safety goggles, and a well-ventilated workspace outdoors or in a garage. Safety first: never deep clean your wick indoors where fumes can accumulate, and keep away from any ignition sources.
Start by removing the wick completely from your heater following your manufacturer’s instructions. This process varies by model, but most wicks lift out once you’ve released the adjustment mechanism. Handle the wick carefully to avoid tearing the fibers.
Submerge the entire wick in your cleaning solution, allowing it to soak for 15-30 minutes. This dissolves accumulated tar and carbon deposits that dry burning can’t eliminate. Gently agitate the wick occasionally, but avoid harsh scrubbing that might damage the mesh or fibers. For particularly stubborn buildup, you can use a soft-bristle brush during the soak.
After soaking, lift the wick out and let the excess solvent drip back into the bucket. Here’s the crucial part: your wick must dry completely before reinstallation. Lay it flat in a well-ventilated area for at least 24 hours, turning it occasionally. Installing a damp wick creates dangerous fumes and poor combustion, compromising both your safety and your heater’s efficiency. This patience pays off with cleaner burning and extended wick life.
Fuel Quality and Your Wick’s Health
Here’s a connection many heater owners miss: the fuel you choose directly impacts how long your wick lasts. Think of your wick as a living part of your heating system that needs proper nourishment to thrive.
Using low-grade kerosene is like feeding your heater junk food. It contains more impurities that create carbon deposits, causing your wick to crust over and fail prematurely. Quality 1-K grade kerosene burns cleaner and keeps your wick healthier season after season.
Proper fuel storage matters tremendously. Keep your kerosene in approved containers, away from sunlight and moisture. Water is particularly problematic, creating sludge that clogs wick fibers and reduces efficiency.
Fuel contamination from dust, debris, or mixing old and new fuel accelerates wick deterioration. Always filter fuel when transferring it and avoid letting it sit for extended periods.
The few extra dollars spent on quality kerosene pays dividends in wick longevity and cleaner burning, making it both an economical and eco-friendly choice for your home heating needs.
Replacing Your Kerosene Heater Wick: A Step-by-Step Walkthrough
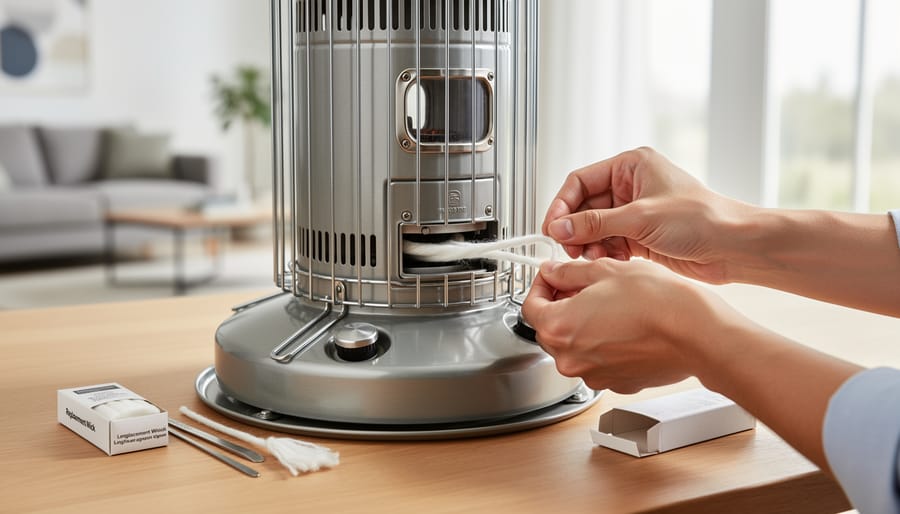
Replacing a kerosene heater wick might seem daunting at first, but with the right approach and attention to safety precautions, it’s a straightforward process that will have your heater running efficiently again. Think of it as giving your heating companion a fresh start for another season of warmth.
Before you begin, gather your tools and materials. You’ll need your new replacement wick, a screwdriver set, a flashlight, work gloves, and some old newspapers or a drop cloth to protect your workspace. Make sure your heater has been turned off for at least an hour and is completely cool to the touch. Drain any remaining kerosene from the tank into an approved container, and work in a well-ventilated area, preferably outdoors or in a garage with open doors.
Start by removing the heater’s outer cabinet or protective guards according to your manufacturer’s instructions. Most models have a few screws holding these components in place. Once you can access the burner assembly, locate the wick adjuster knob and remove it by loosening the set screw or pulling it straight off, depending on your model.
Next, remove the old wick by carefully lifting it out of the wick holder. Take note of how it’s positioned, as you’ll need to install the new one the same way. Look for any debris or carbon buildup in the wick holder and clean it thoroughly with a dry cloth. This is also an excellent time to inspect the wick holder for any signs of damage or wear.
Installing the new wick requires patience and precision. Gently insert it into the wick holder, ensuring it sits flat and even all around. The wick should move smoothly up and down when you adjust it. Reattach the wick adjuster knob and reassemble the heater components in reverse order.
Before your first use, the new wick needs proper saturation. Fill the tank with fresh kerosene and let the wick absorb fuel for at least an hour. Some eco-conscious users prefer overnight saturation for optimal performance. When you’re ready for the initial burn-in, light the wick and let it burn on a low setting for about 20 minutes outdoors to burn off manufacturing residues.
Common installation mistakes include forcing the wick into position, which can cause tearing, or adjusting it too high initially. If your heater produces excessive smoke after replacement, lower the wick slightly and ensure proper ventilation during operation.
Common Wick Mistakes That Cost You Money and Warmth
Even experienced homeowners fall into common traps that drain efficiency from their kerosene heaters. Let’s explore the mistakes that literally cost you warmth and money.
The most frequent error? Setting your wick height incorrectly. Many people crank it up high, thinking more flame means more heat. Actually, a wick adjusted too high produces incomplete combustion, creating soot, odors, and wasted fuel. You’re burning through kerosene without gaining proportional warmth. On the flip side, setting it too low starves the flame, reducing heat output and causing the heater to struggle. The sweet spot is following your manufacturer’s specifications, typically creating a blue-tipped yellow flame.
Another wallet-draining mistake involves fuel choices. Using contaminated or low-grade kerosene directly impacts wick lifespan. Poor kerosene fuel quality leaves deposits on wick fibers, reducing their ability to draw fuel efficiently. This forces you to replace wicks far more frequently than necessary. Always use clean, properly stored 1-K grade kerosene for optimal performance and longevity.
Neglecting regular maintenance ranks high among costly errors. When you ignore dry burning your wick every few weeks, carbon and tar buildup accumulates. This blockage reduces heating efficiency by up to 30 percent, meaning you’re running your heater longer to achieve the same warmth. That’s wasted fuel and unnecessary wear on your heater’s components.
Perhaps the most tempting mistake is buying bargain-basement replacement wicks. Those generic options might save you a few dollars upfront, but they rarely fit precisely or use quality materials. Poor-fitting wicks create gaps that cause uneven burning and potential safety issues. Inferior materials deteriorate faster, forcing you to replace them more often. You’ll actually spend more money over a heating season while dealing with reduced performance.
The eco-conscious approach means investing in quality components and proper maintenance. This not only maximizes your heater’s efficiency but reduces fuel consumption and replacement waste, benefiting both your budget and the environment.
Now that you understand how the right wick transforms your kerosene heater’s performance, it’s time to put this knowledge into action. A properly selected and maintained wick isn’t just about keeping your home warm—it’s about creating a reliable, efficient heating solution that saves you money on fuel costs and reduces unnecessary replacements. When your heater burns cleanly with minimal odor and maximum heat output, you’re not only enhancing your comfort but also making an eco-friendly choice that reduces waste and emissions.
Think of your kerosene heater as an investment in your home’s warmth and ambiance. Regular wick inspection, proper trimming, and timely replacement ensure you’ll enjoy consistent, dependable heat throughout the coldest months. Whether you’re warming a cozy living space or supplementing your primary heating system, a well-maintained heater becomes a trusted companion during winter’s chill.
Don’t wait until performance issues arise. Take a moment today to check your current wick’s condition and stock up on the right replacement for your model. Your future self—and your family—will thank you when reliable warmth fills your home at the touch of a match.
")